
How to Disable Windows Defender on Windows 11 Permanently
Are you looking to secure your applications and safeguard information exchange between systems on Windows Server 2019? OpenSSL is your go-to open-source solution, offering a suite of cryptographic protocols for robust security. This toolkit, maintained by a global network of dedicated volunteers, supports both Secure Sockets Layer (SSL versions 2 and 3) and Transport Layer Security (TLS version 1) protocols, ensuring top-tier encryption. Follow this straightforward guide to get OpenSSL up and running on your Windows Server 2019. After downloading, initiate the setup by either double-clicking the `.exe` file or launching it via PowerShell with the following command:
 Navigating through the installation of OpenSSL on your Windows Server 2019 is straightforward. Begin by selecting the destination folder for OpenSSL installation during the setup process.
Follow up by choosing a directory for the Application shortcut, ensuring easy access to OpenSSL from anywhere on your system.
Navigating through the installation of OpenSSL on your Windows Server 2019 is straightforward. Begin by selecting the destination folder for OpenSSL installation during the setup process.
Follow up by choosing a directory for the Application shortcut, ensuring easy access to OpenSSL from anywhere on your system. The setup wizard will then prompt you to select any additional tasks you wish to perform during the installation. This could include creating desktop shortcuts or registering OpenSSL as a system service.Proceed by clicking “Install” to initiate the OpenSSL installation on your Windows Server 2019. This process may take a few minutes, so a little patience is required.Once the installation wraps up, finalize it by clicking “Finish.” This step concludes the successful setup of OpenSSL on your server.
 To integrate OpenSSL seamlessly into your system’s operations, add C:\OpenSSL-Win64 to your Windows environment PATH using the following PowerShell commands:
 For those operating on a 32-bit system, simply substitute OpenSSL-Win64 with OpenSSL-Win32 in the path to match your system architecture.
What is OpenSSL?
OpenSSL is a powerful and widely used open-source software library that provides a robust set of cryptographic tools for securing communications over computer networks. Primarily, it implements the SSL (Secure Sockets Layer) and TLS (Transport Layer Security) protocols, offering encryption and security features to facilitate secure Internet communications and transactions. Besides its core functionalities of encrypting sessions and verifying the identity of servers and clients, OpenSSL also includes utilities for creating digital certificates, keys, and other cryptographic operations. It is maintained by a global community of volunteers, ensuring it remains up-to-date with the latest security standards and encryption techniques.Simple Steps to Install OpenSSL on Your Windows Server 2019
Dive into securing your server by downloading OpenSSL, a critical tool for cryptographic security on Windows Server 2019. Start by visiting the OpenSSL download page to find the version that aligns with your system’s architecture. I go for the 64-bit variant. You’ll see options for both a lightweight version and the full package.For those who prefer using the command line, the `curl.exe` command offers a straightforward way to download OpenSSL directly:curl.exe -L -o Win64OpenSSL.exe https://slproweb.com/download/Win64OpenSSL-3_0_0.exeBelow is an illustration of the process.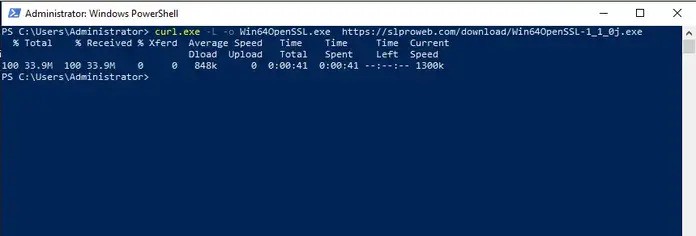 After downloading, initiate the setup by either double-clicking the `.exe` file or launching it via PowerShell with the following command:
.\Win64OpenSSL.exeProceed by agreeing to the Software License Agreement and clicking “Next” to continue with the installation.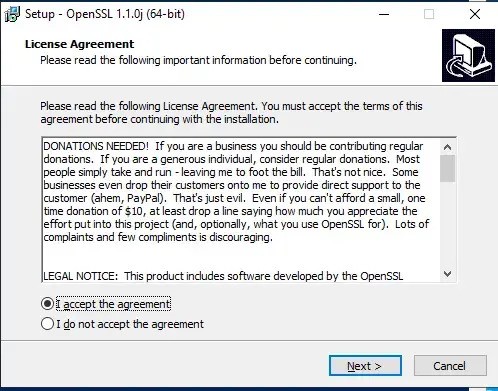 Navigating through the installation of OpenSSL on your Windows Server 2019 is straightforward. Begin by selecting the destination folder for OpenSSL installation during the setup process.
Follow up by choosing a directory for the Application shortcut, ensuring easy access to OpenSSL from anywhere on your system.
Navigating through the installation of OpenSSL on your Windows Server 2019 is straightforward. Begin by selecting the destination folder for OpenSSL installation during the setup process.
Follow up by choosing a directory for the Application shortcut, ensuring easy access to OpenSSL from anywhere on your system.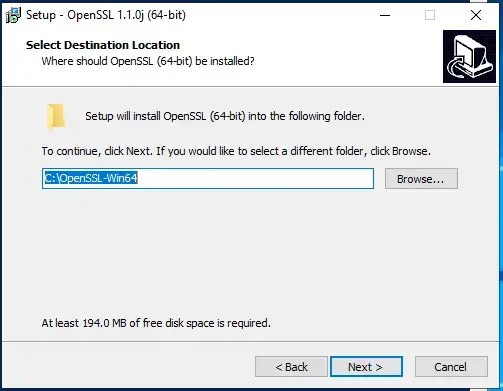 The setup wizard will then prompt you to select any additional tasks you wish to perform during the installation. This could include creating desktop shortcuts or registering OpenSSL as a system service.Proceed by clicking “Install” to initiate the OpenSSL installation on your Windows Server 2019. This process may take a few minutes, so a little patience is required.Once the installation wraps up, finalize it by clicking “Finish.” This step concludes the successful setup of OpenSSL on your server.
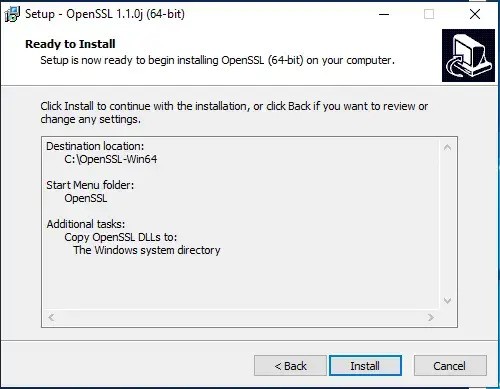 To integrate OpenSSL seamlessly into your system’s operations, add C:\OpenSSL-Win64 to your Windows environment PATH using the following PowerShell commands:
$userenv = [System.Environment]::GetEnvironmentVariable("Path", "User")[System.Environment]::SetEnvironmentVariable("PATH", $userenv + ";C:\OpenSSL-Win64\bin", "User")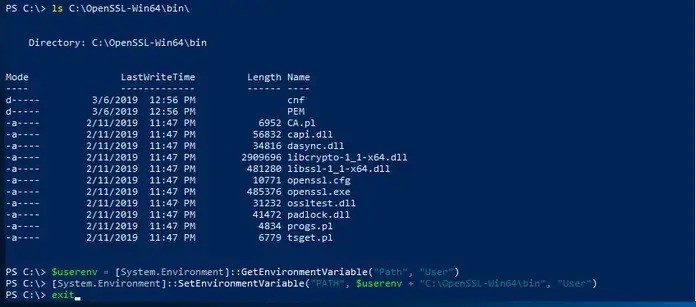 For those operating on a 32-bit system, simply substitute OpenSSL-Win64 with OpenSSL-Win32 in the path to match your system architecture.
Creating Certificates with OpenSSL on Windows Server 2019
Having successfully installed OpenSSL on Windows Server 2019, you’re now equipped to generate your own certificates. Begin this process by setting the OPENSSL_CONF environment variable:set OPENSSL_CONF=C:\OpenSSL-Win64\bin\openssl.cfgRemember, if you’re working on a 32-bit system, you should adjust the path to use OpenSSL-Win32 instead. Next, let’s proceed by generating a test SSL certificate to ensure everything is set up correctly:openssl.exe req -new -nodes -keyout server.key -out server.csr -newkey rsa:2048Feel free to explore more detailed guides and articles on our website for further reading and assistance.Conclusion
Securing your Windows Server 2019 with OpenSSL is made easy with this guide, designed to enhance application security and secure system communications. OpenSSL, a widely embraced open-source toolkit, offers a comprehensive set of cryptographic protocols, including SSL and TLS, for robust encryption and secure data exchange. This guide simplifies the installation process, from downloading the correct version of OpenSSL to configuring your system to integrate OpenSSL seamlessly. It also includes steps for generating your certificates and ensuring your server communications are encrypted and secure. Aimed at both beginners and experienced users, this tutorial provides all the necessary instructions to successfully implement OpenSSL, safeguarding your digital environment against vulnerabilities and threats.Turning Off Windows Defender for Good: A Simple Guide
Turning off Windows Defender for good on Windows can seem daunting due to the need to adjust core Windows settings. If not done correctly, these adjustments could lead to your computer not working properly. This tutorial will cover various strategies to permanently disable Windows Defender on your Windows 11 PC.How to Temporarily Turn Off Windows Defender on Windows 11?
For situations where you need to temporarily disable Windows Defender to perform certain tasks on your PC, here’s a straightforward process:Press the Windows + I keys together to launch the Settings app.Navigate to Privacy & Security and select Windows Security.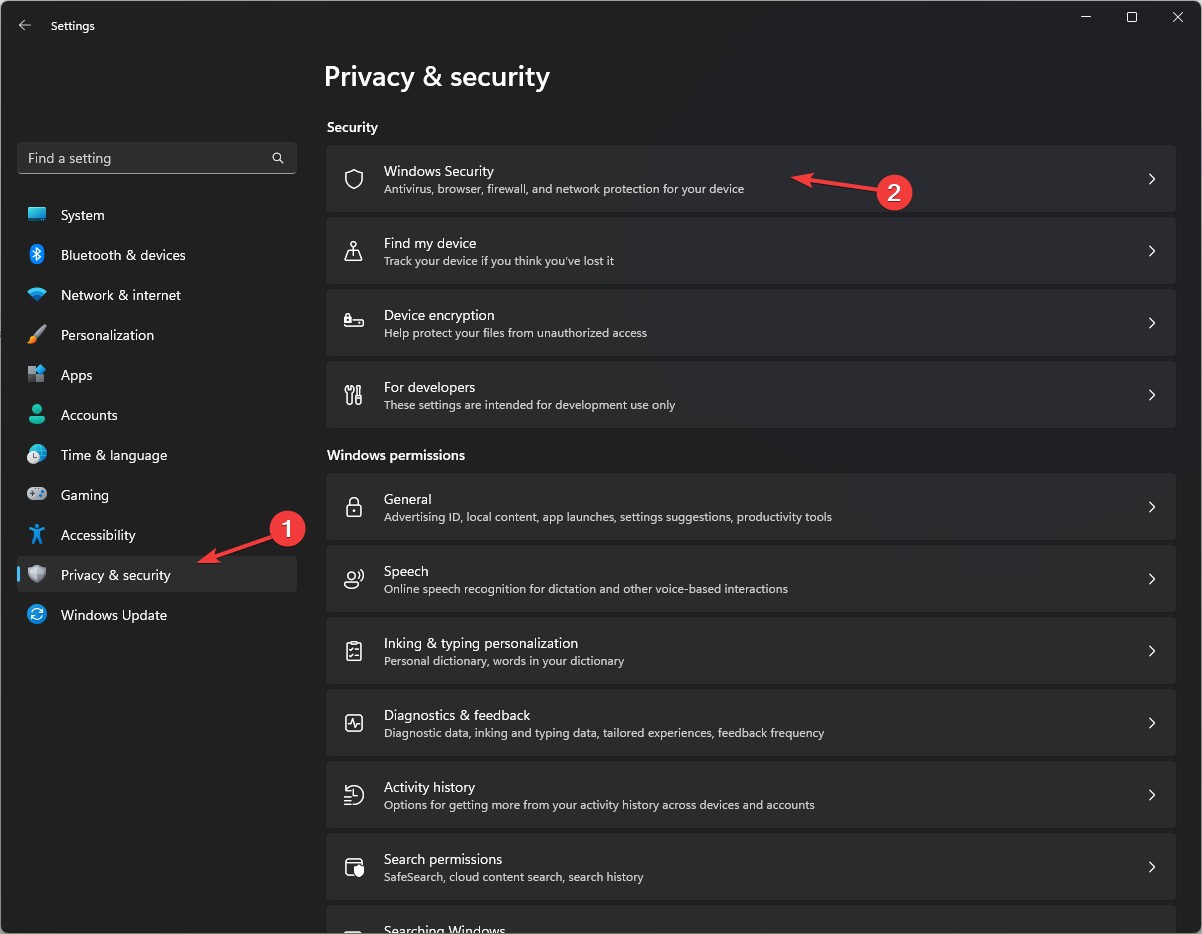 Then, head over to Virus & Threat Protection.
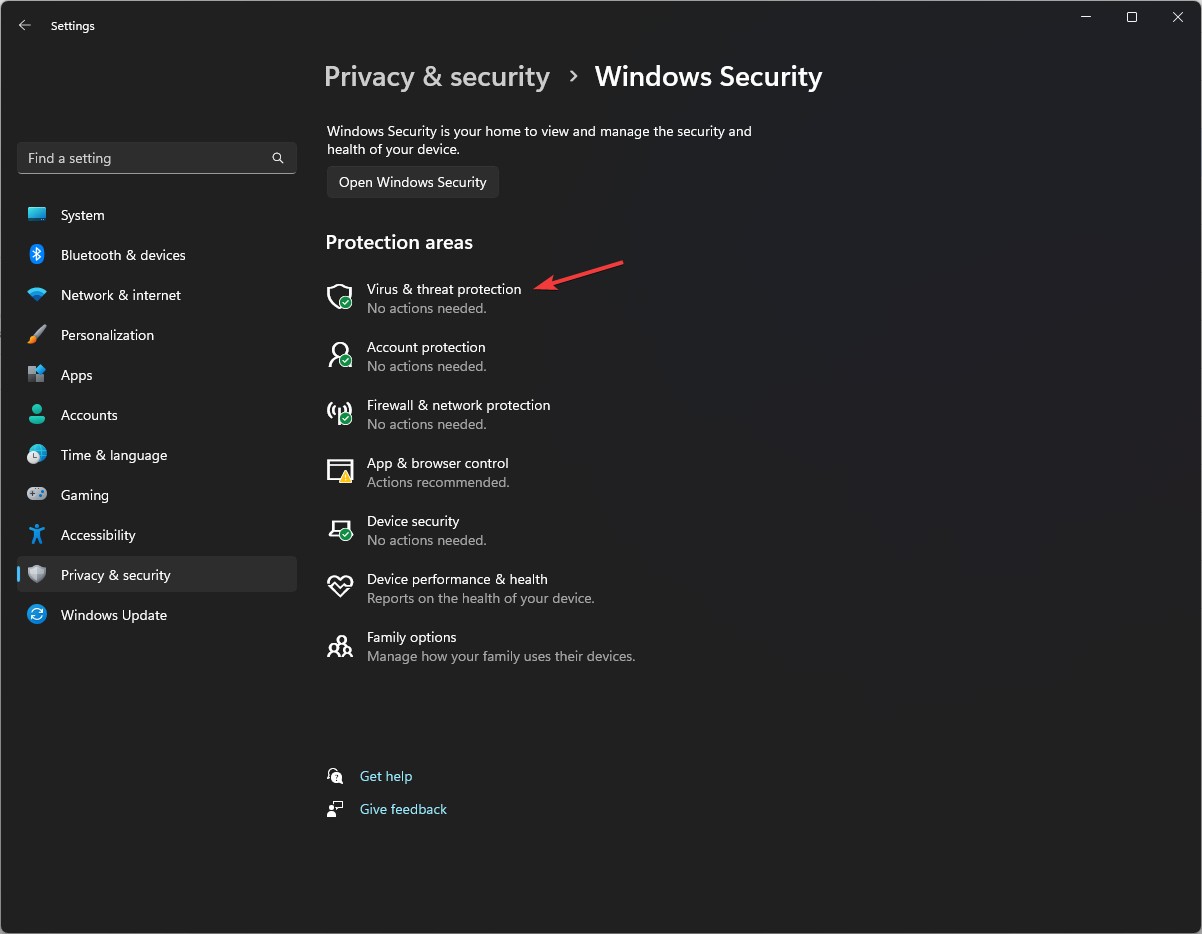 Select “Manage Settings”.
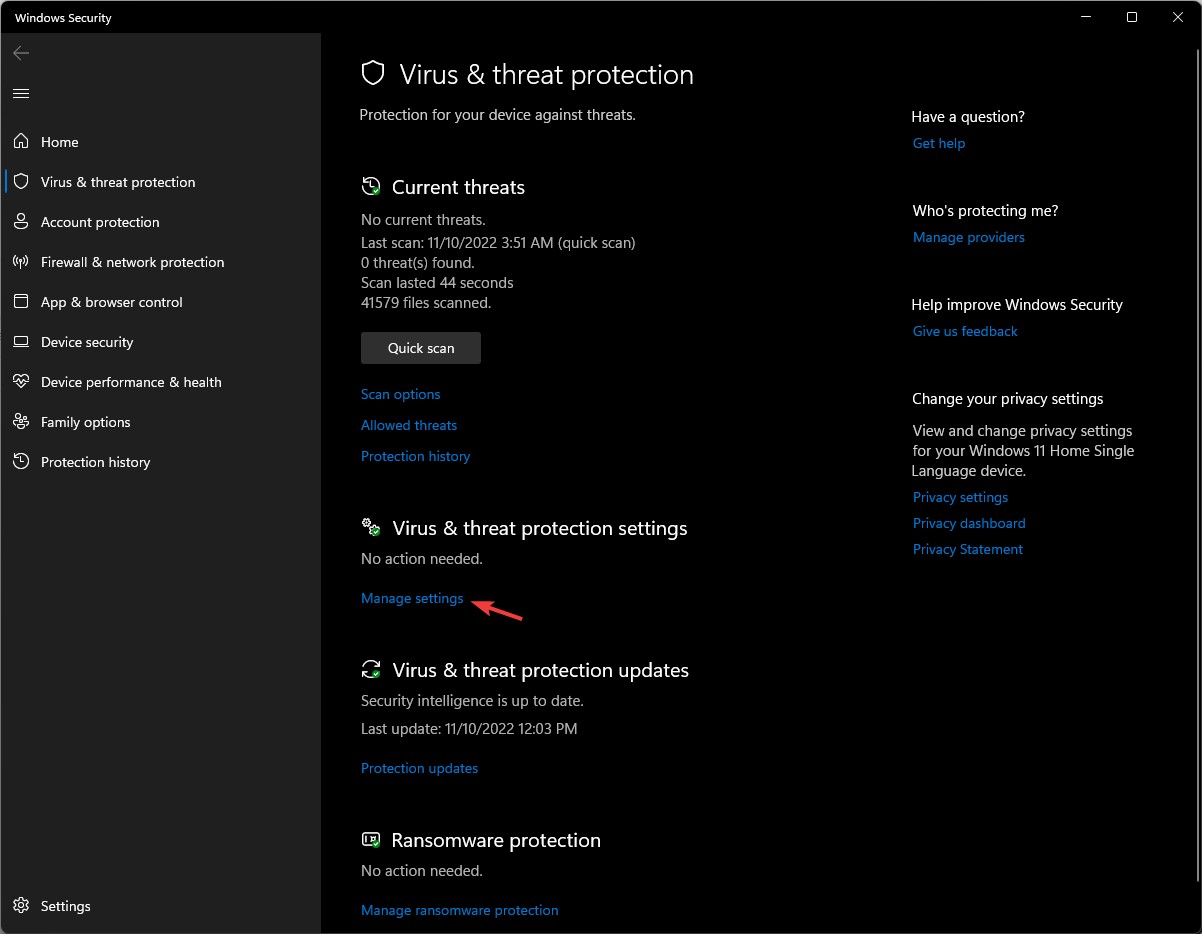 Then, flip the switch under “Real-time protection” to the off position.Real-time protection: OFF
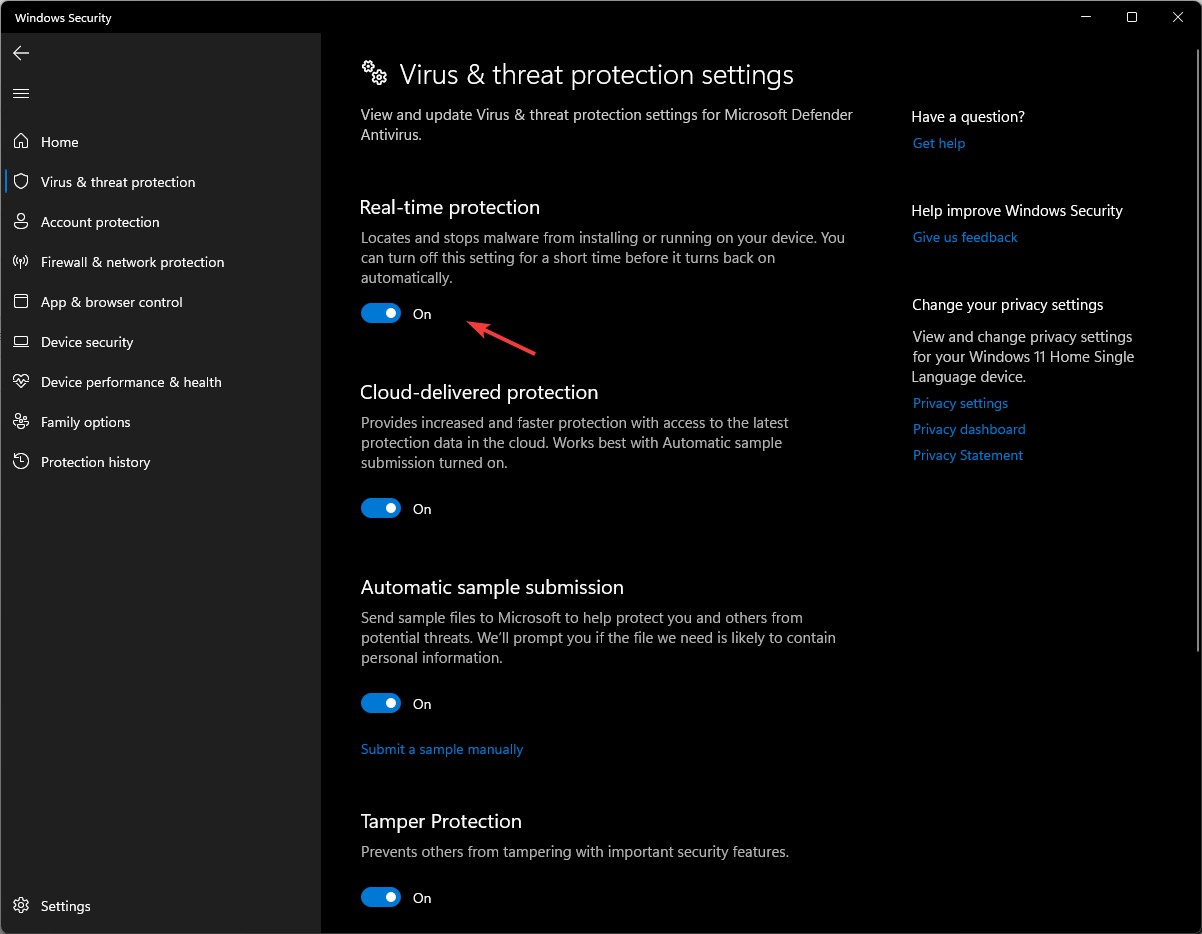 Remember: Real-time protection will turn back on when you reboot your PC.Having explored how to briefly deactivate the Windows Defender application on Windows 11, we’re now ready to examine the method for permanently disabling it.
Forever Turning Off Windows Defender on Windows 11: A Complete Guide
To permanently switch off Windows Defender on Windows 11, it’s essential to first deactivate Real-time protection to ensure it doesn’t interfere with the process.Start your PC in Safe ModeHit Windows + R to open the Run dialogEnter “msconfig” to access the System Configuration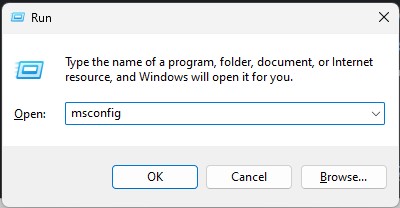 Navigate to the Boot tab. Within the Boot options, tick the box for Safe Boot with the Minimal option selected.– Safe boot
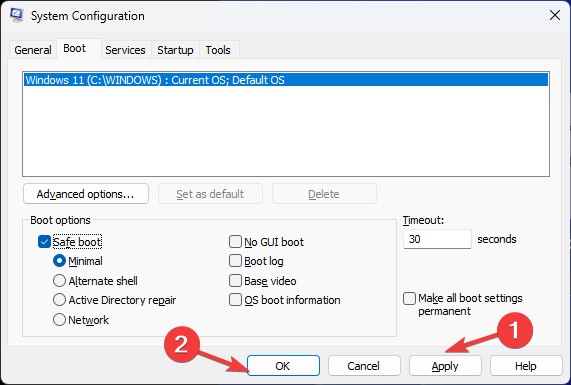 – Hit Apply followed by OK.
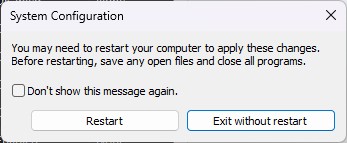 This action will prompt your computer to reboot in Safe Mode.
Adjusting Permissions for Permanent Disabling
Altering Access RightsUse Windows + E to launch File Explorer.Then, copy the following address into the address bar and press Enter:`C:\ProgramData\Microsoft\Windows Defender`Find the Platform folder, right-click on it, and choose Properties. – Open the Security tab and select Advanced.
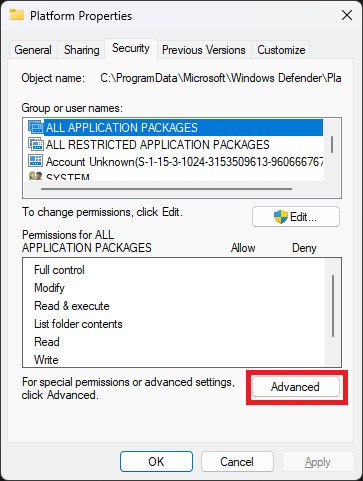 – In the Advanced Security Settings for the Platform section, find the Owner section and click on Change.
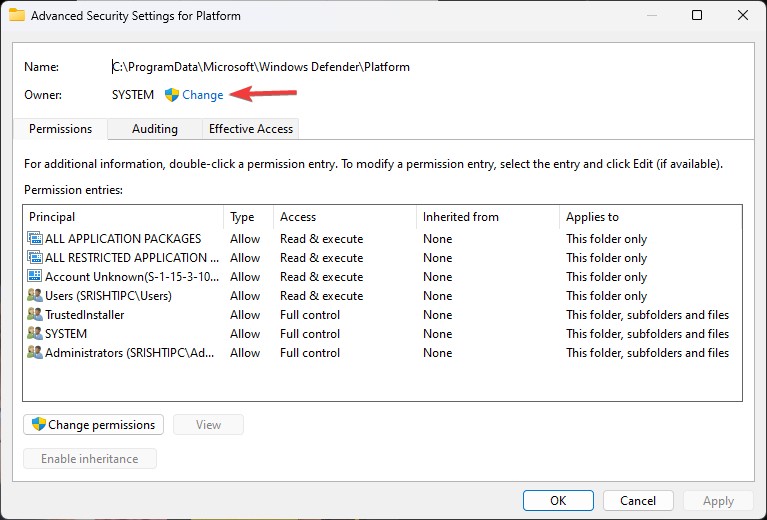 – Type the name of the new owner in the “Enter the object name to select” field and confirm by clicking OK.
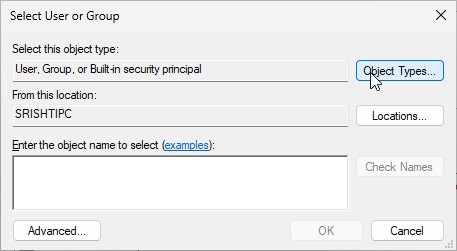 – Within the Permission Entries, locate and select “System” then press the Remove button.– Proceed to find “Trusted Installer” and also click Remove.– Ensure to tick the option for “Replace owner on subcontainers and objects.”
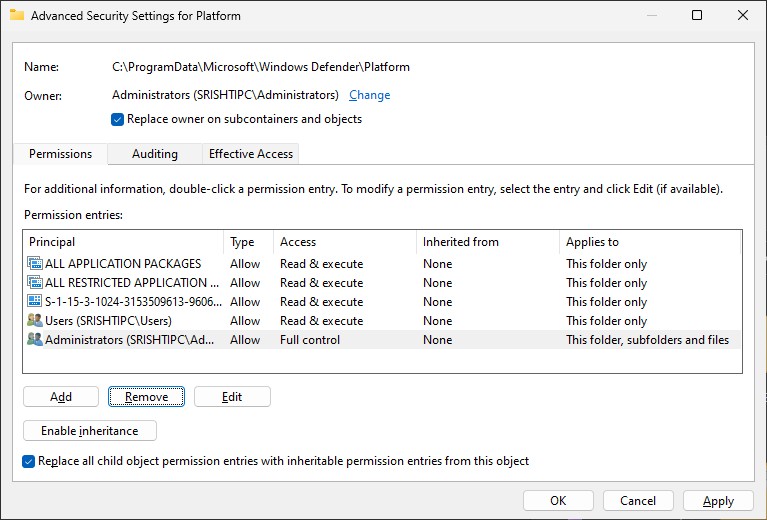 Now put a checkmark on Replace all child object permission entries with inheritable permissions from this object.Click Apply and then OK.
Safe Reverting from Safe Mode: Deactivating Boot
Turning Off Safe BootPress Windows + R to bring up the Run dialog.Enter “msconfig” and press Enter to open the System Configuration.In the Boot tab, look for Boot options.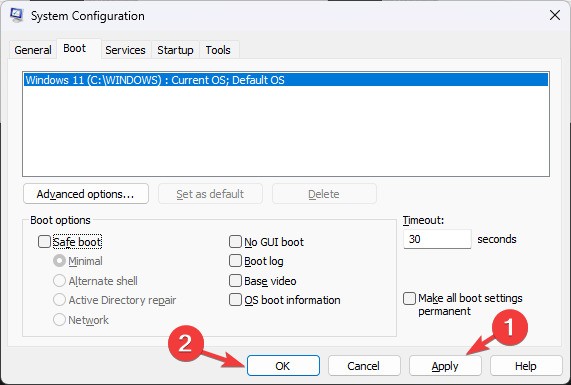 Turn off Safe Boot by unchecking the Safe Boot option.Click Apply, then OK, and reboot your system.
Securing Your System Post-Windows Defender
After completing the steps to permanently disable Windows Defender on your Windows 11 computer, including transitioning your PC out of Safe Mode, you’ll notice several immediate effects and some longer-term implications.Immediate Effects:
- Increased Administrative Control: You’ll have greater control over your system’s security settings and the applications you can install without running into permissions or blocks from Windows Defender.
- Potential Performance Boost: With Windows Defender disabled, your system may run slightly faster, especially during startup or when running heavy applications, as there’s no background antivirus software consuming resources.
- Freedom to Use Third-party Antivirus: You’re now able to install and use any third-party antivirus or security software without conflicts or performance issues caused by having multiple security programs running simultaneously.
Longer-term Implications:
- Security Risks: Without constant protection from Windows Defender, your system might be more vulnerable to malware, viruses, and other security threats. It’s crucial to have a reliable third-party antivirus program installed and to stay vigilant about your digital security practices.
- Manual Updates and Scans: You’ll need to be proactive about system security. This means regularly updating your chosen antivirus software and manually scanning for threats, as you won’t have Windows Defender automatically doing this in the background.
- Potential Compatibility Issues: Future Windows updates may try to re-enable Windows Defender or could conflict with your system’s settings due to the lack of an active built-in antivirus. Keeping your system and any third-party security software up to date will be essential to minimize these risks.
- Responsibility for Security: Ultimately, the responsibility for keeping your system secure falls entirely on you. Regularly updating your software, being cautious with the websites you visit and the files you download, and staying informed about the latest in cyber security will be key to maintaining a safe computing environment.
