
Install OpenSSL on Windows server 2016 A Step-by-Step Guide
Are you looking to secure your applications and safeguard information exchange between systems on Windows Server 2019? OpenSSL is your go-to open-source solution, offering a suite of cryptographic protocols for robust security. This toolkit, maintained by a global network of dedicated volunteers, supports both Secure Sockets Layer (SSL versions 2 and 3) and Transport Layer Security (TLS version 1) protocols, ensuring top-tier encryption. Follow this straightforward guide to get OpenSSL up and running on your Windows Server 2019. After downloading, initiate the setup by either double-clicking the `.exe` file or launching it via PowerShell with the following command:
 Navigating through the installation of OpenSSL on your Windows Server 2019 is straightforward. Begin by selecting the destination folder for OpenSSL installation during the setup process.
Follow up by choosing a directory for the Application shortcut, ensuring easy access to OpenSSL from anywhere on your system.
Navigating through the installation of OpenSSL on your Windows Server 2019 is straightforward. Begin by selecting the destination folder for OpenSSL installation during the setup process.
Follow up by choosing a directory for the Application shortcut, ensuring easy access to OpenSSL from anywhere on your system. The setup wizard will then prompt you to select any additional tasks you wish to perform during the installation. This could include creating desktop shortcuts or registering OpenSSL as a system service.Proceed by clicking “Install” to initiate the OpenSSL installation on your Windows Server 2019. This process may take a few minutes, so a little patience is required.Once the installation wraps up, finalize it by clicking “Finish.” This step concludes the successful setup of OpenSSL on your server.
 To integrate OpenSSL seamlessly into your system’s operations, add C:\OpenSSL-Win64 to your Windows environment PATH using the following PowerShell commands:
 For those operating on a 32-bit system, simply substitute OpenSSL-Win64 with OpenSSL-Win32 in the path to match your system architecture.
What is OpenSSL?
OpenSSL is a powerful and widely used open-source software library that provides a robust set of cryptographic tools for securing communications over computer networks. Primarily, it implements the SSL (Secure Sockets Layer) and TLS (Transport Layer Security) protocols, offering encryption and security features to facilitate secure Internet communications and transactions. Besides its core functionalities of encrypting sessions and verifying the identity of servers and clients, OpenSSL also includes utilities for creating digital certificates, keys, and other cryptographic operations. It is maintained by a global community of volunteers, ensuring it remains up-to-date with the latest security standards and encryption techniques.Simple Steps to Install OpenSSL on Your Windows Server 2019
Dive into securing your server by downloading OpenSSL, a critical tool for cryptographic security on Windows Server 2019. Start by visiting the OpenSSL download page to find the version that aligns with your system’s architecture. I go for the 64-bit variant. You’ll see options for both a lightweight version and the full package.For those who prefer using the command line, the `curl.exe` command offers a straightforward way to download OpenSSL directly:curl.exe -L -o Win64OpenSSL.exe https://slproweb.com/download/Win64OpenSSL-3_0_0.exeBelow is an illustration of the process.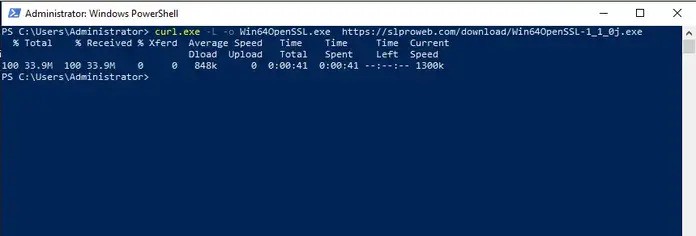 After downloading, initiate the setup by either double-clicking the `.exe` file or launching it via PowerShell with the following command:
.\Win64OpenSSL.exeProceed by agreeing to the Software License Agreement and clicking “Next” to continue with the installation.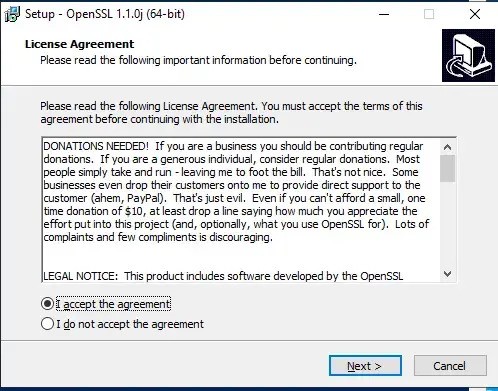 Navigating through the installation of OpenSSL on your Windows Server 2019 is straightforward. Begin by selecting the destination folder for OpenSSL installation during the setup process.
Follow up by choosing a directory for the Application shortcut, ensuring easy access to OpenSSL from anywhere on your system.
Navigating through the installation of OpenSSL on your Windows Server 2019 is straightforward. Begin by selecting the destination folder for OpenSSL installation during the setup process.
Follow up by choosing a directory for the Application shortcut, ensuring easy access to OpenSSL from anywhere on your system.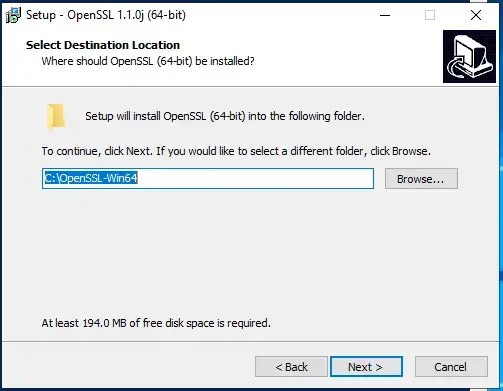 The setup wizard will then prompt you to select any additional tasks you wish to perform during the installation. This could include creating desktop shortcuts or registering OpenSSL as a system service.Proceed by clicking “Install” to initiate the OpenSSL installation on your Windows Server 2019. This process may take a few minutes, so a little patience is required.Once the installation wraps up, finalize it by clicking “Finish.” This step concludes the successful setup of OpenSSL on your server.
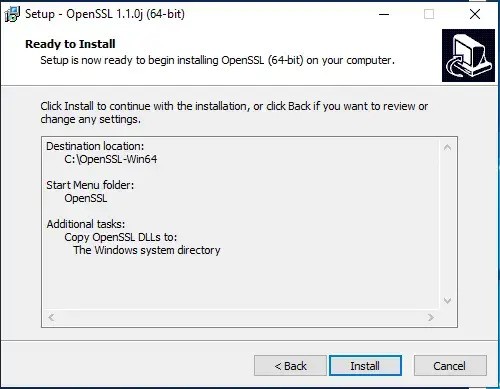 To integrate OpenSSL seamlessly into your system’s operations, add C:\OpenSSL-Win64 to your Windows environment PATH using the following PowerShell commands:
$userenv = [System.Environment]::GetEnvironmentVariable("Path", "User")[System.Environment]::SetEnvironmentVariable("PATH", $userenv + ";C:\OpenSSL-Win64\bin", "User")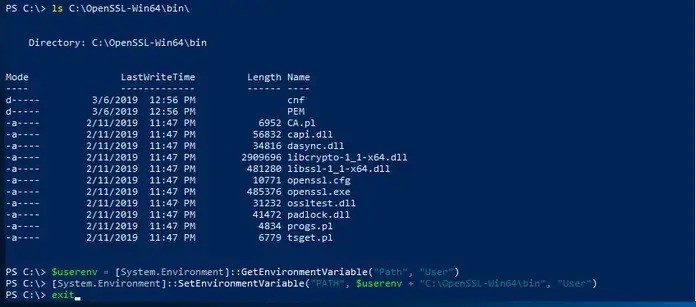 For those operating on a 32-bit system, simply substitute OpenSSL-Win64 with OpenSSL-Win32 in the path to match your system architecture.
Creating Certificates with OpenSSL on Windows Server 2019
Having successfully installed OpenSSL on Windows Server 2019, you’re now equipped to generate your own certificates. Begin this process by setting the OPENSSL_CONF environment variable:set OPENSSL_CONF=C:\OpenSSL-Win64\bin\openssl.cfgRemember, if you’re working on a 32-bit system, you should adjust the path to use OpenSSL-Win32 instead. Next, let’s proceed by generating a test SSL certificate to ensure everything is set up correctly:openssl.exe req -new -nodes -keyout server.key -out server.csr -newkey rsa:2048Feel free to explore more detailed guides and articles on our website for further reading and assistance.Conclusion
Securing your Windows Server 2019 with OpenSSL is made easy with this guide, designed to enhance application security and secure system communications. OpenSSL, a widely embraced open-source toolkit, offers a comprehensive set of cryptographic protocols, including SSL and TLS, for robust encryption and secure data exchange. This guide simplifies the installation process, from downloading the correct version of OpenSSL to configuring your system to integrate OpenSSL seamlessly. It also includes steps for generating your certificates and ensuring your server communications are encrypted and secure. Aimed at both beginners and experienced users, this tutorial provides all the necessary instructions to successfully implement OpenSSL, safeguarding your digital environment against vulnerabilities and threats.
OpenSSL stands as an all-encompassing encryption toolkit that leverages the TLS protocol, and it’s freely available as open-source software. Initially launched in 1998, it supports a range of operating systems including Linux, Windows, macOS, and BSD. OpenSSL empowers users to perform various SSL-related tasks such as generating a Certificate Signing Request (CSR), creating private keys, and installing SSL certificates. In this guide, we’ll walk you through the process of configuring OpenSSL on a Windows Server 2016. For those in need of a Windows VPS server, Eldernode offers suitable packages for purchase. Moving forward, the next step involves choosing where OpenSSL should be installed on your Windows Server. Simply enter or confirm the desired installation path and click “Next.”
 Next, decide on a location for the OpenSSL application shortcuts. This step helps you quickly access OpenSSL from your desktop or start menu.
 Finally, it’s time to select any additional tasks you want to perform during the installation. Review the options presented in the following screen, make your selection, and then proceed by clicking “Next.”
 To wrap up the OpenSSL setup on your system, simply hit the “Install” button:
 After the installation process has concluded, click “Finish” to finalize everything:
 Important Reminder: After installation, remember to add the OpenSSL directory to your Windows environment PATH. Use C:\OpenSSL-Win64 for the 64-bit version or C:\OpenSSL-Win32 for the 32-bit version. This ensures that OpenSSL commands can be run from anywhere in the command prompt.
 Continue by navigating to the “Advanced” tab, then select “Environment Variables” to proceed:
 This part will guide you through setting up the OPENSSL_CONF variable:
 Lastly, we’ll show you how to correctly adjust the Path Variable for complete integration:We kicked off this guide by giving you a rundown of what OpenSSL is all about. Following that, we walked you through the installation process of OpenSSL on Windows Server 2016. To cap it off, we’ve shown you the steps to properly configure OpenSSL to ensure it’s set up correctly on your system.
Setting Up OpenSSL on Windows Server 2016: A Beginner’s Tutorial
OpenSSL is a powerful, industrial-strength toolkit designed for implementing the Transport Layer Security (TLS) and Secure Sockets Layer (SSL) protocols. In the following segments, we aim to familiarize you with the basics of OpenSSL. After that, we’ll guide you through the installation process of OpenSSL on Windows Server 2016. To conclude, we’ll show you the steps to properly configure OpenSSL. Make sure to follow along for a comprehensive walkthrough.Getting Started with OpenSSL: A Beginner’s Guide
OpenSSL stands as a pivotal tool in the realm of SSL technologies, with SSL certificates now more crucial than ever. The push for encryption took a significant leap forward with the “HTTPS Everywhere” initiative, fundamentally altering how online security is viewed. Initially, the introduction of SEO benefits for sites using digital certificates nudged website owners towards adoption. Subsequently, browsers like Chrome mandated HTTPS for all sites, marking unsecured sites as “not secure” in popular browsers like Chrome and Firefox.The role of SSL in ensuring a website’s security and credibility cannot be overstated. Despite many site owners only recently becoming acquainted with SSL, they must have access to the right tools for implementation. OpenSSL is one such indispensable tool.OpenSSL facilitates a range of SSL management tasks, from certificate requests to installation and format conversion, alongside various authentication processes. Mastering a few basic OpenSSL commands can significantly streamline the certificate installation and configuration process. This is especially true for operating systems or server environments lacking a graphical interface for SSL management, where OpenSSL might be the sole method for certificate handling.Continue with us as we delve into a step-by-step guide on installing OpenSSL on Windows Server 2016, simplifying the process for beginners and seasoned users alike.Easy Steps to Install OpenSSL on Windows Server
Ready to get OpenSSL up and running on your Windows Server 2016, 2019, or 2012? Just follow these straightforward steps to ensure a smooth installation.Kick things off by navigating to the OpenSSL download webpage. Once there, select the most recent OpenSSL version compatible with your server’s operating system. Alternatively, you can download OpenSSL directly using PowerShell with the command below:curl.exe -L -o Win64OpenSSL.exe https://slproweb.com/download/Win64OpenSSL-1_1_0j.exeOnce the download is complete, you’re ready to start the installation. Launch PowerShell and execute the command:
.\Win64OpenSSL.exeA setup window will pop up. Here, you’ll need to agree to the license terms by choosing the “I accept the agreement” option, then proceed by clicking “Next.”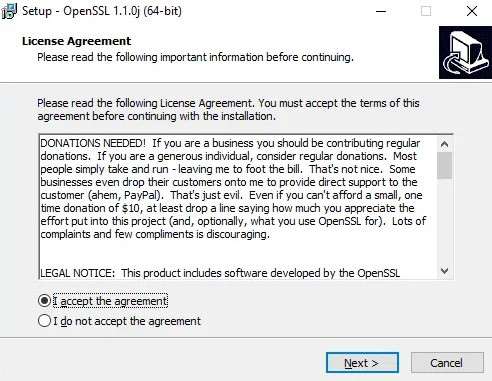 Moving forward, the next step involves choosing where OpenSSL should be installed on your Windows Server. Simply enter or confirm the desired installation path and click “Next.”
 Next, decide on a location for the OpenSSL application shortcuts. This step helps you quickly access OpenSSL from your desktop or start menu.
 Finally, it’s time to select any additional tasks you want to perform during the installation. Review the options presented in the following screen, make your selection, and then proceed by clicking “Next.”
 To wrap up the OpenSSL setup on your system, simply hit the “Install” button:
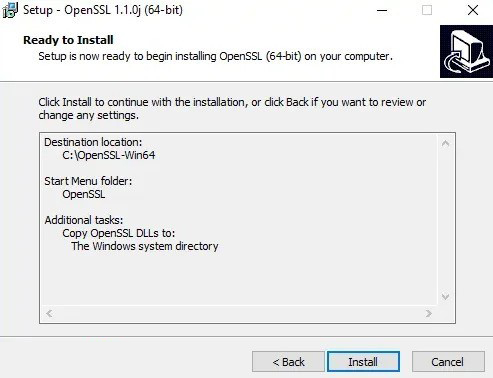 After the installation process has concluded, click “Finish” to finalize everything:
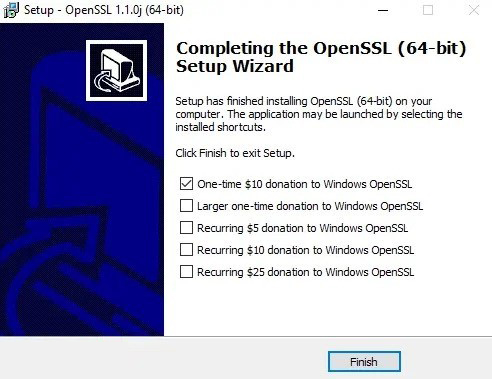 Important Reminder: After installation, remember to add the OpenSSL directory to your Windows environment PATH. Use C:\OpenSSL-Win64 for the 64-bit version or C:\OpenSSL-Win32 for the 32-bit version. This ensures that OpenSSL commands can be run from anywhere in the command prompt.
Setting Up OpenSSL on Your Windows Server 2016
Now that you’ve successfully installed OpenSSL, let’s move on to configuring it for your system. To test your installation and create a sample SSL certificate, use the command below:openssl.exe req -new -nodes -keyout server.key -out server.csr -newkey rsa:2048Next, it’s crucial to set up the necessary environment variables for OpenSSL to function correctly on your system. These include OPENSSL_CONF and Path. Apply the following commands to adjust these settings conveniently:set OPENSSL_CONF=C:\OpenSSL-Win32\bin\openssl.cfgset Path=%Path%;C:\OpenSSL-Win32\binTo make the OPENSSL_CONF and Path variables a permanent part of your system’s environment, here are the steps to follow:– Begin by pressing the Windows+R keys together to launch the Run dialog box.– Enter `sysdm.cpl` into the dialog box and hit Enter: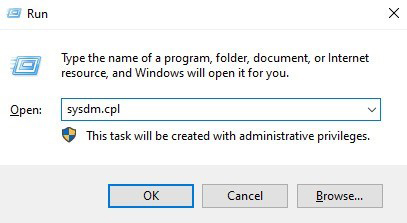 Continue by navigating to the “Advanced” tab, then select “Environment Variables” to proceed:
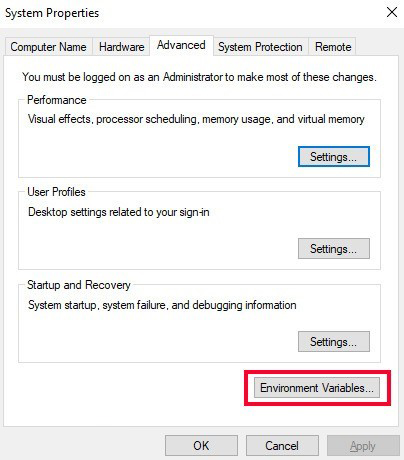 This part will guide you through setting up the OPENSSL_CONF variable:
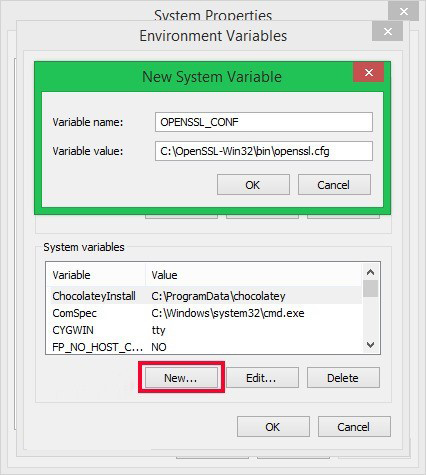 Lastly, we’ll show you how to correctly adjust the Path Variable for complete integration:
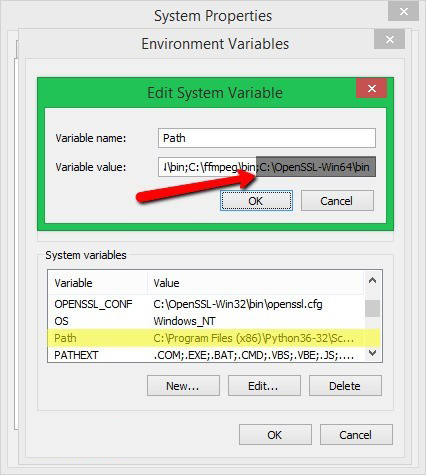 We kicked off this guide by giving you a rundown of what OpenSSL is all about. Following that, we walked you through the installation process of OpenSSL on Windows Server 2016. To cap it off, we’ve shown you the steps to properly configure OpenSSL to ensure it’s set up correctly on your system.