
How to Install GUI on Ubuntu Server in 4 Easy Steps
Did you install Ubuntu Server but now can’t find the desktop? Are you staring at an unexpected black screen with just a few lines of text? If so, you’re not alone. When I set up my first VPS and installed Ubuntu, I was also greeted by that empty screen. With only a few lines showing, I assumed the installation had failed since it looked nothing like the Ubuntu I was used to on my laptop! So, what went wrong, and why is this happening? Also, how can you add a graphical user interface (GUI) to Ubuntu Server? This article will help you figure it out.
If you’re looking for a quick way to get things up and running, we recommend checking out the video below for a simple setup guide. However, we suggest reading the full article for a more detailed explanation and better understanding.
Contents
What is Ubuntu Server and why is it Important?
Ubuntu Server is a version of the popular Ubuntu operating system designed specifically for use as a server. Developed by Canonical, Ubuntu is widely recognized as one of the top Linux distributions for workstations and laptops. The server edition, in particular, has gained even more popularity over the years. The reason behind this growing demand is simple: it works incredibly well! Below are some of the standout features of Ubuntu Server GUIs:
● Simple Container Deployment
One of the best things about Ubuntu Server’s GUI is how effortlessly it lets you deploy applications. With just a few clicks, you can install essential software containers like Apache, MySQL, and PHP, helping you get your system up and running in no time.
● Lightweight Design
Ubuntu Server’s GUI is built on a lightweight distribution, making it easy to manage your server without the need for a full desktop environment. This can be especially useful if you’re looking to conserve system resources or prefer running a server in a headless configuration.
● Seamless Cloud Integration
Connecting your server to popular cloud platforms like Amazon Web Services (AWS) or Microsoft Azure is simple with Ubuntu Server. This ease of integration allows you to scale your server’s resources up or down as needed, making it an ideal solution for businesses that occasionally need more capacity or are just starting out with cloud services.
● Excellent Hardware Support
Ubuntu Server is known for its exceptional hardware compatibility. The development team works hard to ensure it performs well on a wide range of devices, ensuring a smooth experience no matter what hardware you use.
Given all the features Ubuntu Server provides, it’s easy to see why it’s a popular choice for server management. So, if it’s such a powerful option, why doesn’t it come with a GUI desktop by default? The reason is that most server operating systems are built with efficiency in mind, focusing on being lightweight so that more system resources are available for server tasks. As a result, many server OSes skip the GUI entirely in favour of a Command-Line Interface (CLI).
While a CLI works well for experienced server administrators and developers, it can be a bit overwhelming for others. That’s why Ubuntu Server allows you to easily add a GUI desktop with a few simple commands. If you’re reading this post, you’re probably looking for just that. So, let’s dive into the details!
If you’re unsure which Ubuntu server GUI to choose, the next section will walk you through your options. If you’ve already made your decision, feel free to jump ahead to the installation guide.
How to Select the Best Ubuntu Server GUI
Choosing the right Ubuntu server GUI requires careful consideration of a few key factors. Some users may prefer a traditional desktop environment, while others might opt for something simpler and more minimalistic.
The first thing to think about is the tasks your server will handle. If you need a server for a specific function, like hosting a website or managing a database, it’s best to choose a GUI tailored for those purposes. On the other hand, if you need a GUI that facilitates remote management of your server, look for one with strong remote access features. If you’re unsure about the server’s specific role, there are plenty of general-purpose GUIS that will work for a variety of tasks.
Another factor to consider is your experience level with Linux servers. Some GUIS are designed with beginners in mind, offering easy-to-use interfaces. If you’re new to Linux, starting with a more user-friendly GUI is a good idea. However, if you’re already experienced with Linux, you may prefer a more advanced GUI that offers additional control over your server’s settings and configuration.
It’s also essential to consider whether you need support for multiple languages. If your server needs to support different languages, make sure the GUI you choose accommodates them. Other factors, such as ease of use and the set of features provided, should also influence your decision.
Lastly, make sure the GUI is compatible with the version of Ubuntu you’re using. Not all GUIS work with every Ubuntu release, so take the time to check compatibility before making your final choice.
In the end, the best Ubuntu server GUI for you will depend on your specific needs and preferences. It might be helpful to try out a few options to see which one suits you best. If you’re interested in exploring other Linux desktop environments, such as Linux Mint’s Cinnamon, MATE, or Xfce, you can check out our blog to compare them and make an informed decision.
How to Install a GUI on Ubuntu Server
Now that you’re familiar with the best Ubuntu server GUIS, it’s time to learn how to install one on your system. Let’s dive right in and get started. First, ensure that you have full root access to your server, which means you have permission to execute sudo or superuser commands. If you’re using a VPS and are unsure how to establish a remote connection or open the terminal, we recommend checking out our tutorial on connecting to a remote Linux server.
Step 1: Update Your Repositories
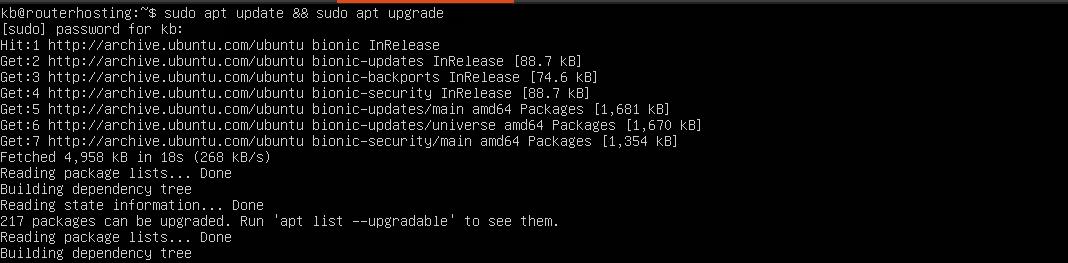
If you’re already familiar with using a Linux distribution, you’re probably aware that installing software often requires using the command line interface (CLI) to access a package repository and download the necessary files. Before installing your preferred GUI, you need to make sure your system’s repositories are up-to-date. This ensures you’re installing the latest, most stable version of the Ubuntu server GUI.
To update the repositories, run the following command:
sudo apt-get update && sudo apt-get upgrade
When prompted to continue with the update, press <Y>.
This command checks for the latest versions of all available software packages from the repositories. Depending on your internet speed and how up-to-date the Ubuntu Server image you installed is, this process may take a few minutes.
Once the update is complete and you’re back at the command prompt, you’re ready to proceed with the installation.
Step 2: Setting Up a Display Manager
To make the installation process easier, we will begin by installing a tool called tasksel manager. This utility simplifies the installation of multiple related packages by allowing you to download and install them all with a single command. It’s particularly useful when installing large software packages, such as a full desktop environment. While you can certainly use the native apt package manager to install your desktop environment, I’ll show you both methods.
If you’re feeling a bit lost or overwhelmed by all these commands, don’t worry! You might find it helpful to check out a guide on the 10 essential Linux commands that every user should know.
That said, I suggest using tasksel for this process, as it reduces the likelihood of issues related to package dependencies. To install tasksel, run this command in your Ubuntu terminal:
sudo apt-get install tasksel -y
Once tasksel is installed, we can move on to selecting and installing a display manager for your Ubuntu Server.
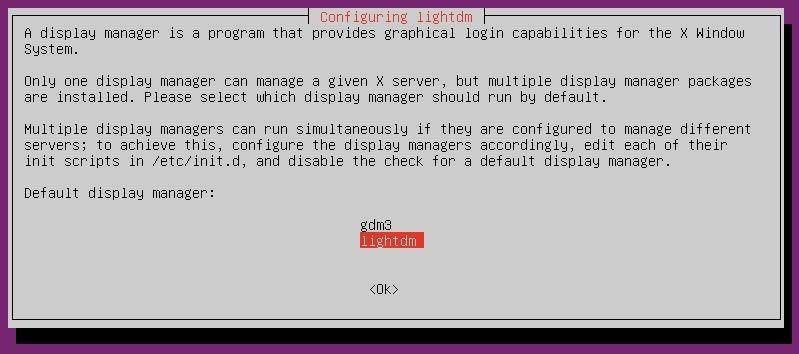
A display manager is responsible for managing the graphical login process and launching the desktop environment. There are several display managers to choose from, each with its own set of features. For a first-time installation, however, I recommend either Slim or Lightdm because they are both lightweight and efficient, causing minimal performance overhead. Slim is often regarded as the best option, with plenty of documentation and tutorials available. Lightdm is a close runner-up, so either choice will work well. If you’re interested in a more detailed comparison, you can check out Slant’s review of both.
To install Slim, use the following command:
sudo apt-get install slim -y
If you prefer Lightdm, enter this command instead:
sudo apt-get install lightdm -y
If you’ve decided to install KDE Plasma as your desktop environment, then you’ll want to go with SDDM, which is the default display manager for KDE Plasma. To install SDDM, use this command:
sudo apt-get install sddm -y
Note that none of these three display managers are native to GNOME, so if you’re using that desktop environment, you may be prompted to choose your default display manager. The options will include the native, but heavier GDM3, or one of the lighter managers (Lightdm, SLiM, or SDDM). Simply select the one you’ve just installed and confirm by pressing <OK>.
With the display manager in place, we are now one step closer to actually installing the GUI on your Ubuntu Server. If you’re feeling a bit overwhelmed, don’t worry—at the end of the guide, I’ll reveal a quick shortcut to make the process even easier.
Step 3: Downloading and Installing Your Preferred GUI
At this point, you should have already decided which Ubuntu server GUI desktop environment you want to install. If you’re still unsure, you can always take a moment to review our comparison of the top options. In this section, we’ll guide you through the installation process for each of the desktops we’ve discussed.
Installing GNOME
To install GNOME on Ubuntu Server, you have a couple of options: you can either use tasksel via the command line or through its minimal user interface. If you prefer to use tasksel from the command line, enter this command:
sudo tasksel install ubuntu-desktop
Alternatively, for a more user-friendly approach, you can use the tasksel UI. Start by running tasksel from the terminal:
tasksel
This will open a simple UI that lets you select the package bundle you want to install. Scroll through the list using the arrow keys until you find “Ubuntu desktop” and press <SPACE> to select it. Then, use <TAB> to move to the “OK” button at the bottom and press <ENTER> to start the installation.
If you’d rather use apt instead of tasksel, you can install GNOME with this command:
sudo apt-get install ubuntu-desktop
Regardless of the method, the installation may take a little while to complete. Once finished, your system will likely reboot. After the reboot, you should be greeted with a graphical login screen. Upon logging in, you’ll see the GNOME desktop environment.
In rare cases, if your server reboots into the command-line interface (CLI), you can manually start the desktop environment by running the appropriate command for your display manager:
- For LightDM:
sudo service lightdm start
- For SLiM:
sudo service slim start
With that, you’ve successfully installed a GUI on Ubuntu Server. If you ran into issues or find these steps complicated, keep reading for an easier shortcut in the conclusion.
Installing KDE Plasma
Next, let’s look at installing KDE Plasma, another popular desktop environment for Ubuntu Server. Since tasksel doesn’t have a KDE Plasma bundle, you’ll need to use apt-get to install it. To do that, run the following command:
sudo apt install kde-plasma-desktop
The installation may take some time, so be patient. Once complete, your system may reboot, and if it starts in CLI mode, you can force the GUI to load by starting your display manager:
- If you installed SDDM as your display manager:
sudo service sddm start
- If you’re using LightDM:
sudo service lightdm start
- If you choose SLiM:
sudo service slim start
Once the installation finishes, you’ll have a sleek and customizable KDE Plasma environment running.
Installing MATE
MATE is a solid choice if you want a balanced desktop environment that combines simplicity and functionality. You can install MATE using either tasksel or apt-get. To use tasksel, run this command:
sudo tasksel install ubuntu-mate-core
Alternatively, use apt-get with the following command:
sudo apt-get install ubuntu-mate-core -y
The installation process will take a bit of time, and once completed, your system will reboot. After logging in, you’ll enjoy the classic, colourful MATE desktop environment.
Installing Xfce
Finally, let’s look at Xfce, a lightweight and highly efficient desktop environment. To install Xfce, you can use apt-get with the following command:
sudo apt-get install xfce4 slim -y
If you want a more feature-rich version, consider installing Xubuntu, which is based on Xfce but with additional resources and a more dynamic look. To install Xubuntu using tasksel, use this command:
sudo tasksel install xubuntu-core
Alternatively, you can install it with apt-get:
sudo apt-get install xubuntu-core -y
After installation, Xfce or Xubuntu will provide you with a fast and resource-efficient desktop environment.
No matter which desktop environment you choose, you now have the option to enjoy a graphical interface on your Ubuntu Server. If any of these steps seemed too complex, don’t worry—stick around for the shortcut I promised earlier in the conclusion!
Step 4: Starting and Stopping Your GUI Desktop
As mentioned earlier, there’s a possibility that your Ubuntu server’s GUI won’t start automatically after installation and reboot. If this happens, you can manually force your display manager to start the desktop environment. To do so, simply run the following command in the terminal:
sudo service DISPLAY_MANAGER start
Note: Replace DISPLAY_MANAGER with the name of the display manager you installed earlier (such as lightdm, slim, or sddm).
If you ever need to stop the GUI and revert back to the command-line interface (CLI), you can do so by entering this command:
sudo service DISPLAY_MANAGER stop
Again, replace DISPLAY_MANAGER with the name of your installed display manager (lightdm, slim, or sddm).
This will allow you to switch between GUI and CLI modes as needed.
Summary
This article explains how to install a graphical user interface (GUI) on Ubuntu Server, addressing common issues such as the default lack of a GUI after installation. It first highlights the benefits of Ubuntu Server, including easy container deployment, lightweight design, cloud integration, and strong hardware support. The article then guides readers through selecting the best GUI for their needs, considering factors like server tasks, user experience level, and language support. It also provides step-by-step instructions for installing popular desktop environments such as GNOME, KDE Plasma, MATE, and Xfce using tools like tasksel and apt-get. Additionally, the article covers how to start and stop the GUI manually if it doesn’t launch automatically, allowing users to switch between graphical and command-line interfaces.
