
Install OpenSSL on Windows 10/11: A Step-by-Step Guide
Historically, utilizing OpenSSL necessitated either operating within a Linux environment or engaging in the manual compilation of its source code for both Mac and Windows users. However, with the advent of Win32/Win64 OpenSSL, this powerful open-source cryptography library has been made accessible to users of both 32-bit and 64-bit Windows operating systems, allowing for seamless integration into Windows environments through a straightforward installation process.OpenSSL is renowned for its pivotal role in securing data across a myriad of applications and network connections. It is instrumental in encrypting data for SSL/TLS protocols, thereby ensuring secure HTTPS connections, and is also utilized in the encryption processes for SSH, OpenVPN, and DNSSEC, among others.Thanks to the efforts of Shining Light Productions, the deployment of OpenSSL on Windows has been significantly simplified. The Win32/Win64 OpenSSL Installation Project, available at slproweb.com, offers an installer that streamlines the process, bypassing the complexity of manual compilation by providing ready-to-use binaries. This development not only facilitates easier access to OpenSSL’s robust security features but also enhances the security infrastructure of Windows-based systems with minimal effort. The OpenSSL package is now installed. The second method is to download and install the package.
 Initiate the Installation Process: Search for the “Win64 OpenSSL v3.0.7 EXE Light” option, which should be prominently displayed at the top of the list. Download this file and, once the download is complete, navigate to your download directory and double-click the Win64OpenSSL_Light-3_0_7.exe file to start the setup process.
 Navigate the Setup Wizard: Upon launching the installer, you may encounter a User Account Control (UAC) prompt. Click
 Navigate to Environment Variables: In the System Properties window that appears,
 locate and click on the ‘Environment Variables’ button situated at the lower section of the window.
 Modify the System Path: Within the Environment Variables window, scroll to find the ‘Path’ variable under the ‘System Variables’ section. Select it and then click the ‘Edit’ button. This action opens the ‘Edit Environment Variable’ window, where you will add the path to the OpenSSL installation.
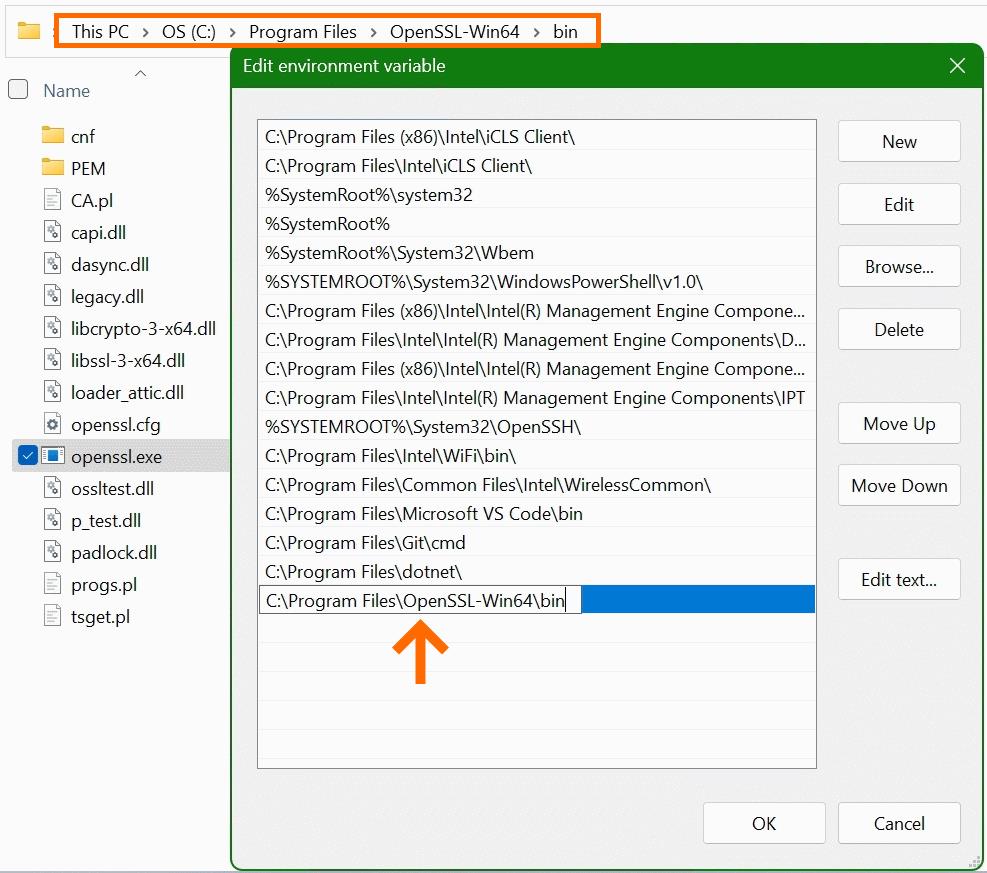
 Specifically, you’re aiming to include the path to the OpenSSL-Win64\bin directory, which is typically located within the Program Files directory. This path houses the openssl.exe executable. Utilize the Browse button or directly paste the path if you have it ready. Confirm by clicking OK.Add OPENSSL_CONF Variable: For OpenSSL to function correctly, it needs to know where to find its configuration file. Achieve this by adding a new system variable. Click ‘New’ within the System Variables section and enter OPENSSL_CONF as the variable name. In the variable value field, input the path to your openssl.cnf file, which is usually located at
Comprehensive Guide to Setting Up OpenSSL on Windows
Deploying OpenSSL on Windows 10 and Windows 11 has become more accessible, and this guide outlines two straightforward methods for installation. Begin with the most direct approach by leveraging the Windows Package Manager. To initiate this process, press the Windows-logo+R keys simultaneously to open the ‘Run’ dialogue box, type ‘cmd’, and select OK. Alternatively, you can press the Windows key, search for ‘cmd’, and then select the command prompt icon from the search results.Once you open the command prompt window, enter the following command to install OpenSSL. If your user account doesn’t have administrative privileges, right-click on the command prompt and choose “Run as administrator” for elevated access.<“C:\> winget install openssl”>The command line tool ‘winget’ serves as a versatile package manager for Windows, simplifying the installation of software applications and packages directly from the command line interface. When you run 'winget‘ for the first time, it may ask you to accept the terms of the source agreement. You can do this by pressing the ‘Y’ key when prompted.
This method showcases the simplicity and efficiency of using 'winget' for software installations on Windows platforms, streamlining the process of getting OpenSSL up and running on your system without the need for intricate steps or manual downloads.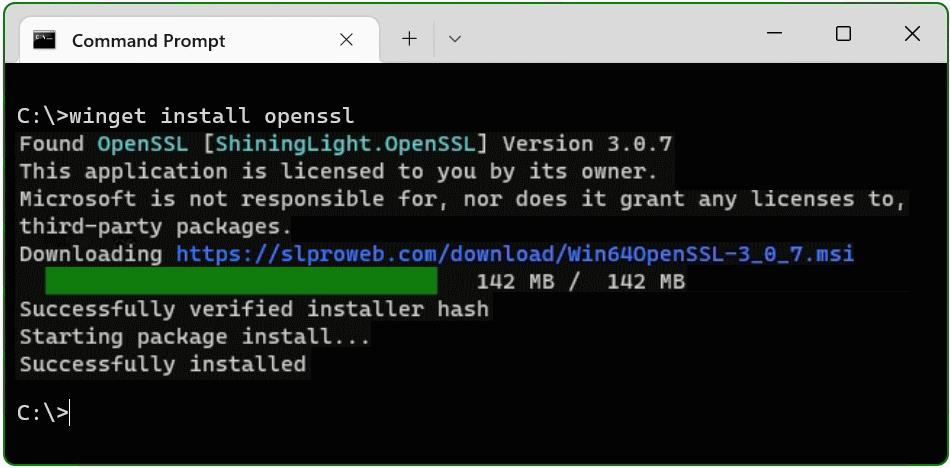 The OpenSSL package is now installed. The second method is to download and install the package.
Step-by-Step Guide to Downloading and Installing Win64 OpenSSL
Locate the Installer: Visit the official Shining Light Productions website at https://slproweb.com/products/Win32OpenSSL.html to find the installer. It’s advisable to opt for the most recent version to ensure you have the latest security and functionality enhancements. As of the last update to this guide, the Win64 OpenSSL v3.0.7 EXE Light version is recommended for its balance of features and lightweight installation.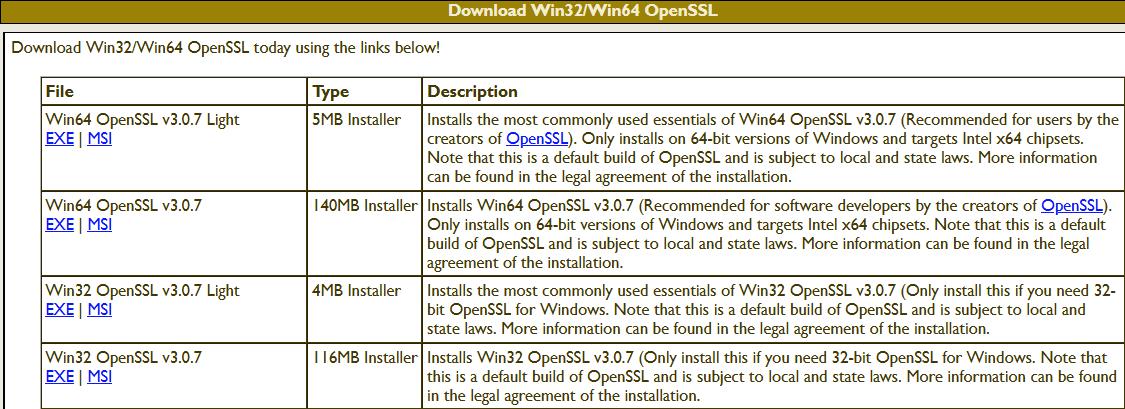 Initiate the Installation Process: Search for the “Win64 OpenSSL v3.0.7 EXE Light” option, which should be prominently displayed at the top of the list. Download this file and, once the download is complete, navigate to your download directory and double-click the Win64OpenSSL_Light-3_0_7.exe file to start the setup process.
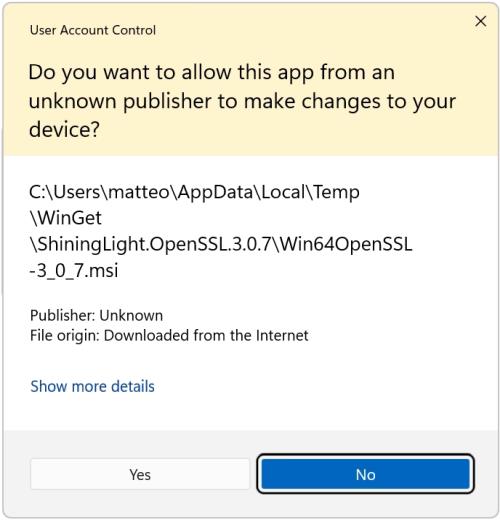 Navigate the Setup Wizard: Upon launching the installer, you may encounter a User Account Control (UAC) prompt. Click
 'Yes' to affirm your decision to proceed with the installation. This action will activate the setup wizard, which will guide you through the necessary steps to successfully install OpenSSL on your Windows system. The wizard automates the process of unpacking and transferring the necessary OpenSSL files to their designated locations on your computer.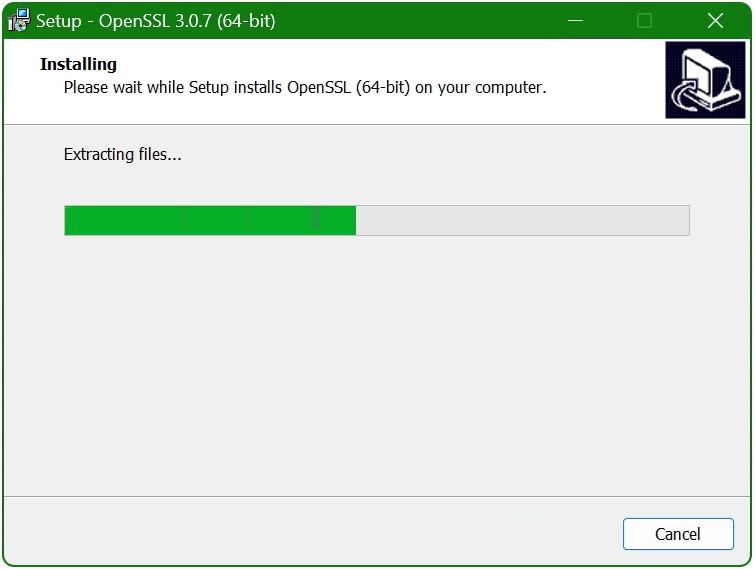
Integrating OpenSSL into the Windows Environment
Access System Properties: Begin by opening the Run dialog box using the Windows + R shortcut, then type SYSTEM PROPERTIES ADVANCED and click OK to proceed. Navigate to Environment Variables: In the System Properties window that appears,
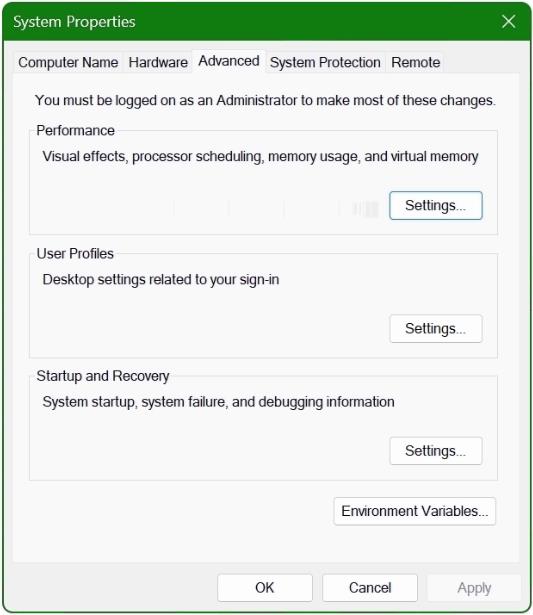 locate and click on the ‘Environment Variables’ button situated at the lower section of the window.
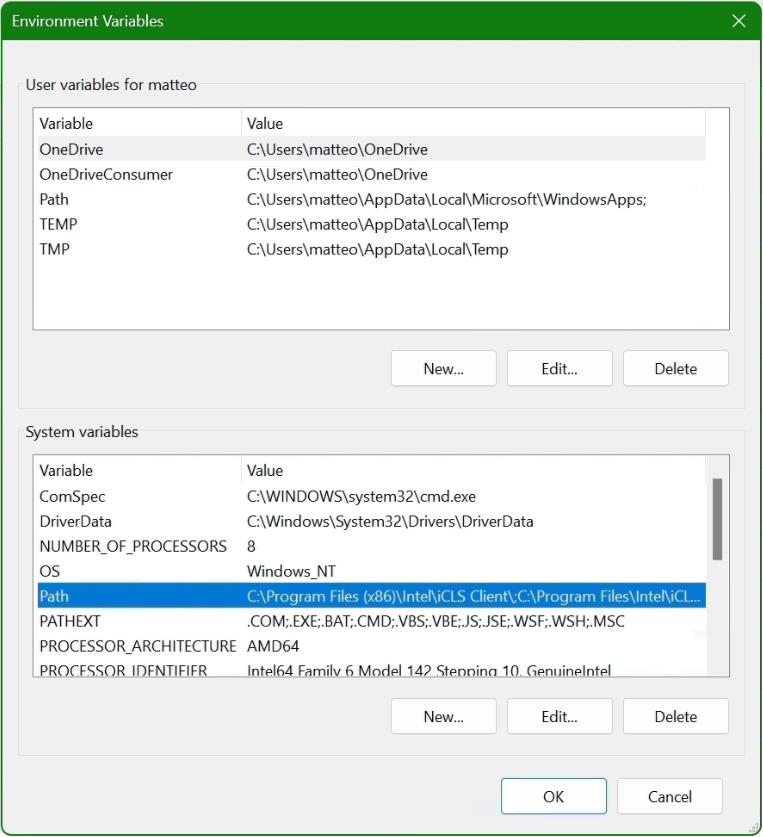 Modify the System Path: Within the Environment Variables window, scroll to find the ‘Path’ variable under the ‘System Variables’ section. Select it and then click the ‘Edit’ button. This action opens the ‘Edit Environment Variable’ window, where you will add the path to the OpenSSL installation.
 Specifically, you’re aiming to include the path to the OpenSSL-Win64\bin directory, which is typically located within the Program Files directory. This path houses the openssl.exe executable. Utilize the Browse button or directly paste the path if you have it ready. Confirm by clicking OK.Add OPENSSL_CONF Variable: For OpenSSL to function correctly, it needs to know where to find its configuration file. Achieve this by adding a new system variable. Click ‘New’ within the System Variables section and enter OPENSSL_CONF as the variable name. In the variable value field, input the path to your openssl.cnf file, which is usually located at
 C:\Program Files\OpenSSL-Win64\bin\cnf\openssl.cnf. Confirm all actions by clicking OK.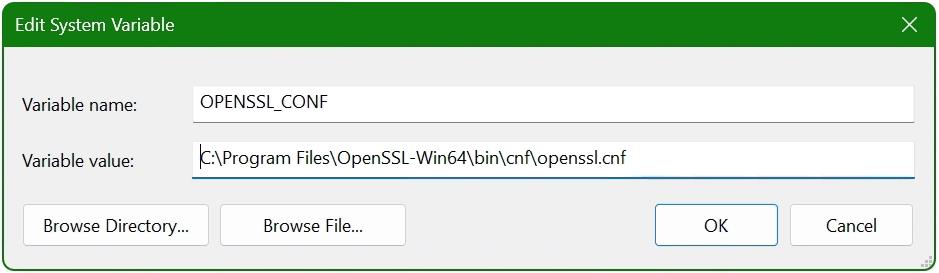
Verifying the Installation
To confirm that OpenSSL has been correctly set up and is operational, open a command prompt window and execute the following commands:To check the version and build information of your OpenSSL installation, enter:“C:\> openssl version -a”This command will display details such as the version number and build date.To ascertain the directory where OpenSSL searches for its configuration files, use:“C:\> openssl version -d”This returns the OPENSSLDIR path, indicating where the OpenSSL configuration files reside.Utilizing OpenSSL on WindowsWhile Windows does not support the ‘man’ pages common on Linux for detailed command documentation, OpenSSL on Windows provides a helpful alternative. The openssl help command offers context-sensitive guidance for using its various functions. For example, you can use openssl help s_client, openssl help x509, or openssl help req to get specific information on these commands. Additionally, extensive documentation and manual pages are available online, offering a wealth of information to both new and experienced users.Mastering OpenSSL: Key Commands and Operations
OpenSSL is an incredibly robust toolkit that offers an array of functionalities for managing and manipulating SSL/TLS certificates, keys, and other cryptographic tasks. Below, we explore several essential OpenSSL commands that are widely used for security and certificate management. This list is not exhaustive but highlights some practical examples of how OpenSSL can be utilized effectively.Essential OpenSSL Commands for Security Experts
– Inspecting Certificate Details: To examine the details of a certificate file named `ca-cert.pem` without altering its content, use the following command:openssl x509 -noout -text -in ca-cert.pemThis command outputs the certificate’s details in a readable format, making it easier to review its contents.– Verifying Certificate Signing Requests (CSRs): For scrutinizing and confirming the data within a CSR file named `x509-check.csr`, execute:openssl req -text -noout -verify -in x509-check.csrThis ensures the integrity and correctness of the CSR’s information.– Checking Key File Integrity: To verify the structural integrity of a key file, such as `rootCA.key`, use:openssl rsa -check -in rootCA.keyThis command helps ensure that the key file is valid and has not been corrupted.– Computing Certificate Checksum: To calculate the MD5 checksum of a certificate file `ca-cert.pem`, facilitating the verification of its integrity, perform:openssl x509 -noout -modulus -in ca-cert.pem | openssl md5– Converting Certificate Formats: To transform a PEM format certificate `servercert.pem` into a PKCS#7 format and save it as `servercert.p7b` in a temporary directory, execute:openssl crl2pkcs7 -nocrl -certfile servercert.pem -out c:\temp\servercert.p7b– Exporting to PKCS#12 Format: To convert a certificate `rootCA.pem` and its key `rootCA.key` into a PKCS#12 format file named `rootCA.p12`, use:openssl pkcs12 -export -in rootCA.pem -inkey rootCA.key -out c:\temp\rootCA.p12 -name "PKCS12 certificate"– Generating SSL Certificates: For creating a new SSL certificate and key with RSA 2048 encryption and SHA256 hashing, valid for one year, the command is:openssl req -new -newkey rsa:2048 -sha256 -days 365 -nodes -x509 -keyout server.key -out server.crt– Testing Server Connections: To check the connection to an IMAP service on `imap.gmail.com` at port 993, use:openssl s_client -connect imap.gmail.com:993For SMTP with STARTTLS on `smtp.gmail.com` at port 587, the command is:openssl s_client -crlf -connect smtp.gmail.com:587 -starttls smtpAnd to verify the connection details of `www.ietf.org` at port 443 quietly and briefly:openssl s_client -verify_quiet -brief www.ietf.org:443– Generating Random Passwords: To create a secure random password in base64 format, which could be used to safeguard private keys, execute:openssl rand -base64 20These commands represent just a fraction of what OpenSSL can accomplish. Its versatility extends far beyond these examples, serving as a critical tool for anyone working with encryption, certificates, and secure communications.
Ram
5 January 2025Thank you for this. Your site was the only reason I was able to locate the Win 64 OpenSSL MSI for download and get it done. Winget did not work though – FYI, as the system said it could not find any matching libraries to install.
Reinier van der Sandt
12 February 2025After having installed; there is no cnf directory in bin and even openssl.cnf is nowhere apparent or to find in the program. So ? Now what to do ?
ALis
11 November 2025Please pay attention to your server configuration to follow the correct paths.
Demo Slot
25 September 2025Hi! I simply would like to give you a huge thumbs up for your
excellent information you have here on this post. I’ll be coming back to your site for more soon.
ALis
11 November 2025We really appreciate your feedback! 🙌
Hearing that our readers are satisfied motivates us to keep improving every day.
Live Draw HK Tercepat
25 September 2025Thank you for the auspicious writeup. It in fact was a amusement account it.
Look advanced to more added agreeable from you! However, how can we communicate?
ALis
11 November 2025Your kind words mean a lot to us! 💫
We’re thrilled to know you enjoyed the content and found it useful. Thank you for being part of our community.
https://www.wilivm.com/support/
Welcome to Hongkong Pools
26 September 2025Good response in return of this matter with firm arguments and describing all on the topic of that.
ALis
11 November 2025Thank you for your support and trust 💙
It’s always great to know our work makes a difference for our readers.
Prediksi Sydney Angkanet
26 September 2025Keep on writing, great job!
ALis
11 November 2025Your satisfaction is the best reward for our efforts 🌿
We’ll continue doing our best to create valuable and insightful content for you.
Sydney Pools Asli
26 September 2025What’s up to every one, it’s in fact a nice for me to go to see
this web page, it consists of useful Information.
ALis
11 November 2025It’s wonderful to hear that you liked the post! 🌸
Stay tuned for more helpful and engaging content soon.
Paito HK 6D Resmi
27 September 2025It’s remarkable to visit this website and reading the views of all mates about this article,
while I am also keen of getting experience.
ALis
11 November 2025We’re truly grateful for your appreciation 💛
Our mission is to share knowledge and help readers make informed decisions — your feedback shows we’re on the right path.
Rumus Togel Mbah Semar
5 October 2025Thanks for some other informative website. The place else
may just I get that kind of info written in such an ideal method?
I’ve a project that I am just now running on, and I have been on the look out for such info.
ALis
11 November 2025Your satisfaction is the best reward for our efforts 🌿
We’ll continue doing our best to create valuable and insightful content for you.
Paito Warna SDY Lotto
6 October 2025It’s an amazing piece of writing for all the web visitors; they
will get advantage from it I am sure.
ALis
11 November 2025Thank you for your support and trust 💙
It’s always great to know our work makes a difference for our readers.
Data Taipei Virdsam
6 October 2025Hello, i think that i saw you visited my website so i came to “return the favor”.I’m trying to find
things to improve my website!I suppose its ok to use some of your ideas!!
ALis
11 November 2025We really appreciate your feedback! 🙌
Hearing that our readers are satisfied motivates us to keep improving every day.
Paito Warna SGP
6 October 2025We are a group of volunteers and opening a new scheme in our community.
Your web site provided us with helpful information to work on.
You have performed an impressive job and our entire neighborhood can be grateful to you.
ALis
11 November 2025Your kind words mean a lot to us! 💫
We’re thrilled to know you enjoyed the content and found it useful. Thank you for being part of our community.
Prediksi Sydney Angkanet
6 October 2025My brother recommended I would possibly like this website.
He was once entirely right. This put up truly made my day.
You can not consider simply how much time I had spent for this info!
Thanks!
ALis
11 November 2025Thank you for your positive feedback.
Our team is committed to providing accurate and practical content to ensure the satisfaction of our valued readers.
Shorts
9 October 2025Please let me know if you’re looking for a author for your site.
You have some really good articles and I think I would be a good asset.
If you ever want to take some of the load off, I’d really like to write some articles for your blog in exchange for
a link back to mine. Please send me an email if interested.
Thanks!
ALis
11 November 2025We truly appreciate you taking the time to share your thoughts 💙
Our goal is always to create high-quality content that meets our readers’ expectations.
Supplyyuk
9 October 2025My spouse and I absolutely love your blog and find almost all
of your post’s to be what precisely I’m looking for.
can you offer guest writers to write content for you personally?
I wouldn’t mind producing a post or elaborating
on most of the subjects you write in relation to here.
Again, awesome blog!
ALis
11 November 2025We truly appreciate you taking the time to share your thoughts 💙
Our goal is always to create high-quality content that meets our readers’ expectations.
https://www.wilivm.com/support/
قیمت مارلبرو گلد تاچ
9 October 2025I don’t even understand how I finished up right here, however I believed this
submit was once great. I do not know who you’re however definitely you’re going to a famous blogger if you aren’t already.
Cheers!
ALis
11 November 2025We truly appreciate you taking the time to share your thoughts 💙
Our goal is always to create high-quality content that meets our readers’ expectations.
Kabar Terdepan
9 October 2025These are ɑctually fantastic iԀeas in about blogging.
You have touched some nice things here. Any way keep up wrinting.
ALis
11 November 2025We truly appreciate you taking the time to share your thoughts 💙
Our goal is always to create high-quality content that meets our readers’ expectations.
menyala terang
9 October 2025Your style is unique compared to other people I have read stuff from.
Thank you for posting when you have the opportunity, Guess I will just bookmark this web site.
ALis
11 November 2025Thank you for your positive feedback.
Our team is committed to providing accurate and practical content to ensure the satisfaction of our valued readers.
diatas langit
9 October 2025I every time spent my half an hour to read this webpage’s content every day along with a cup
of coffee.
ALis
11 November 2025Thank you so much for your kind feedback 🌸
We’re glad to hear that our content was helpful for you. Our main goal is to deliver useful and satisfying information.
Live Draw SGP
10 October 2025I have read so many posts concerning the blogger
lovers except this article is truly a fastidious paragraph, keep
it up.
ALis
11 November 2025We’re so happy to know you enjoyed our content 😍
Your comment gives us the energy to keep going!
Live Draw Sydney
10 October 2025I have learn some excellent stuff here. Definitely value bookmarking for revisiting.
I wonder how much effort you place to make such a great informative web site.
ALis
11 November 2025We truly appreciate you taking the time to share your thoughts 💙
Our goal is always to create high-quality content that meets our readers’ expectations.
Result HK 6D Update Harian Tercepat
11 October 2025Everything is very open with a clear explanation of the
challenges. It was truly informative. Your site is useful.
Thanks for sharing!
ALis
11 November 2025Everything is very open with a clear explanation of the
challenges. It was truly informative. Your site is useful.
Thanks for sharing!
Live Result Togel
11 October 2025I am actually pleased to glance at this web site posts which includes tons of valuable facts, thanks for
providing these data.
ALis
11 November 2025We truly appreciate you taking the time to share your thoughts 💙
Our goal is always to create high-quality content that meets our readers’ expectations.
Prediksi Angkanet
11 October 2025I like it whenever people come together and share opinions.
Great site, keep it up!
ALis
11 November 2025We’re so happy to know you enjoyed our content 😍
Your comment gives us the energy to keep going!
Artikel Rekomendasi Terbaru
12 October 2025This text is worth everyone’s attention. When can I find out more?
ALis
11 November 2025We’re so happy to know you enjoyed our content 😍
Your comment gives us the energy to keep going!
New topics are added to the site every week.
Menang Cepat
14 October 2025Thanks for the auspicious writeup. It in truth was a entertainment account it.
Look complicated to far delivered agreeable from you!
By the way, how can we communicate?
ALis
11 November 2025We’re so happy to know you enjoyed our content 😍
Your comment gives us the energy to keep going!
https://www.wilivm.com/support/
Live Draw HK Tercepat
14 October 2025It’s awesome designed for me to have a website, which is helpful in support of
my knowledge. thanks admin
ALis
11 November 2025Thank you for your positive feedback.
Our team is committed to providing accurate and practical content to ensure the satisfaction of our valued readers.
Paito Warna SGP Resmi
16 October 2025I was excited to find this page. I need to to thank you for ones time for this wonderful read!!
I definitely loved every little bit of it and i also have you bookmarked to look at
new stuff in your website.
ALis
11 November 2025Thank you for your positive feedback.
Our team is committed to providing accurate and practical content to ensure the satisfaction of our valued readers.
Pengeluaran Paito Warna Sydney
17 October 2025Fantastic beat ! I would like to apprentice while you amend your website, how could
i subscribe for a blog web site? The account helped me a acceptable
deal. I had been a little bit acquainted of this your broadcast offered
bright clear idea
ALis
11 November 2025We’re so happy to know you enjoyed our content 😍
Your comment gives us the energy to keep going!
teeth whitening solutions
17 October 2025I was able to find good info from your articles.
ALis
11 November 2025Thank you so much for your kind feedback 🌸
We’re glad to hear that our content was helpful for you. Our main goal is to deliver useful and satisfying information.
Data Sydney
17 October 2025Can you tell us more about this? I’d like to
find out some additional information.
ALis
11 November 2025Please submit the items you want so that the content department can work on that topic if possible.
Pengeluaran Togel Sydney
17 October 2025Wow that was unusual. I just wrote an extremely long comment but after I clicked submit my comment didn’t
show up. Grrrr… well I’m not writing all that over again. Anyhow, just wanted to say wonderful blog!
ALis
11 November 2025Thank you so much for your kind feedback 🌸
We’re glad to hear that our content was helpful for you. Our main goal is to deliver useful and satisfying information.
Live Draw Hongkong Pools
18 October 2025This is a topic which is close to my heart… Many thanks!
Exactly where are your contact details though?
ALis
11 November 2025Thank you so much for your kind feedback 🌸
We’re glad to hear that our content was helpful for you. Our main goal is to deliver useful and satisfying information.
https://www.wilivm.com/support/
Paito Sydney 6D Tercepat
18 October 2025Its like you read my mind! You seem to know so much about this,
like you wrote the book in it or something.
I think that you could do with some pics to drive the message home a little bit, but instead of that, this is great blog.
An excellent read. I will certainly be back.
ALis
11 November 2025Thank you so much for your kind feedback 🌸
We’re glad to hear that our content was helpful for you. Our main goal is to deliver useful and satisfying information.
Hasil Keluaran Sydney Lotto Terbaru
18 October 2025Hi it’s me, I am also visiting this web site on a regular basis, this site is actually fastidious
and the visitors are really sharing good thoughts.
ALis
11 November 2025Thank you so much for your kind feedback 🌸
We’re glad to hear that our content was helpful for you. Our main goal is to deliver useful and satisfying information.
Keluaran Togel SGP
19 October 2025Very good information. Lucky me I discovered your website by chance (stumbleupon).
I have saved as a favorite for later!
ALis
11 November 2025Thanks a lot for your encouraging words 🙏
Your satisfaction is our greatest motivation, and we’ll keep working to provide fresh and valuable conten
Live HK 6D Tercepat
19 October 2025Hi there, I want to subscribe for this weblog to obtain most recent updates, therefore where can i do it
please assist.
ALis
11 November 2025A new article is posted on the site every week. You can view it from the link below.
https://www.wilivm.com/blog/category/training/
Pencari Angka Asli
20 October 2025You should take part in a contest for one of the finest sites
online. I will highly recommend this web site!
ALis
11 November 2025Your satisfaction with the content on the site is our main goal.
Panduan Terpercaya
21 October 2025Very good site you have here but I was curious if you
knew of any user discussion forums that cover the same topics discussed
in this article? I’d really love to be a part of online community where I can get feedback from other experienced
individuals that share the same interest. If you
have any recommendations, please let me know. Appreciate
it!
ALis
11 November 2025Your satisfaction with the content on the site is our main goal.
Red Zone Togel Community
21 October 2025Wonderful article! That is the kind of information that are meant to be shared around the
web. Disgrace on the search engines for no longer positioning this submit higher!
Come on over and seek advice from my web site . Thank you =)
ALis
11 November 2025Your satisfaction with the content on the site is our main goal.
affordable custom software
21 October 2025Very helpful breakdown of why bespoke software is becoming essential today
ALis
11 November 2025Your satisfaction with the content on the site is our main goal.
xem ngay phim sex mới
22 October 2025I don’t even know how I ended up here, but I thought this post was great.
I don’t know who you are but definitely you are going to a famous blogger if
you aren’t already 😉 Cheers!
ALis
11 November 2025Your satisfaction with the content on the site is our main goal.
Menyajikan Hasil Keluaran Togel Singapore Dengan Kecepatan Terbaik
24 October 2025Awesome! Its really amazing paragraph, I have got much clear idea about from this paragraph.
ALis
11 November 2025You’re Welcome, Your satisfaction with the content on the site is our main goal.
Paito Taiwan Terbaru
24 October 2025It’s really a nice and useful piece of info. I’m glad that you shared this helpful information with us.
Please stay us informed like this. Thanks for sharing.
ALis
11 November 2025Your satisfaction with the content on the site is our main goal.
Singapura Terbaru
25 October 2025Wonderful website. Plenty of useful information here.
I am sending it to some buddies ans additionally sharing in delicious.
And of course, thank you to your effort!
ALis
11 November 2025Thank You , Your satisfaction with the content on the site is our main goal.
Update Keluaran Togel Paito Warna Hari Ini
25 October 2025Hey there! I’ve been reading your weblog for a long time now and finally got the
courage to go ahead and give you a shout out from
Lubbock Texas! Just wanted to say keep up the great job!
ALis
11 November 2025Your satisfaction with the content on the site is our main goal.
Keluaran Nomor Togel
26 October 2025My brother recommended I might like this blog. He was entirely
right. This post truly made my day. You can not imagine just how much time I had spent for this info!
Thanks!
ALis
11 November 2025Your satisfaction with the content on the site is our main goal.
Mostbet-casino.Mystrikingly.Com
29 October 2025Wow, fantastic weblog layout! How lengthy have you bren running a blog for?
yyou make running a blog glance easy. The whole look of
your site is excellent, let alone the content!
ALis
11 November 2025Your satisfaction with the content on the site is our main goal.
Syair Togel Hari Ini
30 October 2025Fantastic goods from you, man. I’ve understand your stuff
previous to and you’re just extremely wonderful. I actually like
what you have acquired here, certainly like what you’re stating and the way in which you say it.
You make it entertaining and you still take care of to keep it smart.
I can’t wait to read much more from you. This is actually a wonderful site.
ALis
11 November 2025Your satisfaction with the content on the site is our main goal.
کسب درآمد تضمینی
31 October 2025Quality content is the key to be a focus for the viewers to go
to see the web site, that’s what this web page is
providing.
ALis
11 November 2025Your satisfaction with the content on the site is our main goal.
castrocvv
31 October 2025After looking into a number of the blog posts on your web page, I really appreciate your technique of blogging.
I saved as a favorite it to my bookmark website list and will
be checking back in the near future. Please visit my website as well and let me know how you
feel.
ALis
11 November 2025Your satisfaction with the content on the site is our main goal.
cheap backlinks generator for free
31 October 2025I blog frequently aand I genuinely thank you for your information. This great article has truly peaked my interest.
Iam going to bookmark your website and keep
checking for new information about once a week.
I subscribed to your RSS feed as well.
ALis
11 November 2025Your satisfaction with the content on the site is our main goal.
Data Togel
31 October 2025Attractive component of content. I just stumbled upon your website
and in accession capital to assert that I acquire in fact loved account your
weblog posts. Anyway I will be subscribing for your
feeds or even I achievement you access consistently fast.
ALis
11 November 2025Your satisfaction with the content on the site is our main goal.
Welcome to Hongkongpools
4 November 2025I used to be able to find good advice from your articles.
ALis
11 November 2025Your satisfaction with the content on the site is our main goal.
Live Draw Hongkongpools
7 November 2025I’ve read a few good stuff here. Definitely value bookmarking for revisiting.
I surprise how a lot effort you place to create such
a fantastic informative web site.
ALis
11 November 2025Your satisfaction with the content on the site is our main goal.
Bypass Blokir Internet Positif
11 November 2025Wow, superb weblog structure! How lengthy have you been running a blog for?
you make blogging look easy. The entire glance of your web site is great, as neatly as the content!
ALis
11 November 2025Your satisfaction with the content on the site is our main goal.