Installing FTP in Windows Server
Are you looking to secure your applications and safeguard information exchange between systems on Windows Server 2019? OpenSSL is your go-to open-source solution, offering a suite of cryptographic protocols for robust security. This toolkit, maintained by a global network of dedicated volunteers, supports both Secure Sockets Layer (SSL versions 2 and 3) and Transport Layer Security (TLS version 1) protocols, ensuring top-tier encryption. Follow this straightforward guide to get OpenSSL up and running on your Windows Server 2019. After downloading, initiate the setup by either double-clicking the `.exe` file or launching it via PowerShell with the following command:
 Navigating through the installation of OpenSSL on your Windows Server 2019 is straightforward. Begin by selecting the destination folder for OpenSSL installation during the setup process.Follow up by choosing a directory for the Application shortcut, ensuring easy access to OpenSSL from anywhere on your system.
 The setup wizard will then prompt you to select any additional tasks you wish to perform during the installation. This could include creating desktop shortcuts or registering OpenSSL as a system service.Proceed by clicking “Install” to initiate the OpenSSL installation on your Windows Server 2019. This process may take a few minutes, so a little patience is required.
Once the installation wraps up, finalize it by clicking “Finish.” This step concludes the successful setup of OpenSSL on your server.
The setup wizard will then prompt you to select any additional tasks you wish to perform during the installation. This could include creating desktop shortcuts or registering OpenSSL as a system service.Proceed by clicking “Install” to initiate the OpenSSL installation on your Windows Server 2019. This process may take a few minutes, so a little patience is required.
Once the installation wraps up, finalize it by clicking “Finish.” This step concludes the successful setup of OpenSSL on your server. To integrate OpenSSL seamlessly into your system’s operations, add C:\OpenSSL-Win64 to your Windows environment PATH using the following PowerShell commands:
 For those operating on a 32-bit system, simply substitute OpenSSL-Win64 with OpenSSL-Win32 in the path to match your system architecture.
What is OpenSSL?
OpenSSL is a powerful and widely used open-source software library that provides a robust set of cryptographic tools for securing communications over computer networks. Primarily, it implements the SSL (Secure Sockets Layer) and TLS (Transport Layer Security) protocols, offering encryption and security features to facilitate secure Internet communications and transactions. Besides its core functionalities of encrypting sessions and verifying the identity of servers and clients, OpenSSL also includes utilities for creating digital certificates, keys, and other cryptographic operations. It is maintained by a global community of volunteers, ensuring it remains up-to-date with the latest security standards and encryption techniques.Simple Steps to Install OpenSSL on Your Windows Server 2019
Dive into securing your server by downloading OpenSSL, a critical tool for cryptographic security on Windows Server 2019. Start by visiting the OpenSSL download page to find the version that aligns with your system’s architecture. I go for the 64-bit variant. You’ll see options for both a lightweight version and the full package.For those who prefer using the command line, the `curl.exe` command offers a straightforward way to download OpenSSL directly:curl.exe -L -o Win64OpenSSL.exe https://slproweb.com/download/Win64OpenSSL-3_0_0.exeBelow is an illustration of the process.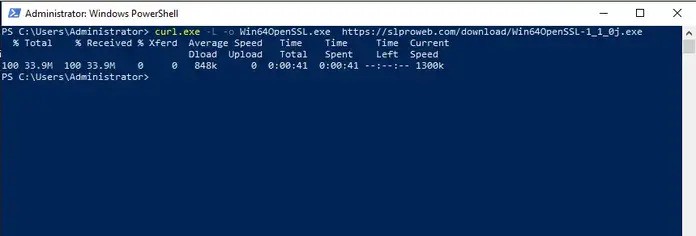 After downloading, initiate the setup by either double-clicking the `.exe` file or launching it via PowerShell with the following command:
.\Win64OpenSSL.exeProceed by agreeing to the Software License Agreement and clicking “Next” to continue with the installation.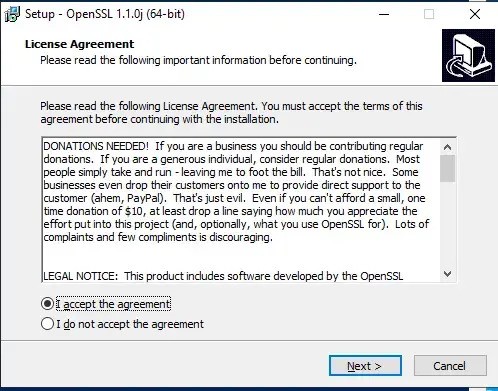 Navigating through the installation of OpenSSL on your Windows Server 2019 is straightforward. Begin by selecting the destination folder for OpenSSL installation during the setup process.Follow up by choosing a directory for the Application shortcut, ensuring easy access to OpenSSL from anywhere on your system.
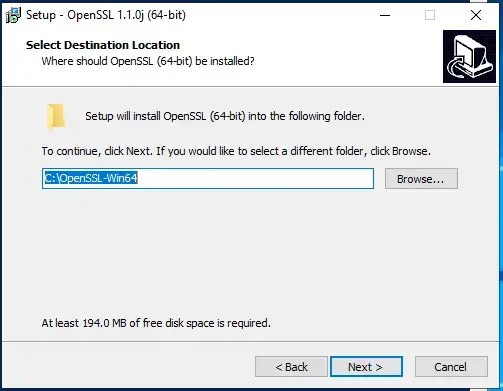 The setup wizard will then prompt you to select any additional tasks you wish to perform during the installation. This could include creating desktop shortcuts or registering OpenSSL as a system service.Proceed by clicking “Install” to initiate the OpenSSL installation on your Windows Server 2019. This process may take a few minutes, so a little patience is required.
Once the installation wraps up, finalize it by clicking “Finish.” This step concludes the successful setup of OpenSSL on your server.
The setup wizard will then prompt you to select any additional tasks you wish to perform during the installation. This could include creating desktop shortcuts or registering OpenSSL as a system service.Proceed by clicking “Install” to initiate the OpenSSL installation on your Windows Server 2019. This process may take a few minutes, so a little patience is required.
Once the installation wraps up, finalize it by clicking “Finish.” This step concludes the successful setup of OpenSSL on your server.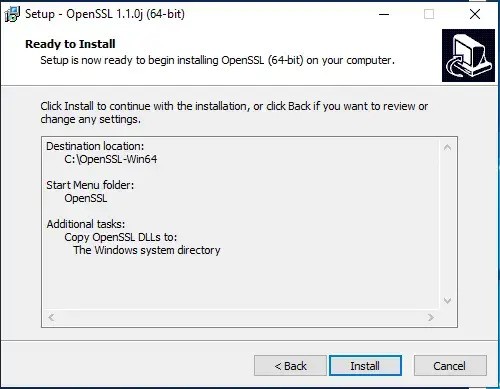 To integrate OpenSSL seamlessly into your system’s operations, add C:\OpenSSL-Win64 to your Windows environment PATH using the following PowerShell commands:
$userenv = [System.Environment]::GetEnvironmentVariable("Path", "User")[System.Environment]::SetEnvironmentVariable("PATH", $userenv + ";C:\OpenSSL-Win64\bin", "User")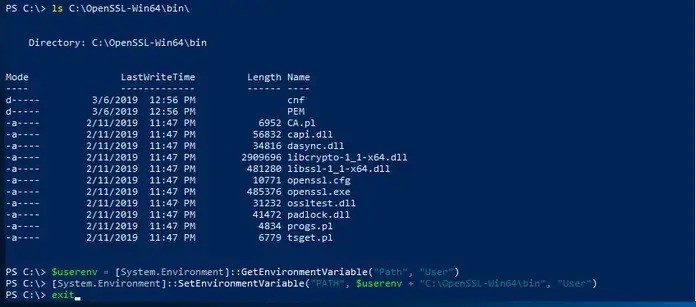 For those operating on a 32-bit system, simply substitute OpenSSL-Win64 with OpenSSL-Win32 in the path to match your system architecture.
Creating Certificates with OpenSSL on Windows Server 2019
Having successfully installed OpenSSL on Windows Server 2019, you’re now equipped to generate your own certificates. Begin this process by setting the OPENSSL_CONF environment variable:set OPENSSL_CONF=C:\OpenSSL-Win64\bin\openssl.cfgRemember, if you’re working on a 32-bit system, you should adjust the path to use OpenSSL-Win32 instead. Next, let’s proceed by generating a test SSL certificate to ensure everything is set up correctly:openssl.exe req -new -nodes -keyout server.key -out server.csr -newkey rsa:2048Feel free to explore more detailed guides and articles on our website for further reading and assistance.Conclusion
Securing your Windows Server 2019 with OpenSSL is made easy with this guide, designed to enhance application security and secure system communications. OpenSSL, a widely embraced open-source toolkit, offers a comprehensive set of cryptographic protocols, including SSL and TLS, for robust encryption and secure data exchange. This guide simplifies the installation process, from downloading the correct version of OpenSSL to configuring your system to integrate OpenSSL seamlessly. It also includes steps for generating your certificates and ensuring your server communications are encrypted and secure. Aimed at both beginners and experienced users, this tutorial provides all the necessary instructions to successfully implement OpenSSL, safeguarding your digital environment against vulnerabilities and threats.
In today’s digital ecosystem, the ability to share files securely and efficiently is paramount for businesses of all sizes. The File Transfer Protocol (FTP) serves as a cornerstone for such activities, offering a robust framework for transferring files between a client and server over a network. This guide is crafted to demystify the process of setting up an FTP server on Windows Server, ensuring that you harness the full potential of FTP for your organizational needs.

 Opting for the Server Role


 Allow some time for the installation process to complete, ensuring that all components are properly set up.


Mastering File Exchanges with FTP Technology
In the digital realm, the File Transfer Protocol (FTP) stands as a foundational method for transferring files across various computer systems via the Internet. This technology allows for seamless uploading and downloading of files, facilitating a straightforward process for sharing data remotely. Essentially, an FTP server functions as a dedicated computer system that hosts files for retrieval or deposit using the FTP protocol, serving as a pivotal element for those needing to distribute files efficiently and securely online.The backbone of FTP technology is the FTP server, a vital entity within the FTP ecosystem that plays a significant role in the movement of files across the internet. This server acts as a repository, where files are initially uploaded from personal computing devices or external storage media. These files are then made accessible to remote users, who can download them through an FTP client application. For effective operation, an FTP server relies on the TCP/IP network protocol, necessitating a stable and continuous internet connection. It operates in conjunction with one or more FTP client programs, maintaining its availability around the clock to ensure uninterrupted access for users at any time. This 24/7 operation model guarantees that connections can be established whenever needed, enabling consistent and reliable file-sharing capabilities for users worldwide.Setting Up an FTP Server
To begin with, the initial step involves integrating FTP server functionalities via the server manager. Here’s a detailed guide to incorporate FTP capabilities:Accessing Windows Server
Start by accessing your Windows server. Use the Windows key to search for “Server Manager.” Once found, click on it to launch the Server Manager as depicted in the following instructions: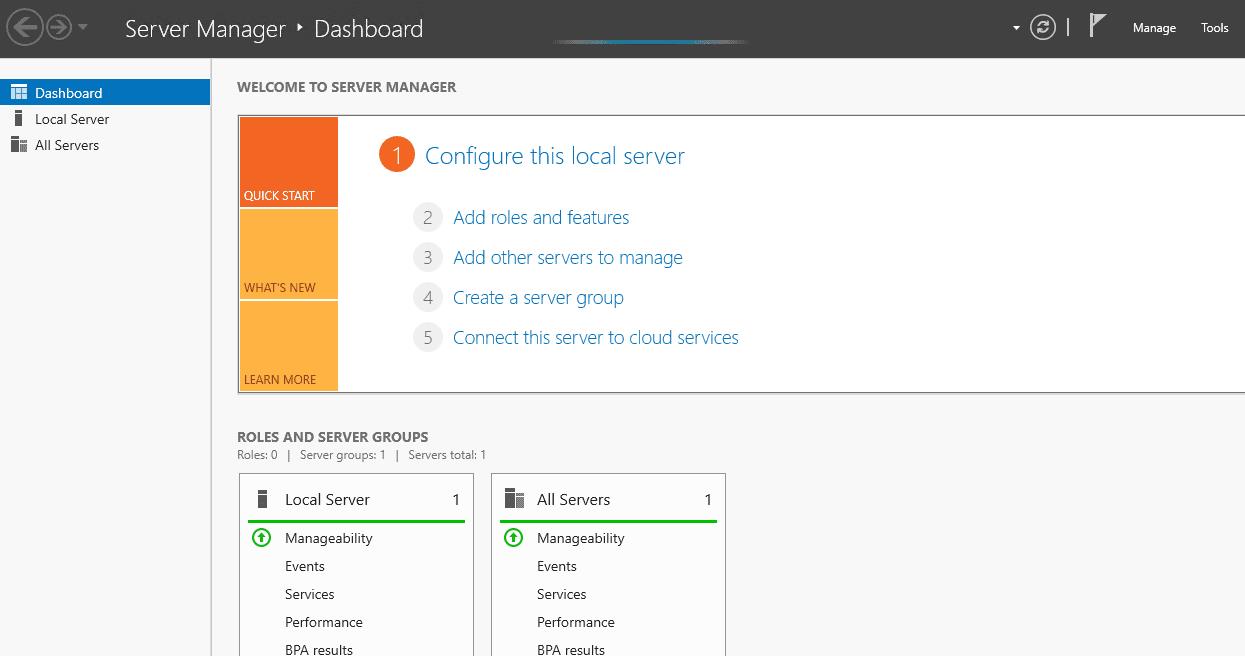
Proceeding with FTP Server Setup
Look for the “Add Roles and Features Wizard” and click on it to proceed. This will bring up the initial screen of the wizard, titled “Before you begin”: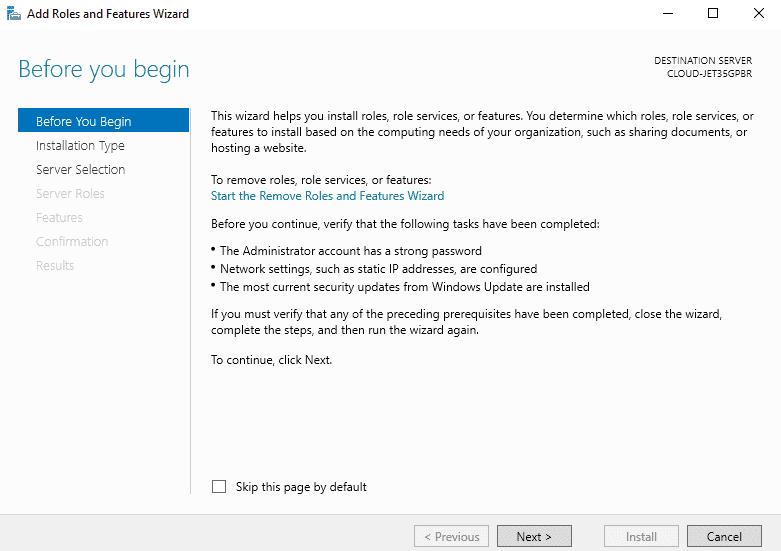
Initiating Role and Feature Addition
Advance the process by selecting “Add Roles and Features”. This action will navigate you to the “Choose Installation Type” phaseDeciding on the Installation Approach
Press the “Next” button to move forward. You will be presented with the “Select Installation Type” window: Opting for the Server Role
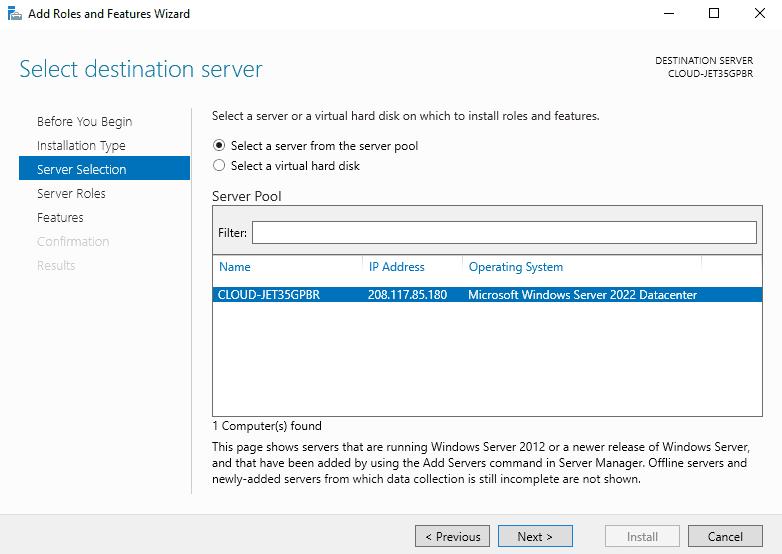
- Choose the “role-based or feature-based installation” option and click on the “Next” button. Following this, you will arrive at the screen where you can select your destination server from the server pool:
Configuring IIS with FTP Capabilities
For those setting up or already running Internet Information Services (IIS), activating the FTP Server feature is a critical step. Within your Server Manager’s workflow, when you reach the point of choosing the “Select Server Role (IIS),” it’s essential to add FTP server capabilities under the “Web Server (IIS)” category. By default, this feature is not activated.Commence by selecting “Select a server from the server pool” and proceed by clicking the “Next” button. This action will lead you to the “Select server roles” interface:
Determining Server Roles
Navigate through the list until you find the “Web Server Role (IIS)” option, select it, and then continue by pressing the “Next” button. You will be directed to the “Select Features” page: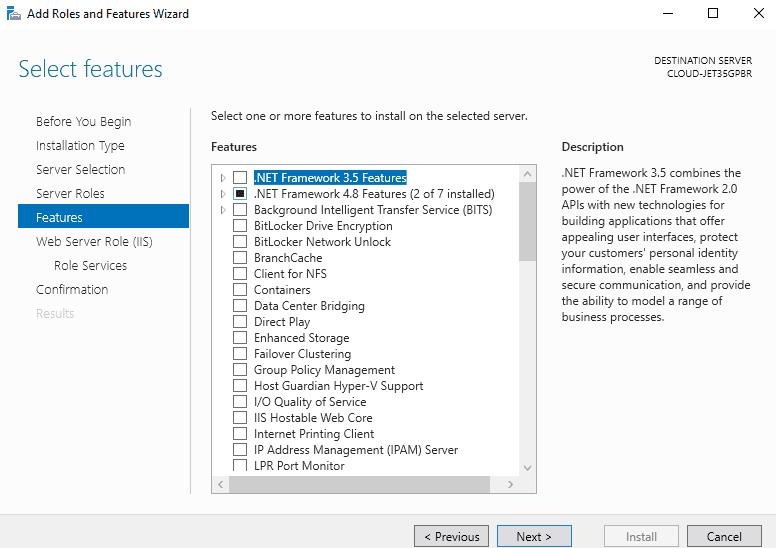
Incorporating Additional Features
Advancing further, click the “Next” button to reach the “Select Role Services” page: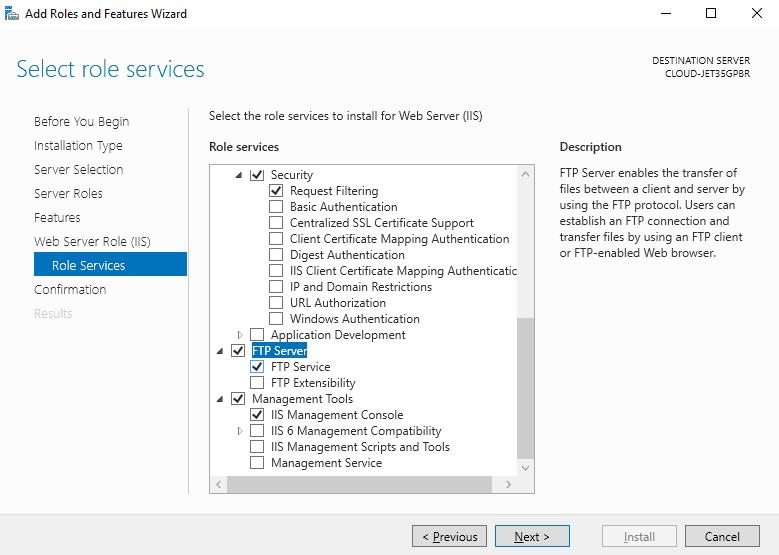
Integrating FTP Services with IIS
Here, you’ll need to choose the “FTP Server” option and then click on the “Next” button. Following this selection, you will be presented with a confirmation screen: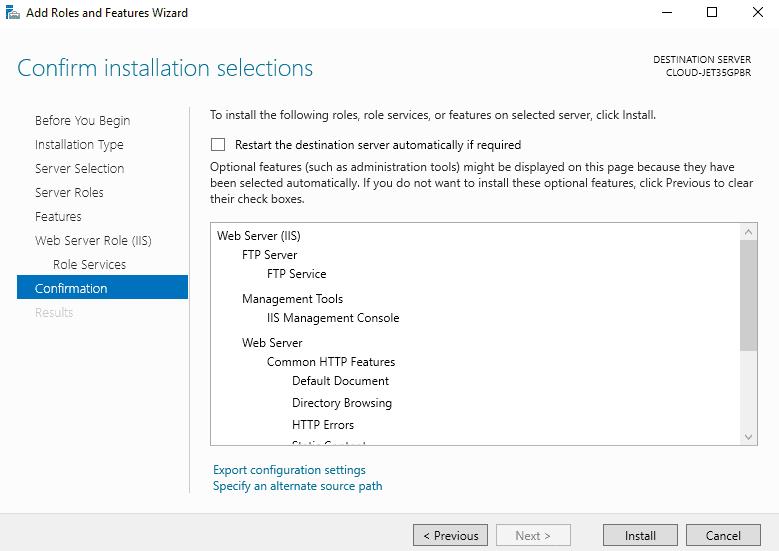
Completing the FTP Server Installation
Carefully review your configurations one last time, and then initiate the installation by clicking on the “Install” button. This will display the installation progress window: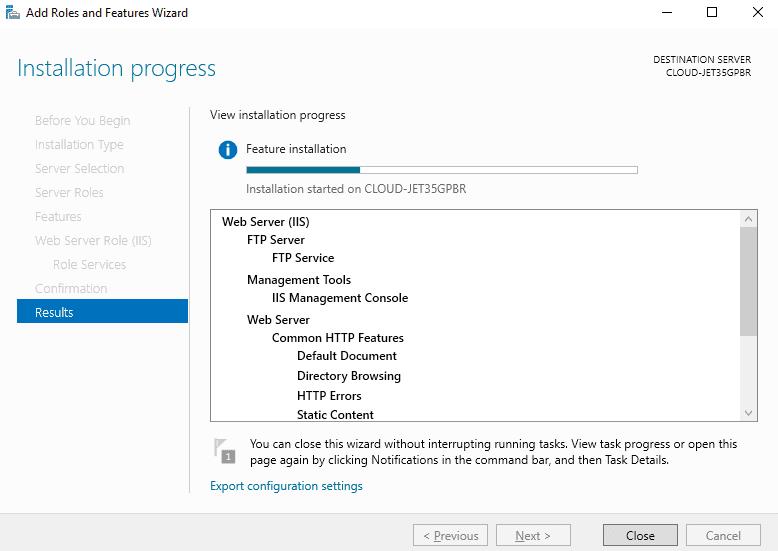 Allow some time for the installation process to complete, ensuring that all components are properly set up.
Establishing FTP Access: User Creation
The subsequent step involves setting up an individual user account for accessing the FTP server. This account will be used for connections to the FTP server.Begin by launching the Server Manager, navigate to Tools, and select Computer Management. You will be greeted with the dashboard as shown below: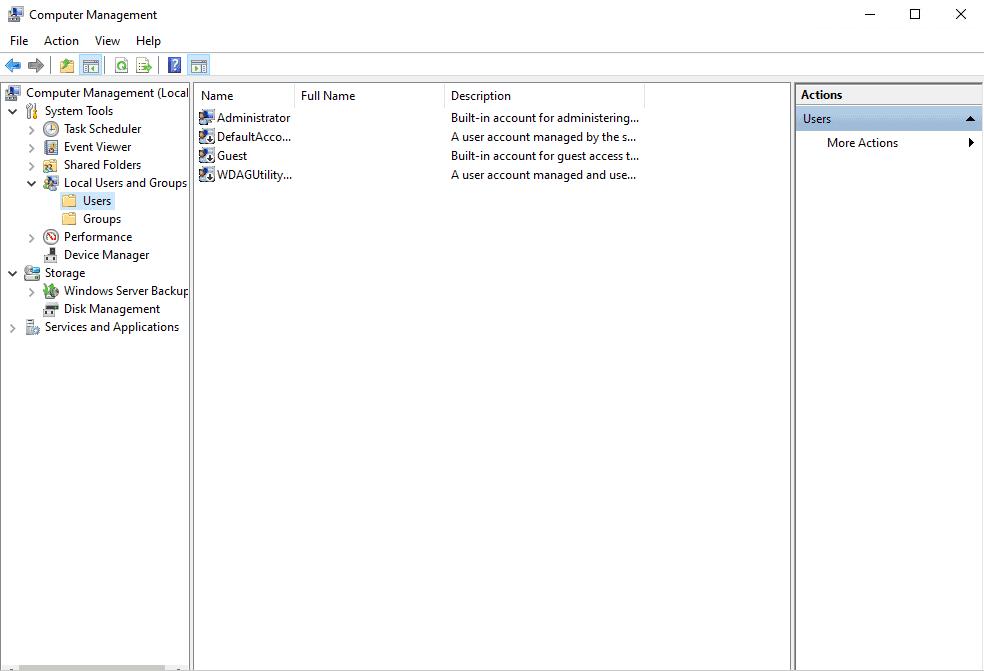
Navigating to the User Management Interface
Proceed by selecting Local Users and Groups > Users from the left pane. Then, right-click on Users and choose “New User” to open the user creation dialog: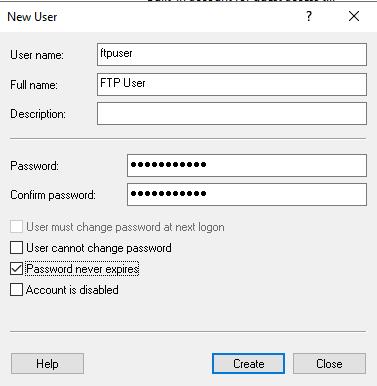
Initiating New FTP User Creation
Fill in the desired username and password, then click on the “Create” button. Your new user will now appear in the user list:The forthcoming step in configuring your FTP Server using IIS on Windows Server 2022 involves setting up the FTP site and preparing it for user connections and file transfers.Establishing Your FTP Site
In this section, we’re going to walk through the process of establishing an FTP site, including specifying the location for your FTP directory using the IIS manager. Here’s how you can set up your FTP site:Begin by opening the Server Manager, navigate through Tools, and select the Internet Information Services (IIS) Manager. You’ll be presented with the IIS dashboard: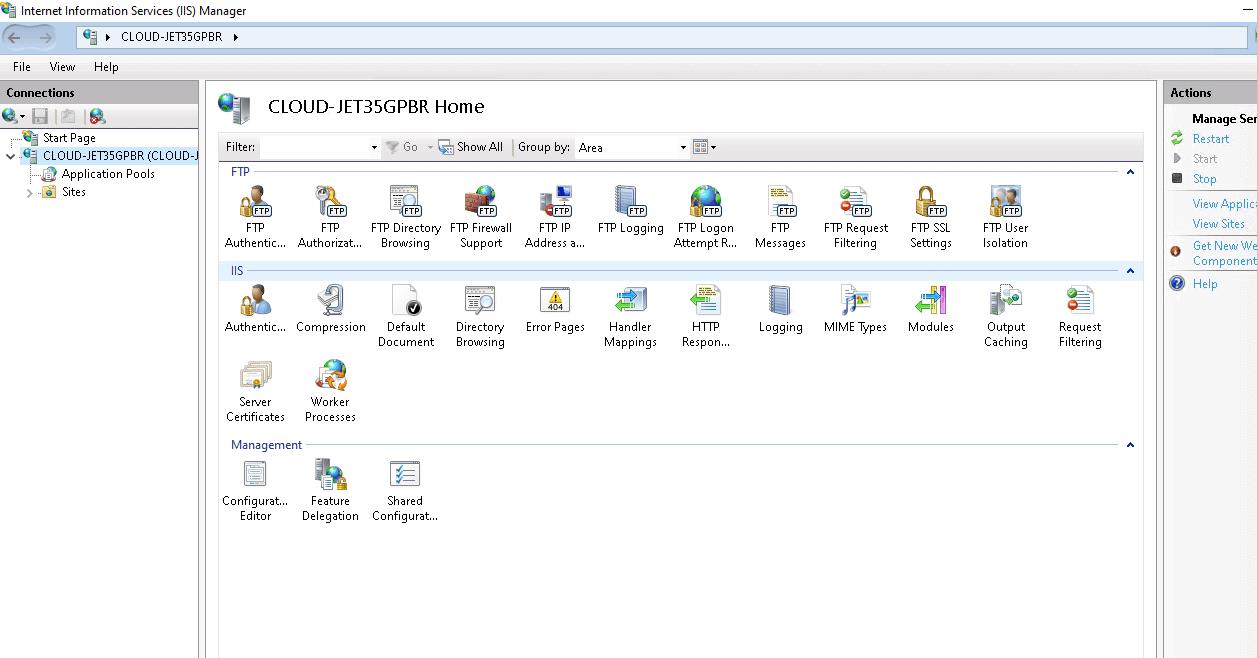
Accessing the IIS Dashboard for FTP Setup
Navigate to the Sites directory, right-click, and choose the option to Add an FTP Site. This action will bring up the configuration settings for your new FTP site: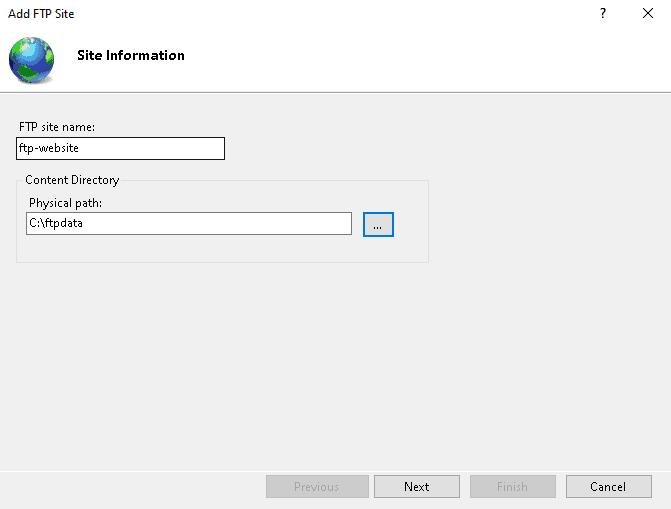
Setting Up FTP Site Parameters
At this point, you’ll need to name your FTP site and define the directory path where your FTP files will reside. After entering these details, click the “Next” button to proceed to setting up your connection preferences: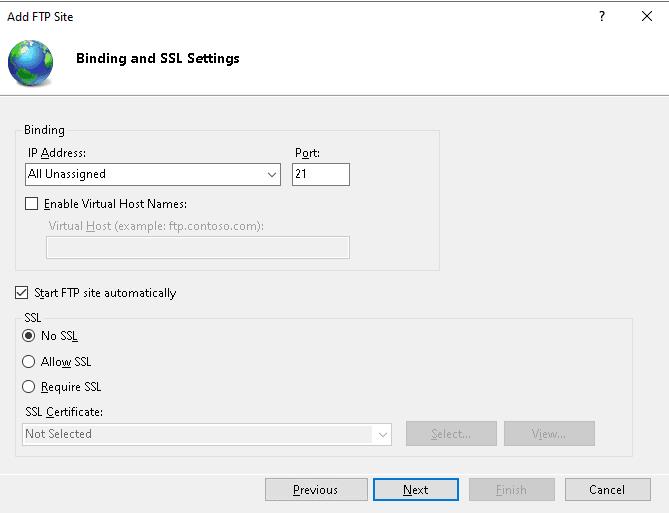
Configuring Connection Preferences
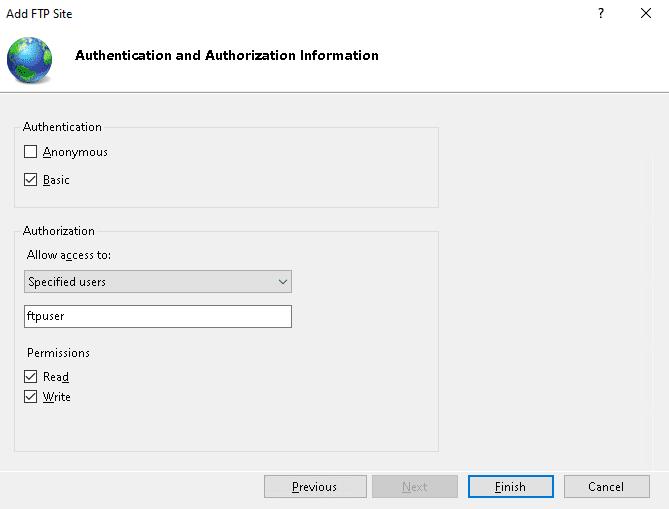
The next step involves specifying your server’s IP address, the port for FTP connections, and your SSL preferences. Once these are set, click on the “Next” button to move on to authentication settings: