Configuring a Static IP in CentOS 7 for Enhanced Network Stability
A reliable network connection is essential for smooth communication and data transmission in today’s networked environment. Making use of CentOS 7’s static IP address configuration is one technique to guarantee constant network access. You may improve network stability by following the thorough directions in this step-by-step tutorial, which will take you through the whole procedure.
Contents
- Accessing the Terminal in Step 1
- Step 2: Authenticating as Root
- Identifying the Network Interface in Step 3
- Editing Network Configuration Files in Step 4
- Modifying the Network Configuration in Step 5
- Step 6: Finishing and Saving
- Step 7: Start up the network service again
- Verifying Network Configuration in Step 8
Accessing the Terminal in Step 1
Launch CentOS 7’s Terminal to get started. You may accomplish this by choosing “Terminal” from the “System Tools” section of the “Applications” menu after clicking on it.
Enhance stability. Buy Linux VPS. Configuring Static IP in CentOS 7. Get yours now!
Step 2: Authenticating as Root
You’ll need root access to set up a static IP. To log in as root, type the following command into the Terminal:
sudo su -
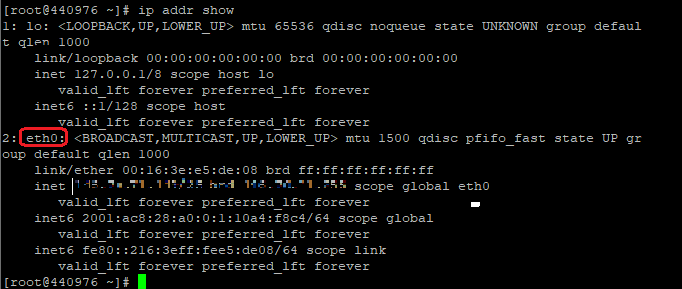
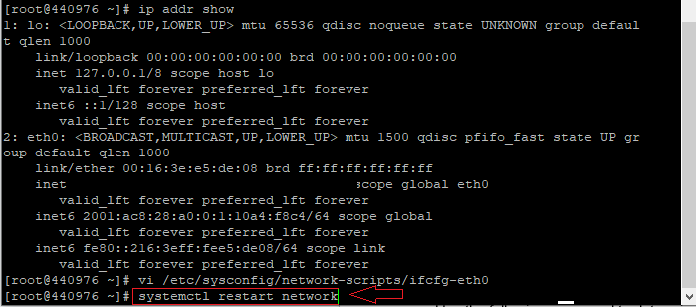
Identifying the Network Interface in Step 3
The network interface name connected to your CentOS 7 machine must then be identified. To get a list of accessible network interfaces, use the command below:
ip addr show
Find the interface name for your network connection, such as eth0, eth1, or ens33.
Editing Network Configuration Files in Step 4
Open the network configuration file for the specified network interface in your chosen text editor (such as nano or vi). For instance, if your interface is called “eth0,” run the command:
vi /etc/sysconfig/network-scripts/ifcfg-eth0
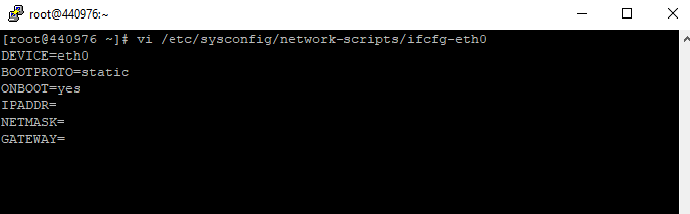
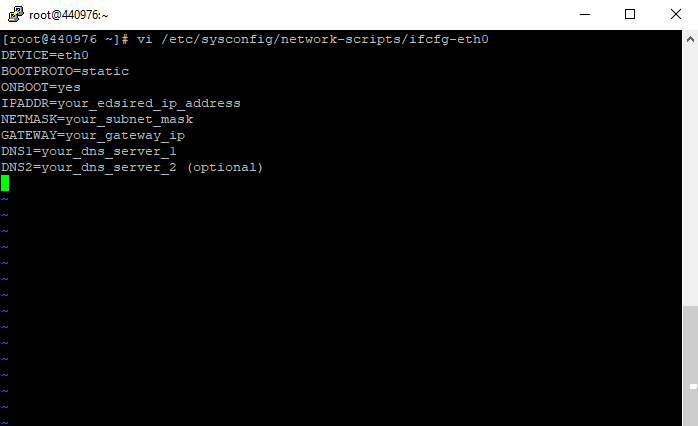
Modifying the Network Configuration in Step 5
Find the line containing “BOOTPROTO” in the network configuration file, then change “dhcp” to “static” on that line. To select your preferred IP address, subnet mask, gateway, and DNS servers, add the lines below:
IPADDR=your_edsired_ip_address

NETMASK=your_subnet_mask

GATEWAY=your_gateway_ip

DNS1=your_dns_server_1

DNS2=your_dns_server_2 (optional)
Step 6: Finishing and Saving
Exit the text editor after saving your modifications to the network configuration file.
Step 7: Start up the network service again
Restart the network service by running the following command to apply the modified network configuration:
systemctl restart network
Verifying Network Configuration in Step 8
Use the following command to determine if the static IP setup was properly implemented:
ip addr show
The modified IP address linked to your network interface should now be visible.
Conclusion: By carefully following this detailed how-to, you have successfully set up a static IP in CentOS 7. This guarantees a steady network connection, enabling reliable communication and data transmission. Benefit from improved network stability and continuous connection.
Keep in mind that setting up a static IP is a useful skill for both system administrators and network hobbyists.
FAQ
Can I use any IP address for the static configuration?
While you have flexibility in choosing an IP address, it is important to ensure that the IP falls within your network's subnet range. Consult your network administrator or refer to your network documentation to determine the appropriate IP address to use for your static configuration.
What if I make a mistake while modifying the network configuration file?
If you encounter issues or make a mistake while editing the network configuration file, you can revert to the previous configuration by restoring the file from a backup. Alternatively, you can correct the errors by re-editing the file and saving the changes.
Do I need to restart my CentOS 7 system after applying the static IP configuration?
In most cases, restarting the system is not necessary after configuring a static IP. However, you will need to restart the network service by executing the command "systemctl restart network" for the changes to take effect.
Can I configure multiple static IP addresses on CentOS 7?
Yes, CentOS 7 allows you to configure multiple static IP addresses on different network interfaces. Simply repeat the steps outlined in the guide for each network interface, ensuring that the IP addresses, subnet masks, gateways, and DNS servers are set correctly for each interface.
Remember, if you encounter any difficulties or have specific network requirements, it is always recommended to consult with a network administrator or refer to CentOS 7 documentation for further assistance.

gralion torile
20 July 2023I have read some good stuff here. Certainly worth bookmarking for revisiting. I surprise how much effort you put to make such a magnificent informative website.