
A Comprehensive Guide to Installing and Configuring Nginx on CentOS 7
The need for high-performance web servers is more urgent than ever as the digital revolution intensifies. Nginx is one such technology that is slowly gaining popularity in the computer world. Nginx, which is pronounced “engine X,” is a reliable HTTP web server that provides a productive substitute for the more conventional Apache server. This article offers a detailed walkthrough for installing and setting up Nginx on CentOS 7, a popular distribution package used in the hosting sector.

Contents
Understanding Nginx
It’s important to comprehend what Nginx is and why it’s growing in popularity among developers and enterprises before beginning the installation procedure. Since it was introduced for use in production in 2004, Nginx has won praise for its event-driven architecture, which makes it more resource-friendly than competitors with process-driven architectures like Apache. By using less resources and a greater volume of concurrent connections, this functionality enables Nginx to increase server responsiveness.
Nginx performs the roles of a reverse proxy, load balancer, and conventional mail server in addition to acting as an HTTP web server. Because of its adaptability, Nginx is a solid option for many web-related jobs.
When to Choose Nginx Over Apache?
The exact needs of your project will play a big role in your decision between Nginx and Apache. Nginx can be a better option if you’re working on a single, high-traffic website and are familiar with sophisticated settings. It also works well if you want to use WSGI over CGI/FastCGI or other more recent web development frameworks.
On the other hand, if you’re planning to host multiple websites with different configurations per site, Apache’s ease of use and well-documented nature make it a more suitable choice.
Preparing for the Installation
Make sure you have the following prerequisites before beginning the installation process:
- a self-managed CentOS 7 server or virtual machine
- a domain that your Nginx web server may connect to
- Having root or sudo access to run commands
- SELinux configured correctly
It’s also advised to have your preferred search engine open in a browser window when installing software so you can quickly obtain further details or troubleshooting.
Disabling Apache
There’s a good probability that Apache is already installed and operational on your CentOS 7 server. It’s preferable to disable Apache to prevent any possible issues with Nginx. To disable Apache, type the following command. Recall that any websites that are now hosted will be unavailable.
sudo service httpd stop
The following command is also used to prevent Apache from starting automatically when a server restarts.
sudo systemctl disable httpd
Installing Nginx
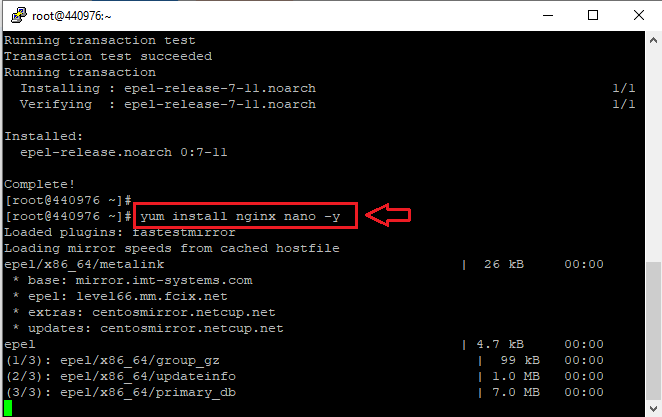
After Apache is disabled, you may go on to installing Nginx. The CentOS 7 EPEL repository should first be added by executing the command:
Yum install epel-release -y

Numerous open-source packages are available in this repository and may be installed using the Yum package manager.
Next, run the command to install Nginx:
yum install nginx nano -y
Starting and Managing Nginx
Nginx won’t launch on its own after installation. Use the following command to start it:
sudo systemctl start nginx
With the following command, you may determine its status:
sudo systemctl status nginx
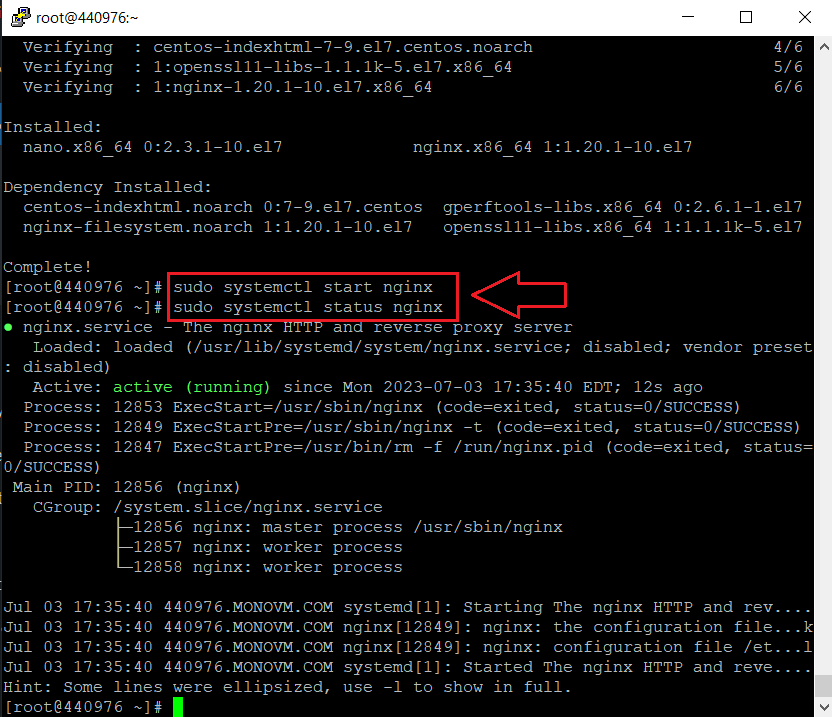
You ought to notice a green text that says “active (running)” in it. If not, Nginx may not have started correctly, in which case you would need to investigate the problem.
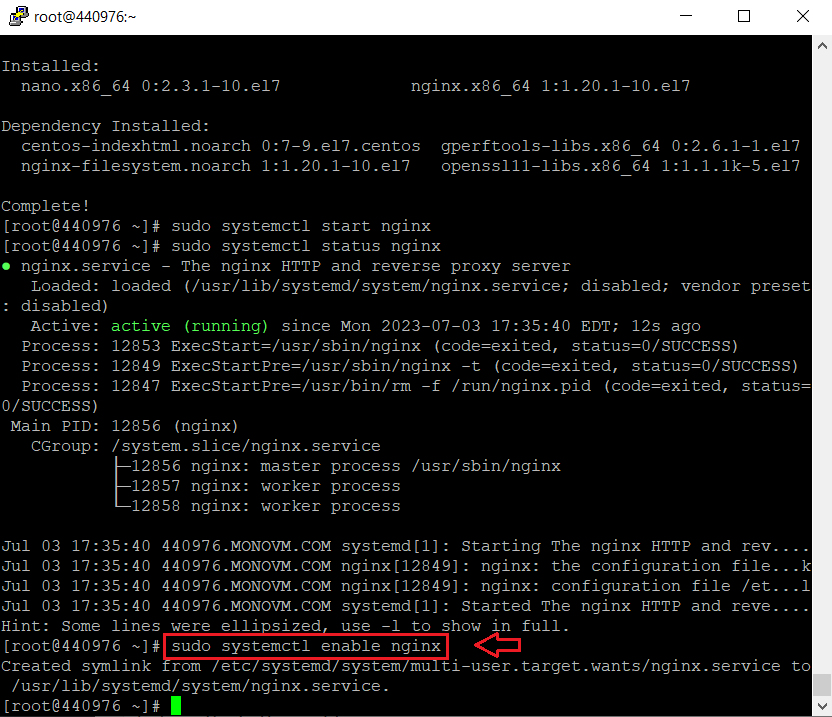
Additionally, run the following command to guarantee that Nginx begins immediately whenever the server restarts:
sudo systemctl enable nginx
Configuring Firewall to Allow Nginx Traffic
By default, CentOS 7’s built-in firewall is set to block Nginx traffic.As a result, you must adjust the firewall rules to allow incoming HTTP and HTTPS packets. The following commands will help you do this:
firewall-cmd –zone=public –permanent –add-service=http
firewall-cmd –zone=public –permanent –add-service=https
firewall-cmd --reload

You should see’success’ after running these instructions, meaning they were successfully run.
Verifying Nginx Installation
Visit the public IP address of your server to see whether Nginx is functioning properly. Visit http://server_IP or_domain_name/ in your web browser. The command “ip a” may be used to discover the public IP address of your server. The default Nginx welcome page must be visible.
Resolving Potential Errors
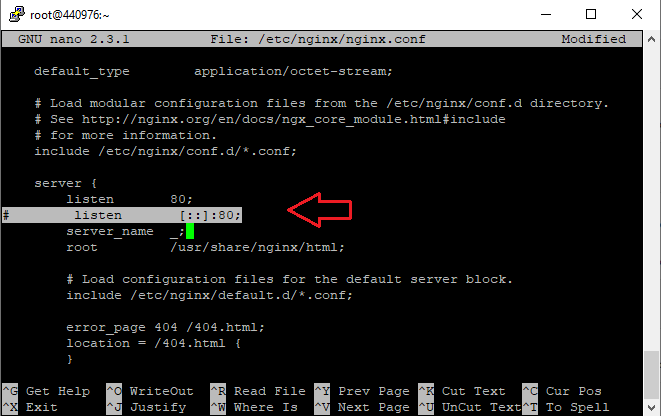
If you get a “test failed” error message for the nginx.conf file, your IP address may be the cause. Nginx listens to both IPv4 and IPv6 by default. The test will, however, fail if your server does not support IPv6. By making changes to the main configuration file, this may be resolved.
Use the following command to open the file:
nano /etc/nginx/nginx.conf
 In order to remove the comment from the line listen [::]:80 default_server;, add a ‘#’ to the line’s beginning. Use this command to reload the Nginx service and save the changes:
sudo systemctl restart nginx
The default Nginx test page should appear when you use your browser to go to your server’s IP address.
Understanding Nginx Configuration Files
Now that you have Nginx up and running, it’s important to know the location and purpose of various Nginx configuration files.
- /etc/nginx/nginx.conf: This is the main Nginx configuration file. It allows you to tweak global configurations and is broken down into contexts like events, HTTP, and server.
- /etc/nginx/conf.d: Additional server blocks can be added here by creating new configuration files with a .conf file extension. These files will be loaded each time Nginx starts.
- /usr/share/nginx/html: This is the default server document root directory, which contains web files.
You may now begin hosting dynamic websites and apps on your CentOS 7 server as Nginx has been successfully installed and configured. Mastering the art of setting Nginx on CentOS 7 is a vital skill in today’s world, whether you’re wanting to host a single high-traffic website or numerous sites with different setups.
Unleash the Power of CentOS 7! Learn to Install and Configure Nginx for Ultimate Web Performance. Get a Linux VPS Today!
conclusion
In conclusion, this instruction may be used to complete the simple process of installing and configuring Nginx on CentOS 7. Nginx is the best option for hosting websites and dealing with huge traffic loads because of its remarkable speed, scalability, and adaptability. You may successfully install Nginx on your CentOS 7 server by following the instructions in this article, and you can use its robust capabilities to improve your web hosting environment.
FAQs
How can I verify if Nginx is running on my CentOS 7 server?
You can use the command systemctl status nginx to check the status of the Nginx service. If it's running, you'll see a "active (running)" message along with other details.
Is it necessary to configure a firewall for Nginx?
Configuring a firewall is highly recommended to enhance the security of your Nginx installation. By allowing only necessary incoming connections, you can protect your server from unauthorized access and potential threats.
Can I host multiple websites on a single Nginx server?
Yes, you can host multiple websites on a single Nginx server by using virtual hosts. Each website can have its own configuration file, allowing you to separate and manage them independently.
How can I optimize Nginx performance?
To optimize Nginx performance, you can enable gzip compression, implement browser caching, fine-tune worker processes and connections, and utilize HTTP/2 for faster page loading. These optimizations can significantly improve the speed and efficiency of your web server.
