
Install and Configure DHCP Server on Windows Server 2019
In this easy-to-follow guide, you’ll discover how to Install and Configure DHCP Server on Windows Server 2019 to dynamically allocate IP addresses to the devices on your network.
The Dynamic Host Configuration Protocol (DHCP) is crucial for the smooth operation of both small and large networks. It simplifies network management by automatically providing IP addresses, along with essential network settings like subnet masks, default gateways, and DNS server details.
This service, along with Active Directory Domain Services (AD DS) and Domain Name Service (DNS), is fundamental to the infrastructure of networks running on Windows Server.
We’re going to explore how to implement and adjust the basic configurations of the DHCP service.
Keep in mind, that the instructions provided in this guide (Install and Configure DHCP Server) are based on Windows Server 2022. However, the setup process remains consistent for earlier versions, including Windows Server 2016 and 2019.
Install and Configure the DHCP Server
Step 1: Adding the DHCP Server Role
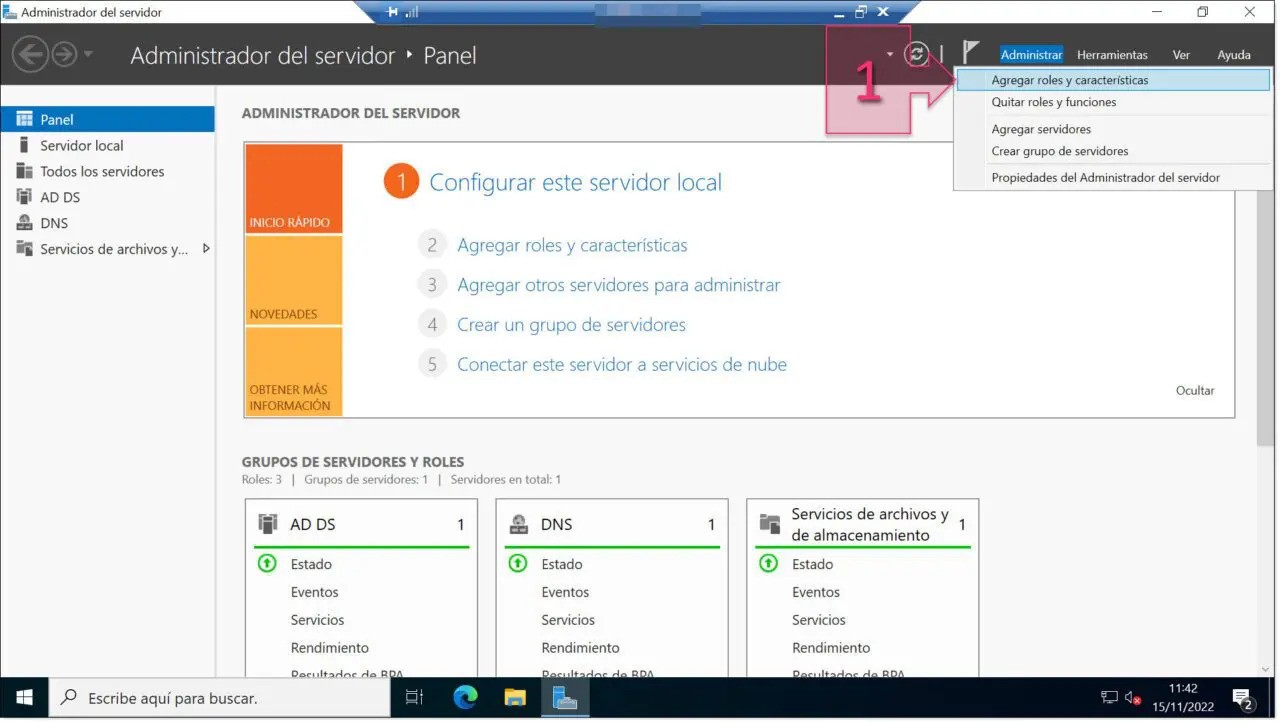
Begin by launching the Server Manager, then navigate to Manage and select the option to ‘Add roles and features’.
Upon initiating the Add Roles and Features Wizard, the first page you encounter will be the welcome screen.
Skipping this screen is an option, though it’s not advised. Foregoing the welcome doesn’t speed up the process, and having a starting point for the installation can be helpful.
This screen includes several suggestions and best practices that are beneficial to review before proceeding.
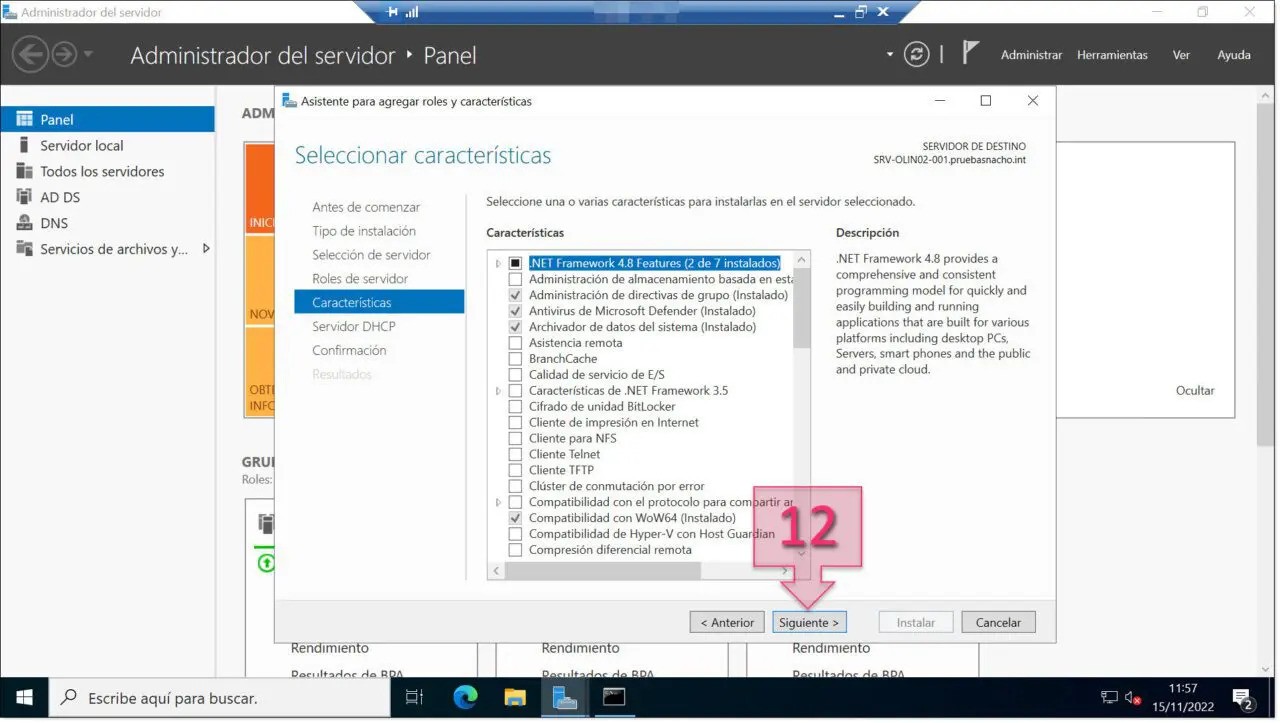
After reviewing the recommendations, proceed by clicking “Next”.

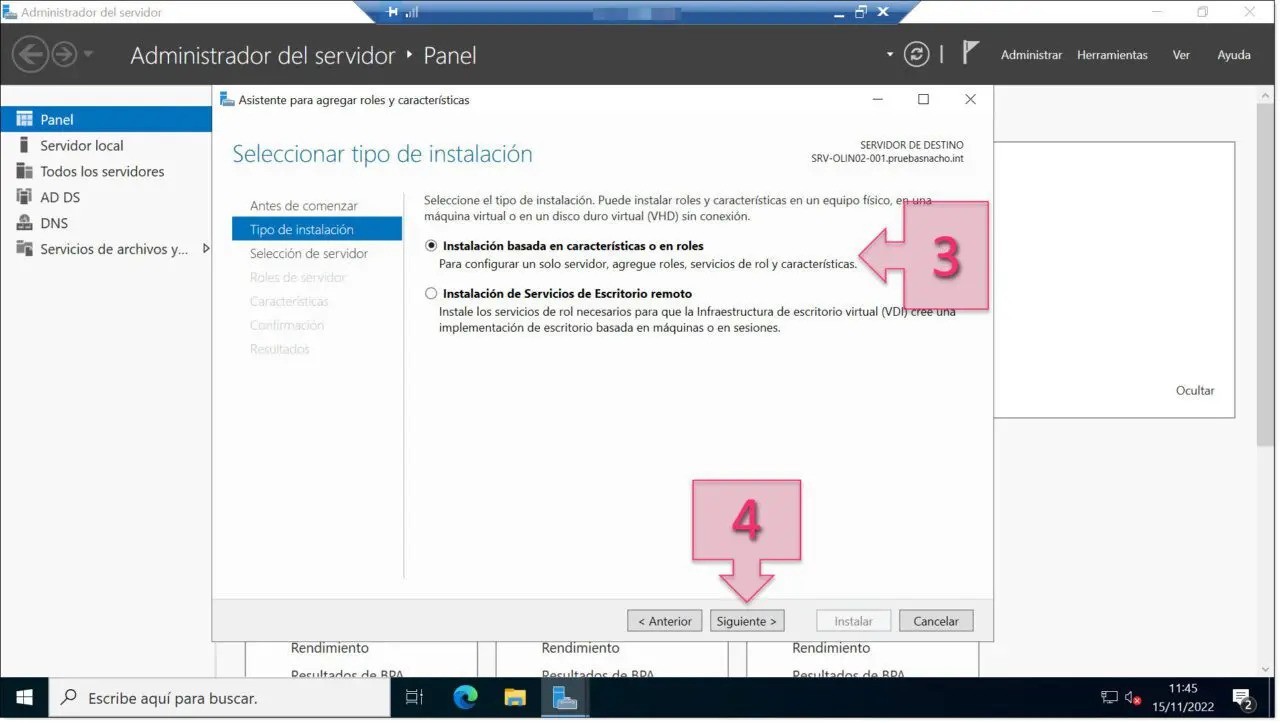
Now, you’ll be presented with two different installation choices:
- Role-based or feature-based installation: This is used for setting up a single server.
- Remote Desktop Services installation: Ideal for implementing a Virtual Desktop Infrastructure (VDI).
Opt for the first option and then proceed by selecting “Next”.
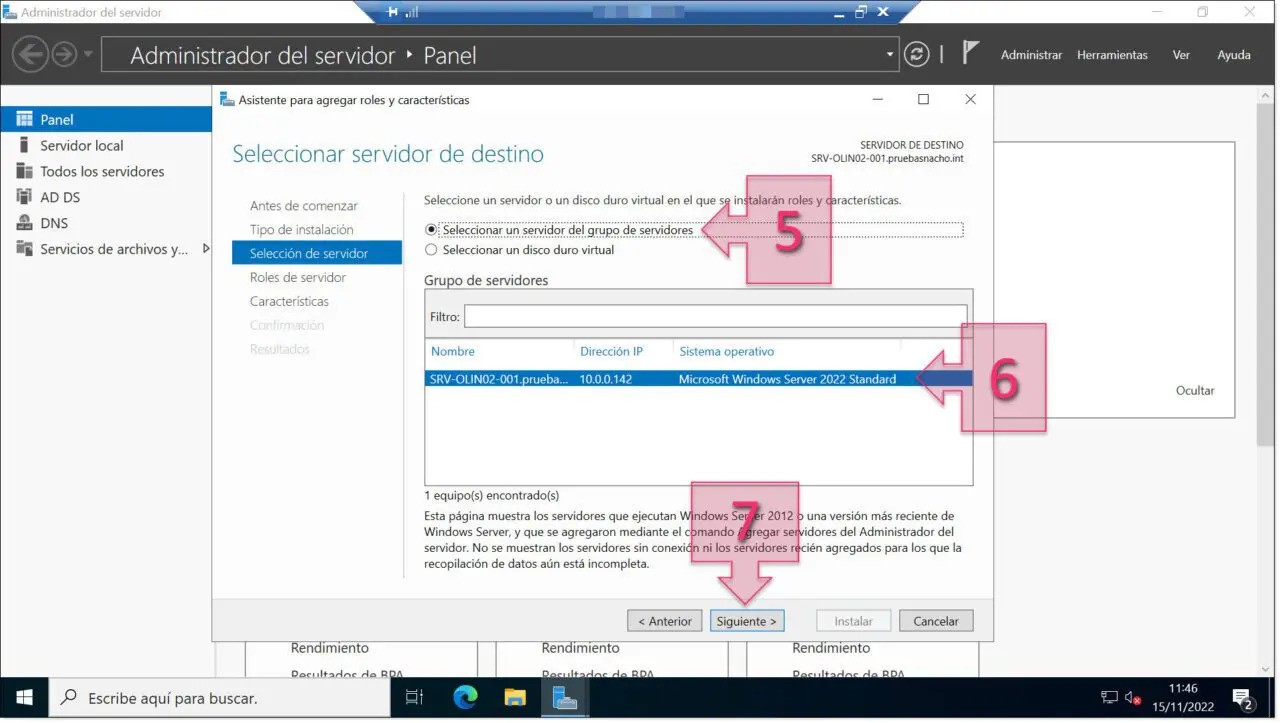
Next up, pick the server on which you’ll install the DHCP server role. Start by choosing “Select a server from the server pool”. You’ll see a list of available servers. Select the server where you want the DHCP role to be installed, and then click “Next”.
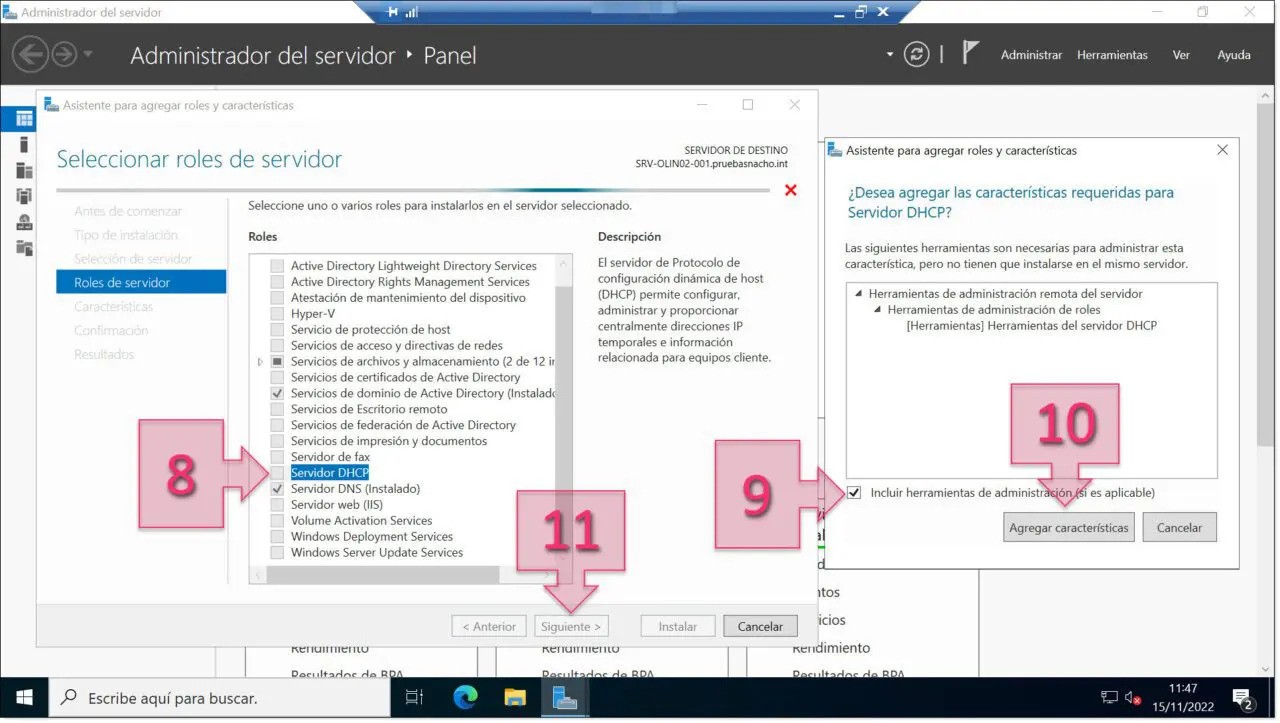
Now, it’s time to pick the specific server role you want to set up, which will be the DHCP service for our purposes.
Scroll through the available roles until you spot “DHCP Server.” Once found, mark it by ticking the checkbox next to it. A prompt will appear, inquiring if you want to add the necessary features for this role, along with a selection of features to consider.
Make sure you select “Include management tools (if applicable)”, then hit “Add features”. Afterward, you can proceed by clicking “Next”.
At the “Select features” screen, you can keep the current settings as they are (unless you have additional features in mind to include). Just click on “Next” to move forward.
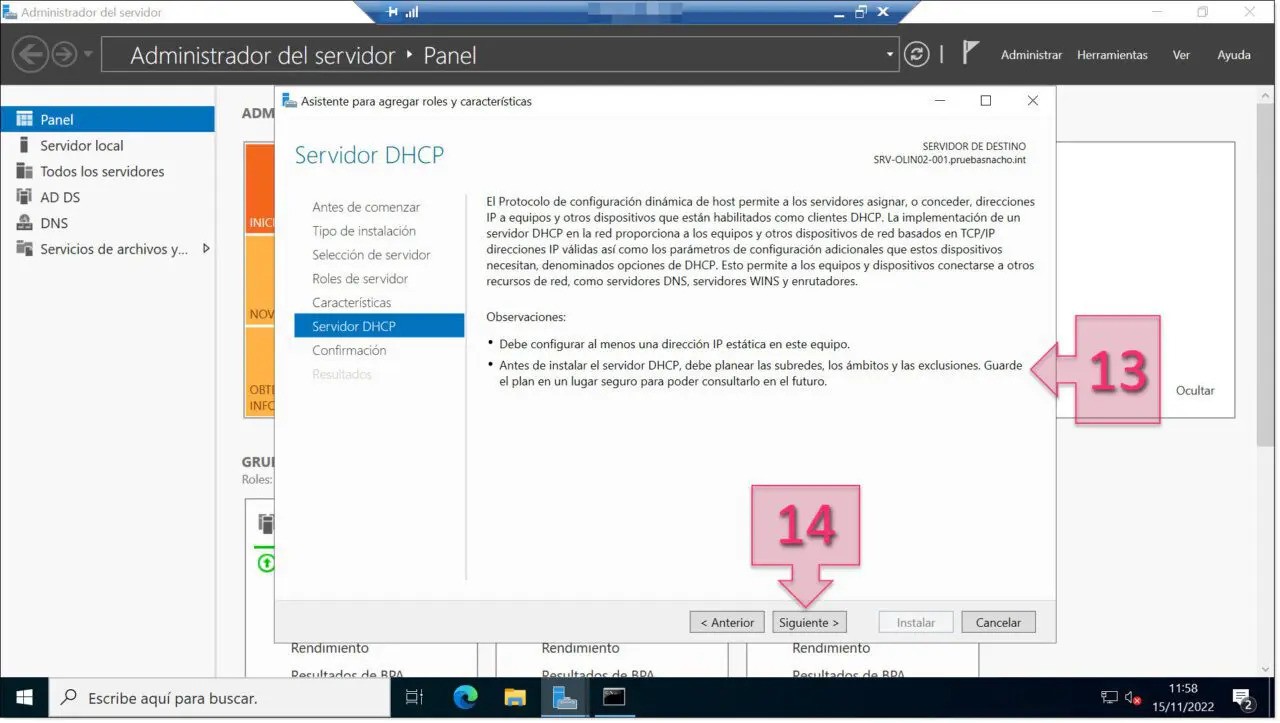
On the DHCP Server role information page, there’s not much required from you. Just spend a moment to go through the extra details provided, and then proceed by clicking “Next”.
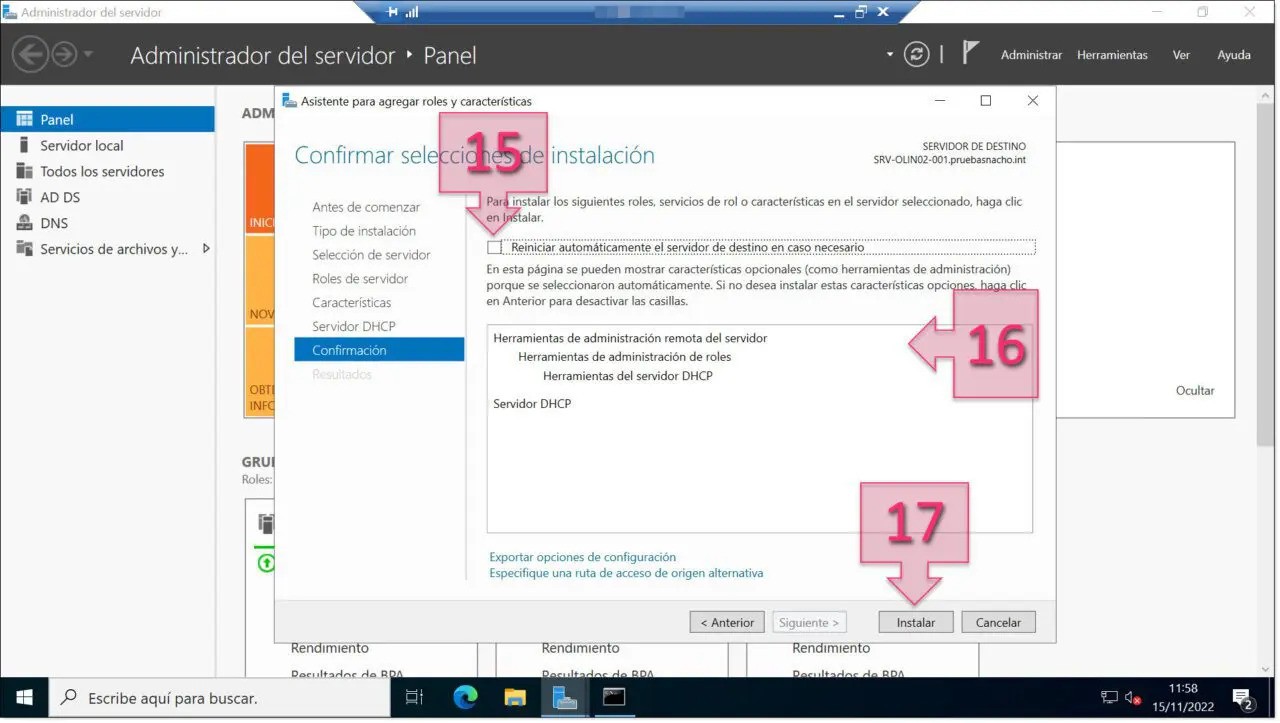
You’ve reached the “Confirm installation selections” step. My advice is to leave the “Restart the destination server automatically if required” option unticked, to maintain complete control over the process.
Review all your installation selections carefully, ensuring everything is set according to your requirements. Once satisfied, proceed by clicking “Install”.
The installation process kicks off now, and you’ll notice a progress bar appear. After the installation concludes, simply click on “Close” to wrap up.
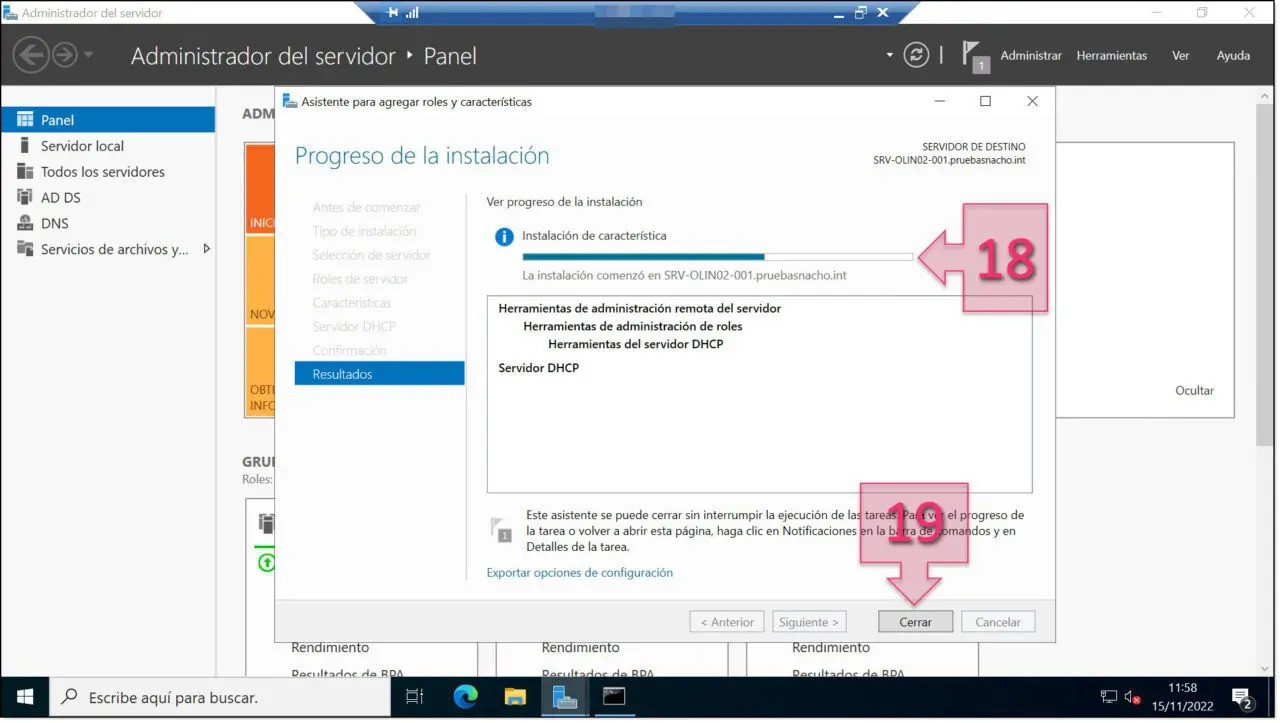
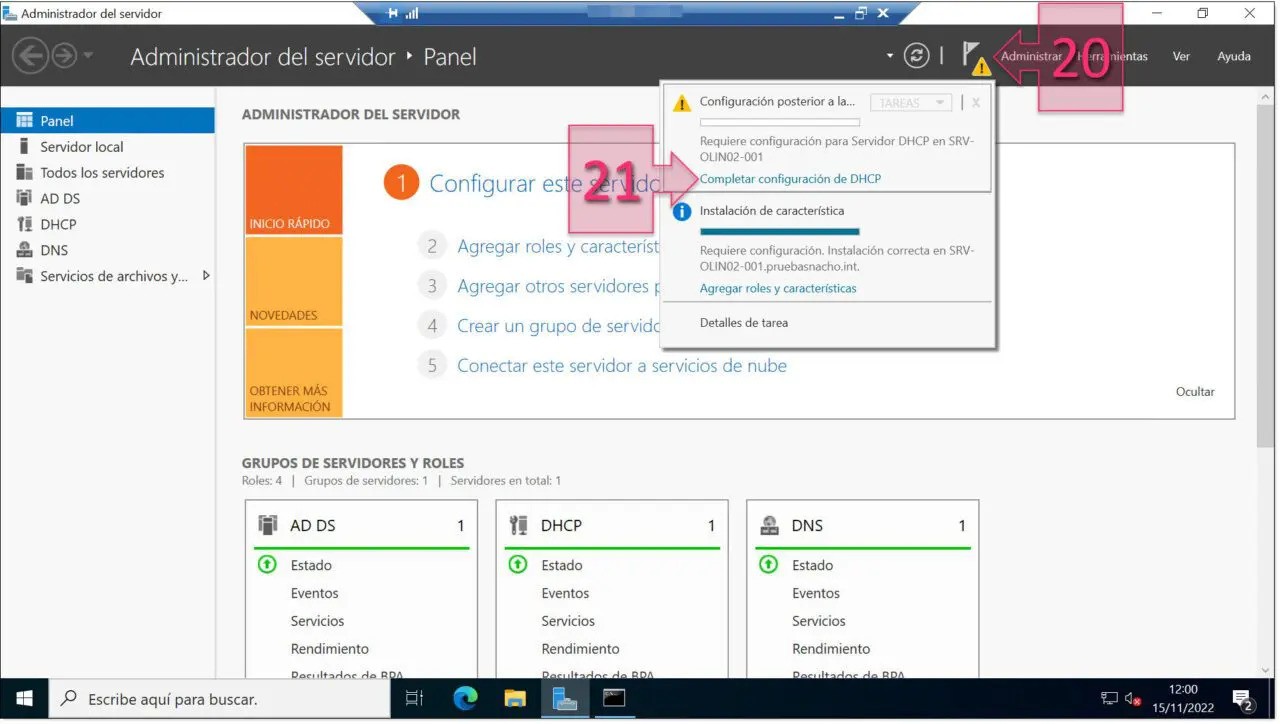
Should you close the wizard before the installation wraps up, there’s no cause for alarm. You can keep an eye on the ongoing installation by selecting the Alert icon found in the menu (20).
After the installation is complete, it’s essential to click on “Complete DHCP configuration” (21) to adjust the fundamental settings of your DHCP server.
Setting Up Your DHCP Server
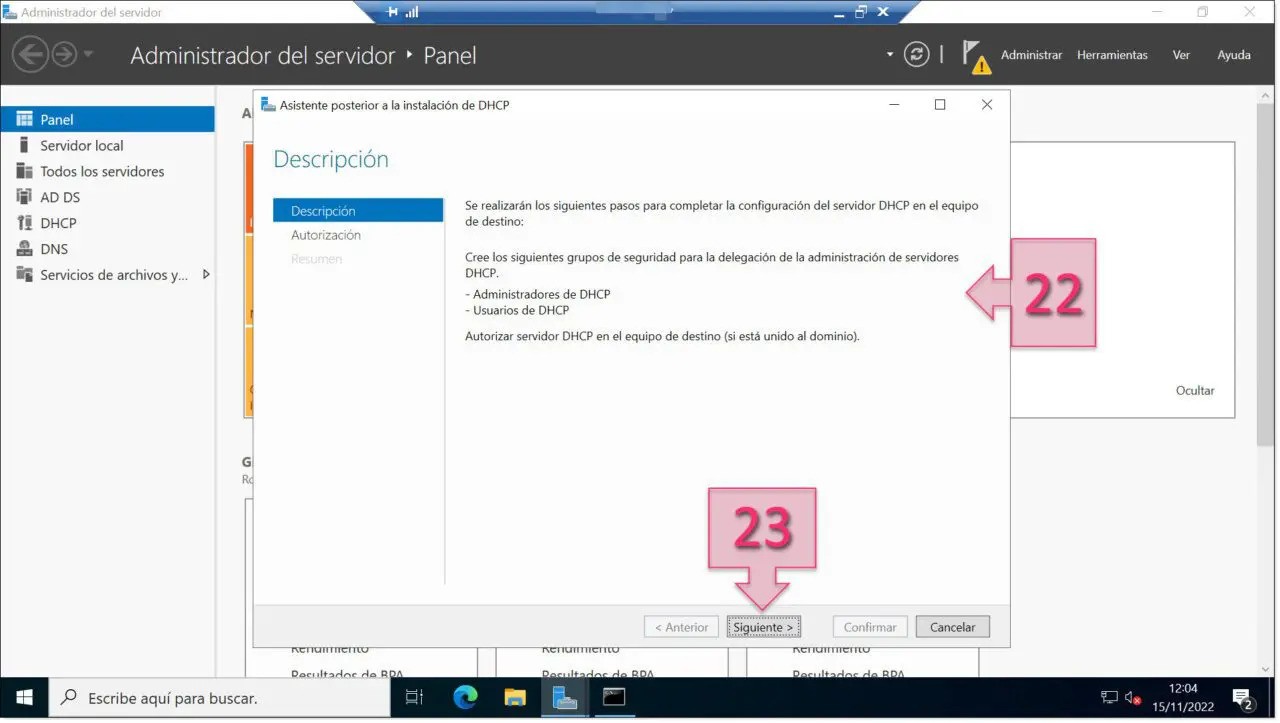
Once you select “Complete DHCP configuration,” the DHCP Post-Installation Configuration Wizard will appear. With the server role now installed, your next step is to set up the essential parameters to get your new DHCP server operational.
A welcome screen will greet you again, this time explaining the need to establish security groups for both administrators and users, which is essential for managing DHCP server administration rights. Additionally, it will guide you on authorizing the DHCP server on the designated computer.
After thoroughly reviewing this information, proceed by clicking “Next”.
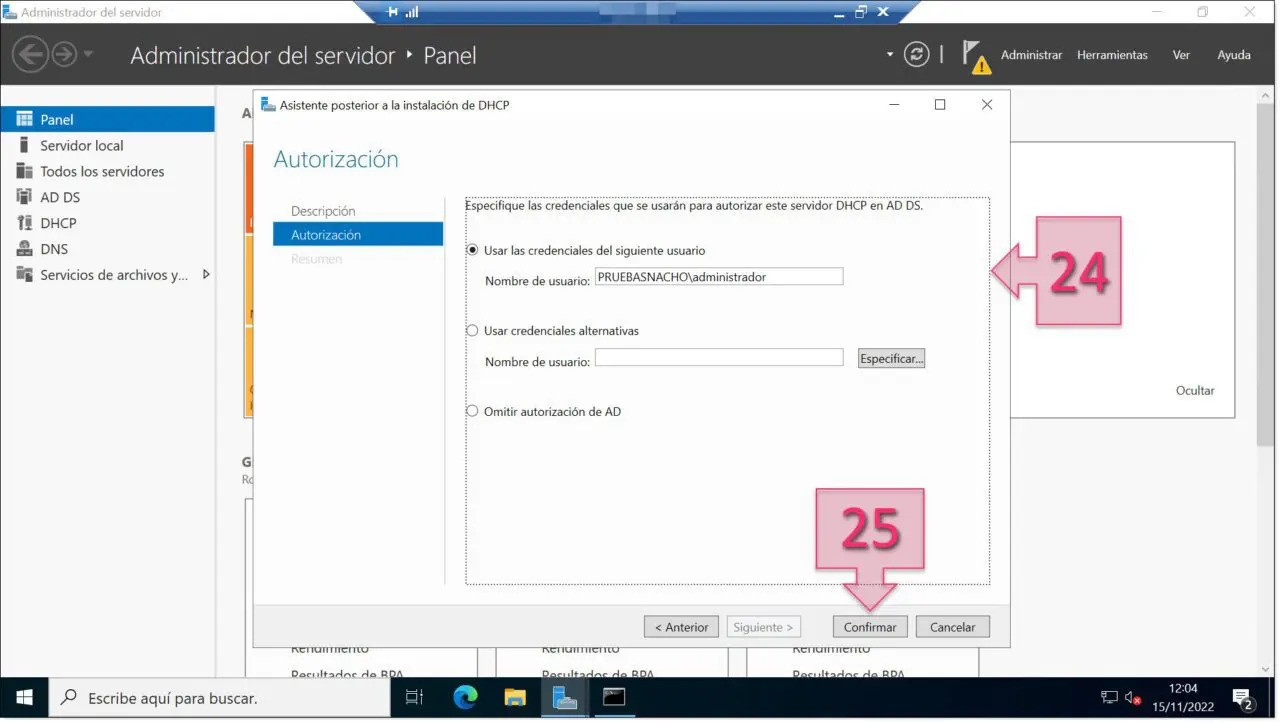
At the Authorization stage, it’s time to provide specific credentials for authorizing the DHCP server within Active Directory Domain Services (AD DS). You’ll encounter the following choices :
- Use the following user’s credentials: Here, input the username in the “Domain\User” format. This is the method we’re following in our guide.
- Use alternate credentials: This option requires you to input a different username.
- Skip AD authorization: Select this if you wish to bypass Active Directory authorization.
After selecting your preferred option and filling in the required details, click on “Confirm” to proceed.
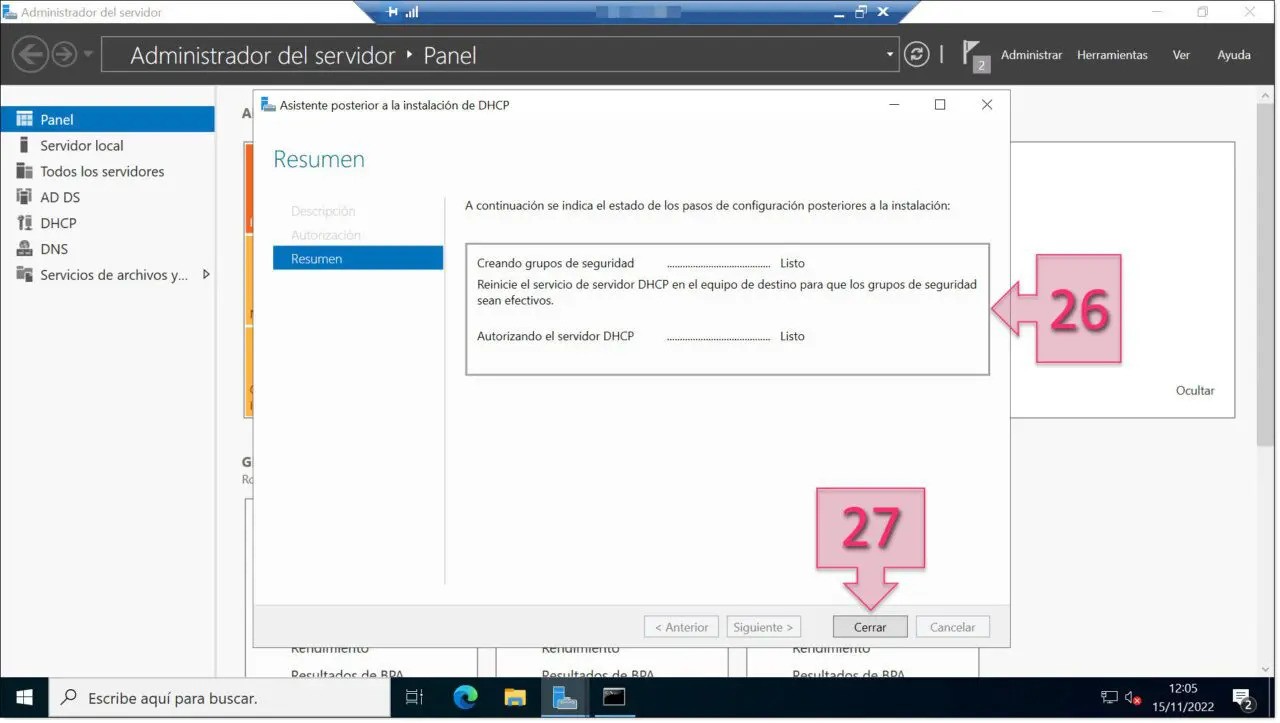
You’ll now be directed to a summary page that outlines the steps you’ve completed:
- Creation of security groups.
- Authorization of the DHCP server.
If all procedures have been successfully executed, a “Done” status will be visible beside each task.
To conclude the setup, simply click on “Close”.
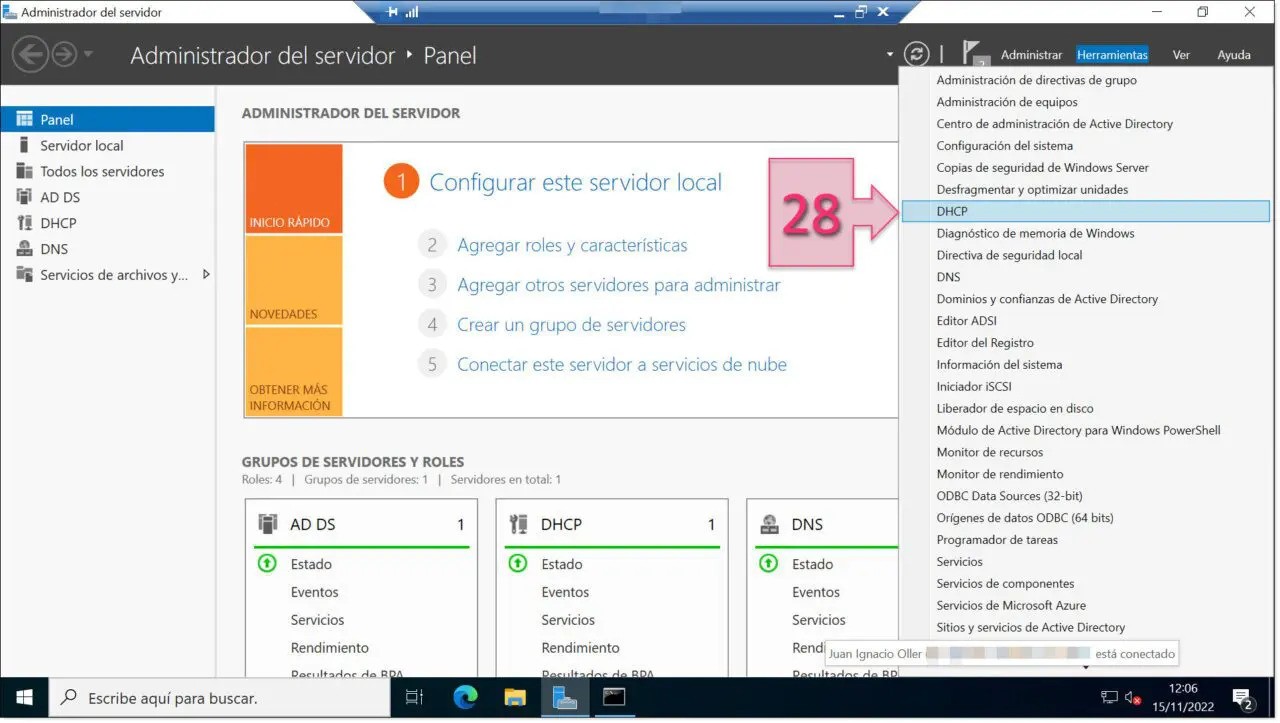
You can now find the DHCP tool within the Server Manager. To manage your newly established service, simply go to the Tools menu and select DHCP.
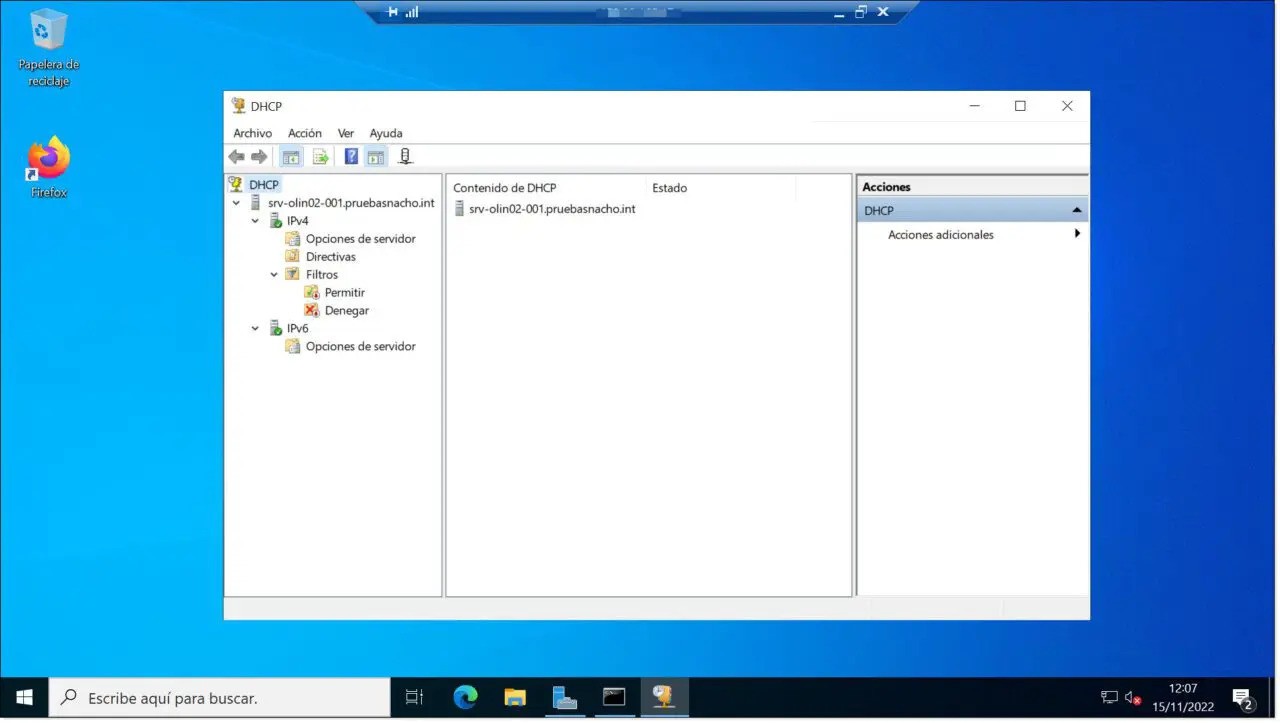
Finally, you’ll be brought to the DHCP management console. This is where you can carry out all tasks related to DHCP, including setting up scopes, allocating leases, establishing ranges, and configuring various settings for client devices, among others.
You succeeded! install and configure the DHCP server. There still remain tasks like configuring scopes and basic settings, but we will leave this for a future tutorial.

Appliance Repair Manual
11 November 2025I am really impressed with your writing skills as well as with the layout on your blog. Is this a paid theme or did you modify it yourself? Anyway keep up the nice quality writing, it is rare to see a nice blog like this one nowadays.
ALis
12 November 2025Hi! Thanks for your nice comment 😊
We’re using WordPress with a customized theme to make the design unique. It’s user-friendly and great for most blogs. Good luck ! 🚀
Appliance Repair Manual
12 November 2025When someone writes an piece of writing he/she keeps the thought of a user in his/her brain that how a user can know it. So that’s why this paragraph is outstdanding.
ALis
30 December 2025Thank you so much for your kind words. I truly appreciate you taking the time to share your thoughts. Understanding the reader’s perspective is always a priority when writing, and I’m really glad to hear that this paragraph stood out to you. Your feedback is very encouraging.
Hairstyles Vip
12 November 2025to this require a great deal of work? I have very little knowledge of computer programming however I had been hoping to start my own blog in the near future. Anyway, should you have any suggestions or tips for new blog owners please share. I understand this is off topic but I simply needed to ask.
ALis
30 December 2025Starting a blog doesn’t require a great deal of technical knowledge, so don’t worry at all. Many successful blogs are built using beginner-friendly platforms like WordPress, which require little to no programming skills. The most important things are choosing a topic you’re passionate about, being consistent with your content, and focusing on providing value to your readers. My suggestion is to start simple, learn as you go, and not be afraid to experiment. Everyone starts somewhere, and experience comes with time. Best of luck with your future blog!
Appliance Repair Manual
13 November 2025Hello there, You’ve done a great job. I will definitely digg it and personally recommend to my friends. I am confident they will be benefited from this website.
ALis
2 December 2025Thank you so much for being with us and sharing our content. We always strive to provide the best.
I Fashion Styles
14 November 2025Greetings! Very helpful advice in this particular article! It’s the little changes that will make the most significant changes. Thanks a lot for sharing!
ALis
2 December 2025Thanks for taking the time to leave such a thoughtful comment! 💛
I Fashion Styles
17 November 2025That is a very good tip especially to those new to the blogosphere. Short but very accurate information… Many thanks for sharing this one. A must read article!
ALis
2 December 2025We’re thrilled you liked it! Stay tuned for more great content soon. 🚀