How To Install SSL Certificate on Windows IIS Server
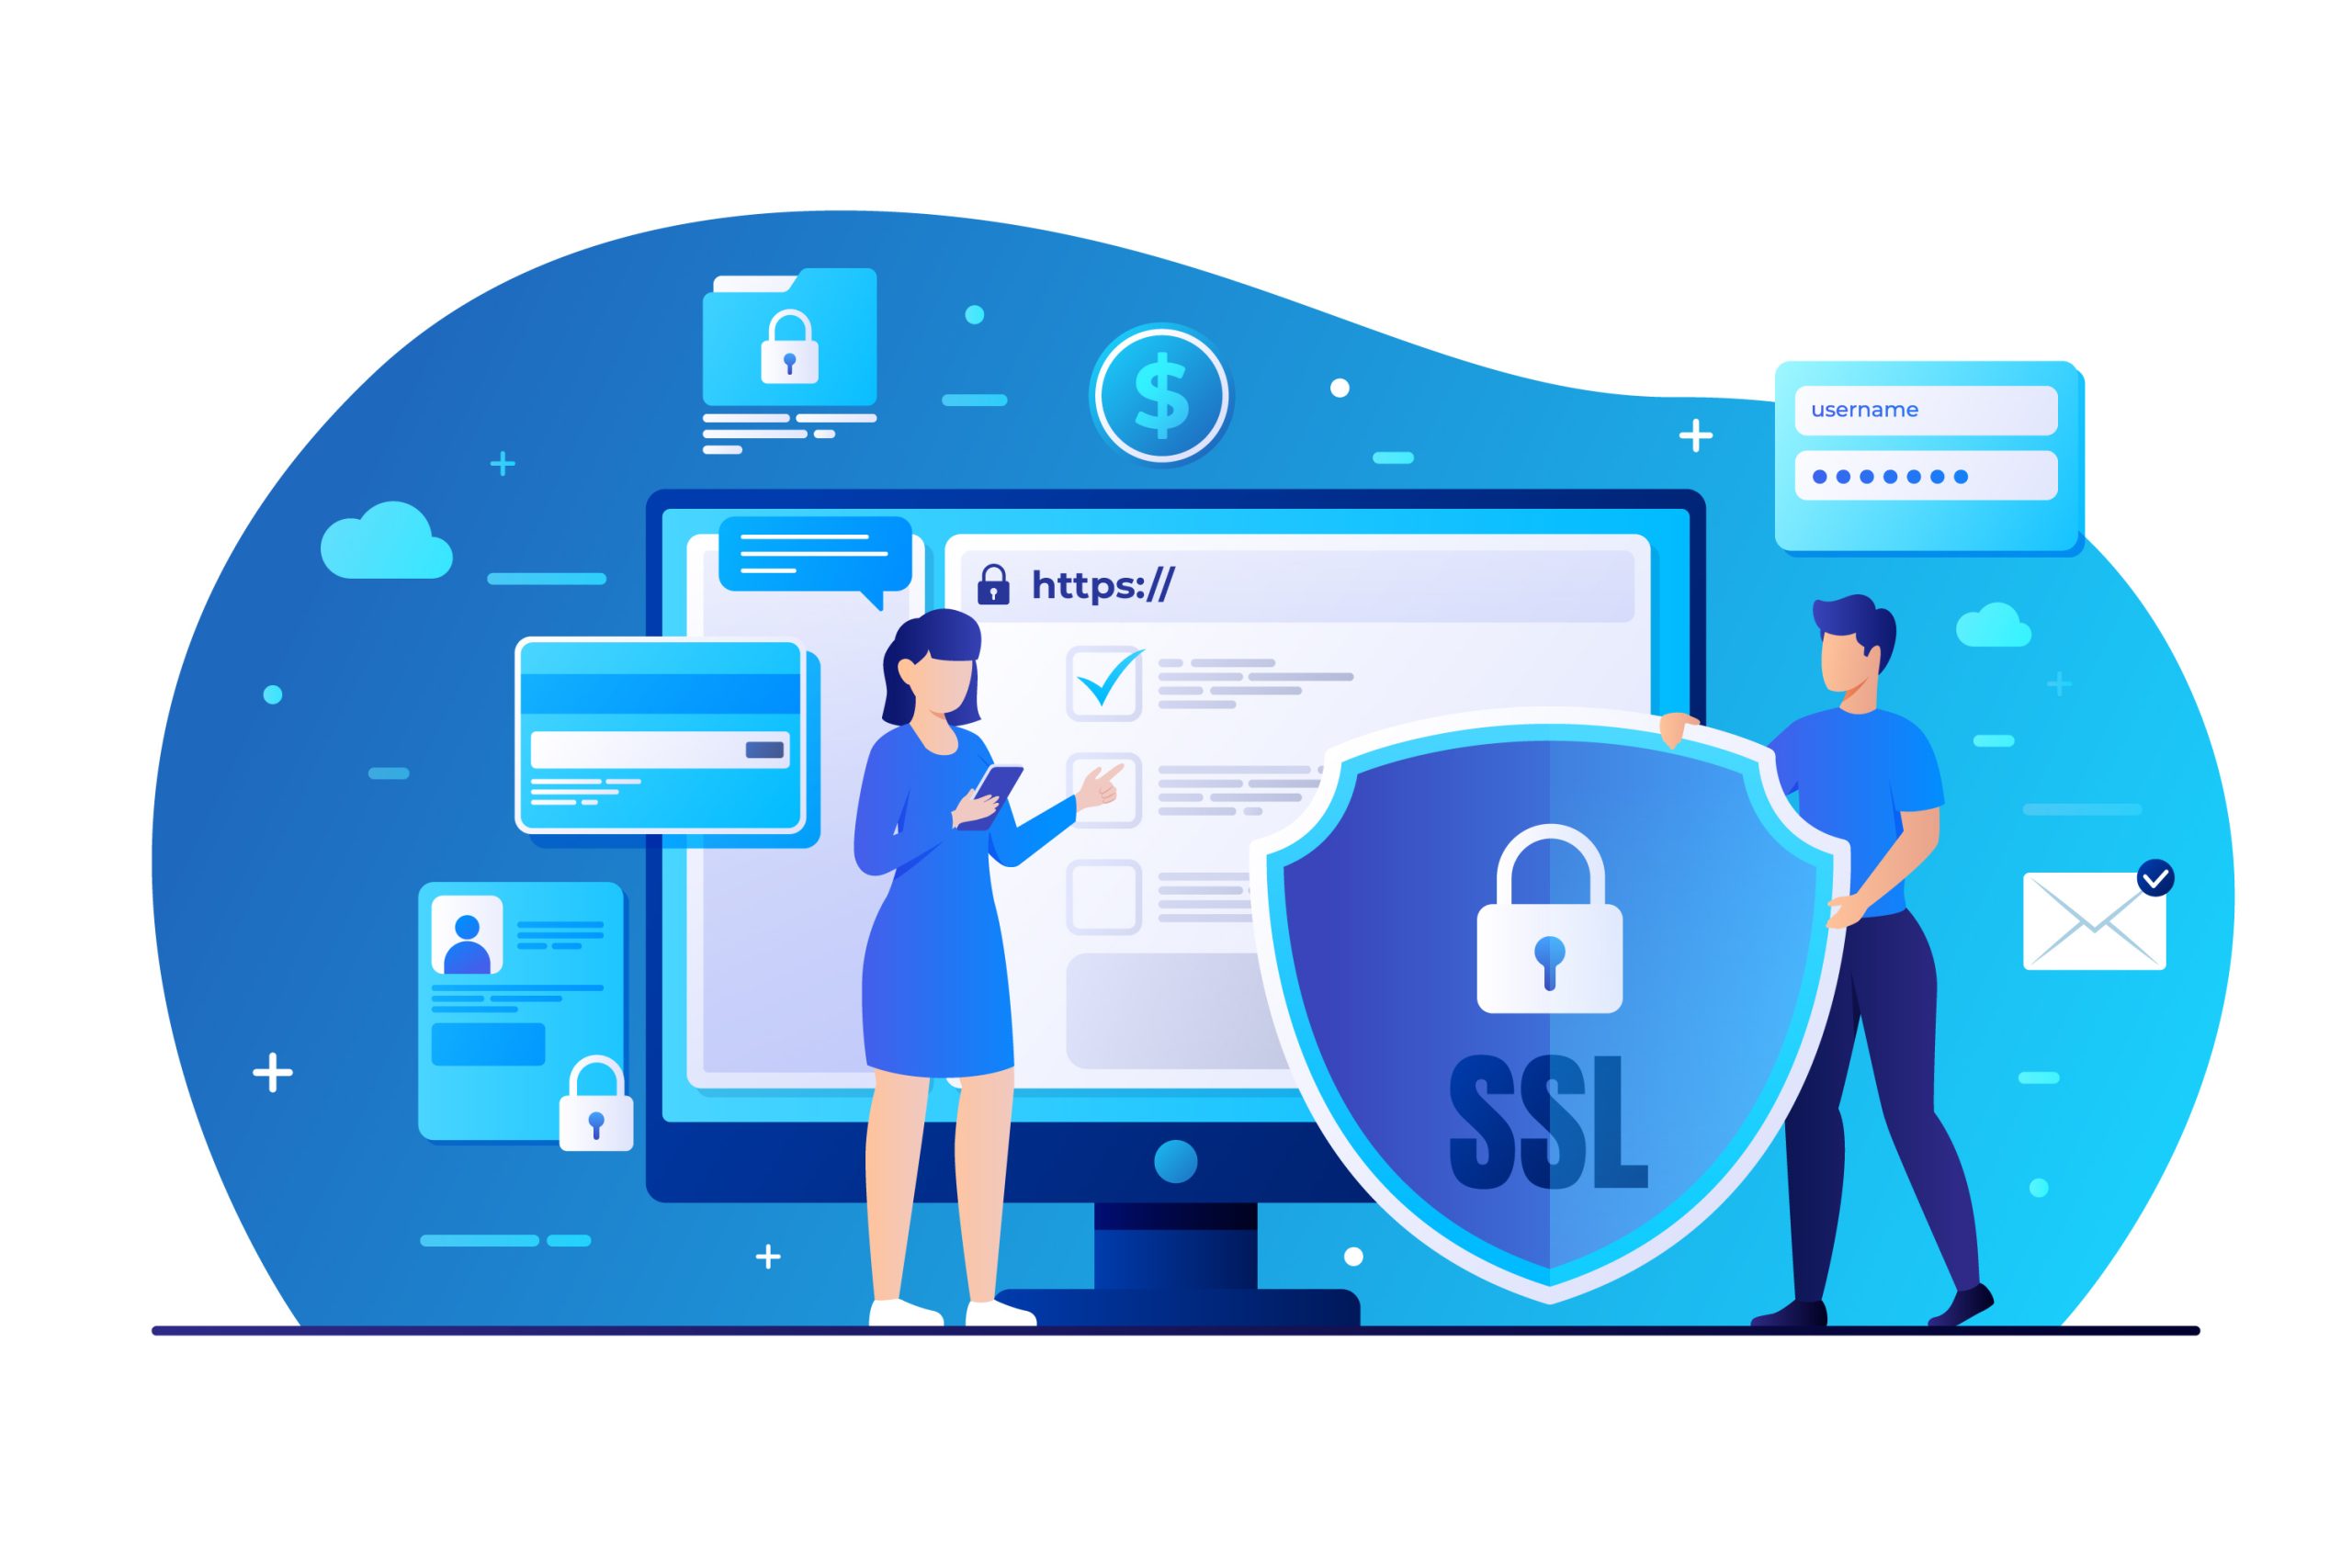
An SSL (Secure Sockets Layer) certificate is an indispensable digital safeguard for secure internet interactions. In This article you will learn how to install SSL Certificate in Internet Information Services (IIS) in a best way. It operates on two main fronts:
Encrypting Data: At its heart, an SSL certificate encrypts the communication channel between your web browser and the server. This encryption turns any information exchanged online—be it financial transactions, log-in details, or personal data—into a coded message that is indecipherable to unauthorized interceptors. This layer of security is crucial for protecting your private information from cyber threats.
Validating Websites: SSL certificates also play a vital role in verifying the authenticity of websites. They function as a digital verification card, issued by a reputable Certificate Authority (CA), to confirm that the website you’re interacting with is legitimate and not a fraudulent scheme designed to deceive you. This verification helps in preventing identity theft and other forms of cyber fraud.
Building Trust: A website equipped with an SSL certificate will often be marked with visual indicators such as a padlock icon or a green address bar in your web browser. These symbols serve as reassurances that your connection is secure, making it safe for you to enter sensitive information. They are key to fostering a sense of security and trustworthiness among users.
Contents
install SSL Certificate on Windows IIS Server
Generating a CSR with IIS 10 on Windows Server
To begin, navigate to your Windows start menu and enter “Internet Information Services (IIS) Manager” in the search bar, then launch the application.
Within the Internet Information Services (IIS) Manager, look towards the Connections menu tree on the left side of the screen. Here, you’ll need to find and select your server’s name.

Once you’re on the homepage for your server’s name (found in the center pane), head over to the IIS segment and give a double-click on “Server Certificates.”
Next, on the “Server Certificates” screen (still in the center pane), turn your attention to the Actions menu located on the right. Here, you’ll want to select the “Create Certificate Request…” option.

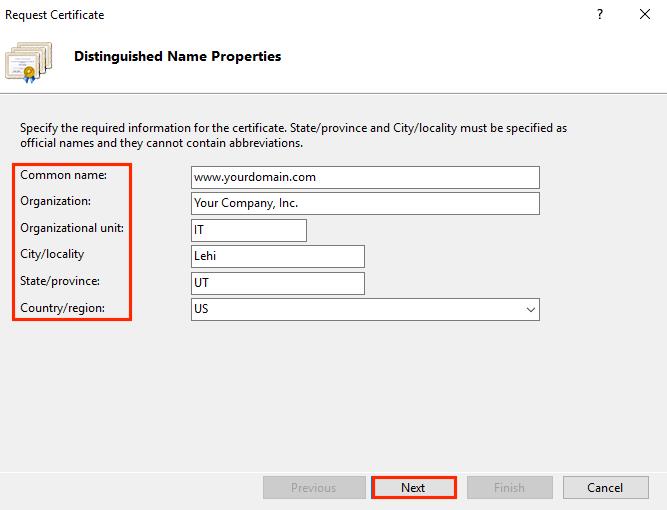
On the Distinguished Name Properties screen of the Request Certificate wizard, you’re asked to enter various details. Here’s what you’ll need to provide before clicking “Next”:
– Common Name: Enter the complete domain name you’re securing with this certificate, such as “www.yoursite.com”.
– Organization: Input the official registered name of your business, like “MyBusiness, LLC”.
– Organizational Unit: Specify your department within the company. Common choices include “IT,” “Web Security,” or you might leave it empty.
– City/Locality: Enter the city where your business is officially based.
– State/Province: Fill in the state or province where your business is registered.
– Country: From the provided drop-down menu, choose the country where your business is legally established.
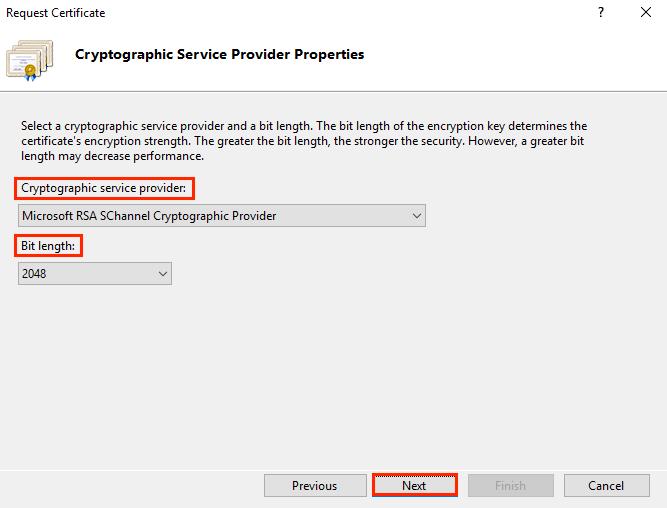
When you arrive at the Cryptographic Service Provider Properties page, follow these instructions:
– Cryptographic Service Provider: From the provided drop-down menu, choose “Microsoft RSA SChannel Cryptographic Provider,” unless there’s another cryptographic provider you’re specifically required to use.
– Bit Length: Use the drop-down menu to select a bit length of 2048. You might choose a larger bit length if you have a particular need for it, but 2048 is generally recommended for most cases.
After filling in these details, proceed by clicking “Next.”
On the File Name step, you’ll see a section asking you to “Specify a file name for the certificate request.” Click on the “…” button to open a window where you can navigate to the folder where you wish to save your CSR.
Important: Make sure to note both the file name you assign and the specific folder you save the csr.txt file in. If you type in a file name without selecting a save location, your CSR will automatically be saved in the C:\Windows\System32 directory.
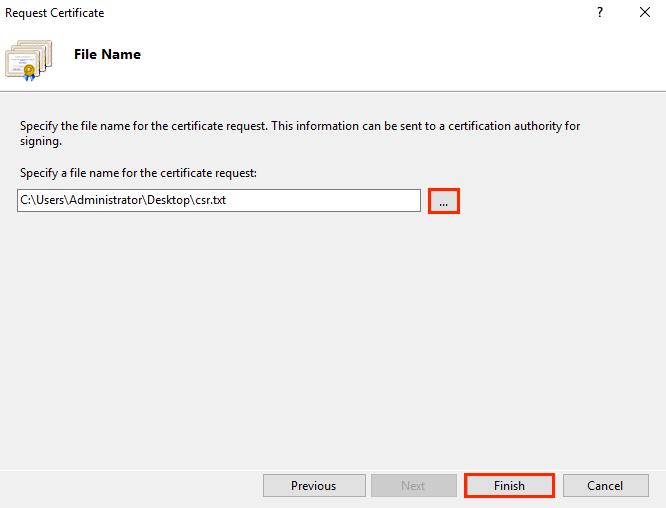
After completing the previous steps, click on the “Finish” button.
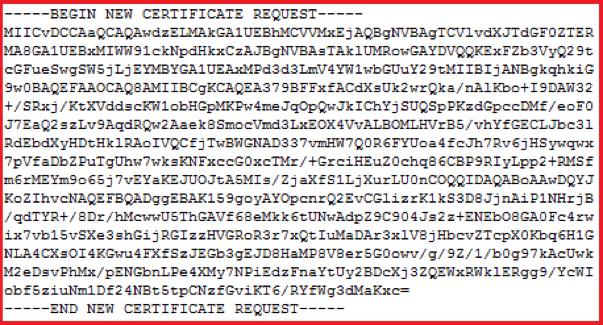
Next, open the file using a basic text editor like Notepad. Make sure to copy all the text, starting from the “—–BEGIN NEW CERTIFICATE REQUEST—–” line and ending with the “—–END NEW CERTIFICATE REQUEST—–“ line. This entire block of text is what you’ll need to paste into the order form on the DigiCert website.
Setting Up Your SSL Certificate on IIS 10 with Windows Server 2016
Before moving forward, ensure you’ve generated a CSR and have your SSL certificate ready, following the guide “IIS 10: How to Create Your CSR on Windows Server 2016.”
Once your SSL certificate has been validated and issued, it’s time to install it on the Windows Server 2016 where you initially generated the CSR. This process involves not only installation but also configuring your server to utilize the new certificate.
For a Single Certificate: Steps to Install and Activate Your SSL Certificate
For Multiple Certificates: Utilizing SNI for SSL Certificate Installation and Configuration
Installing and Configuring a Single SSL Certificate:
– Locate the .cer file (for example, your_domain_com.cer) that you received from DigiCert and save it on the server where the CSR was created.
– Open the Windows start menu, search for Internet Information Services (IIS) Manager, and open it.
– Within the Internet Information Services (IIS) Manager, use the Connections menu on the left to find and
select your server’s name.
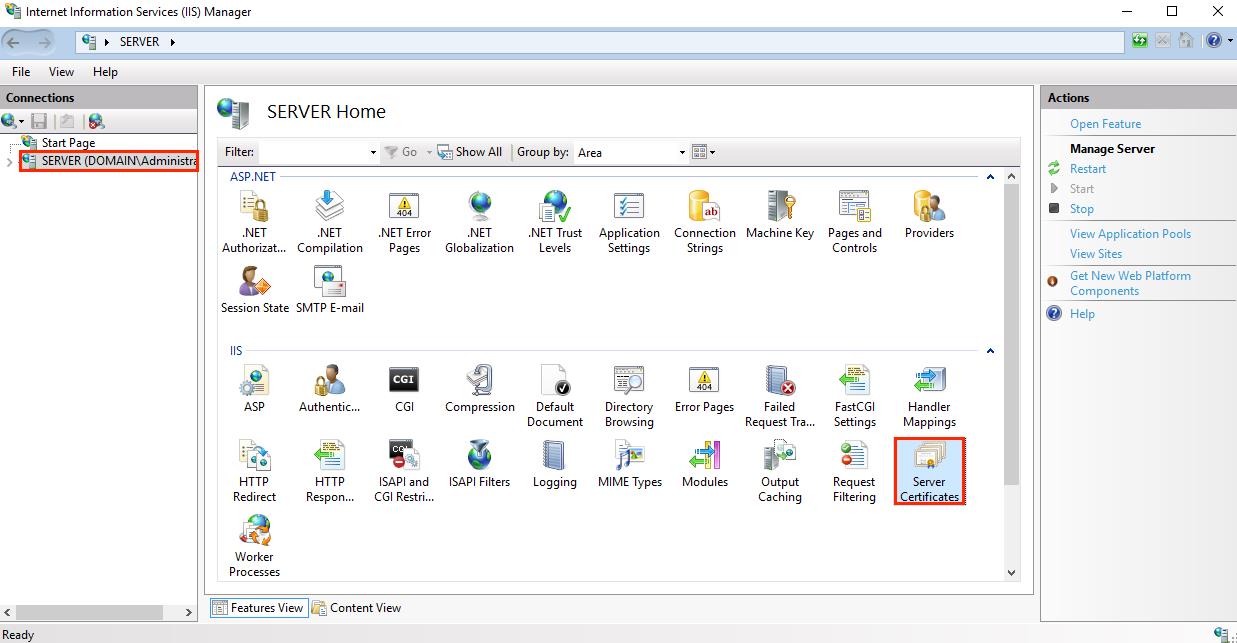
After selecting your server name within IIS Manager, proceed by navigating to the IIS section found on the server’s main dashboard (the center pane), and then double-tap on “Server Certificates.”
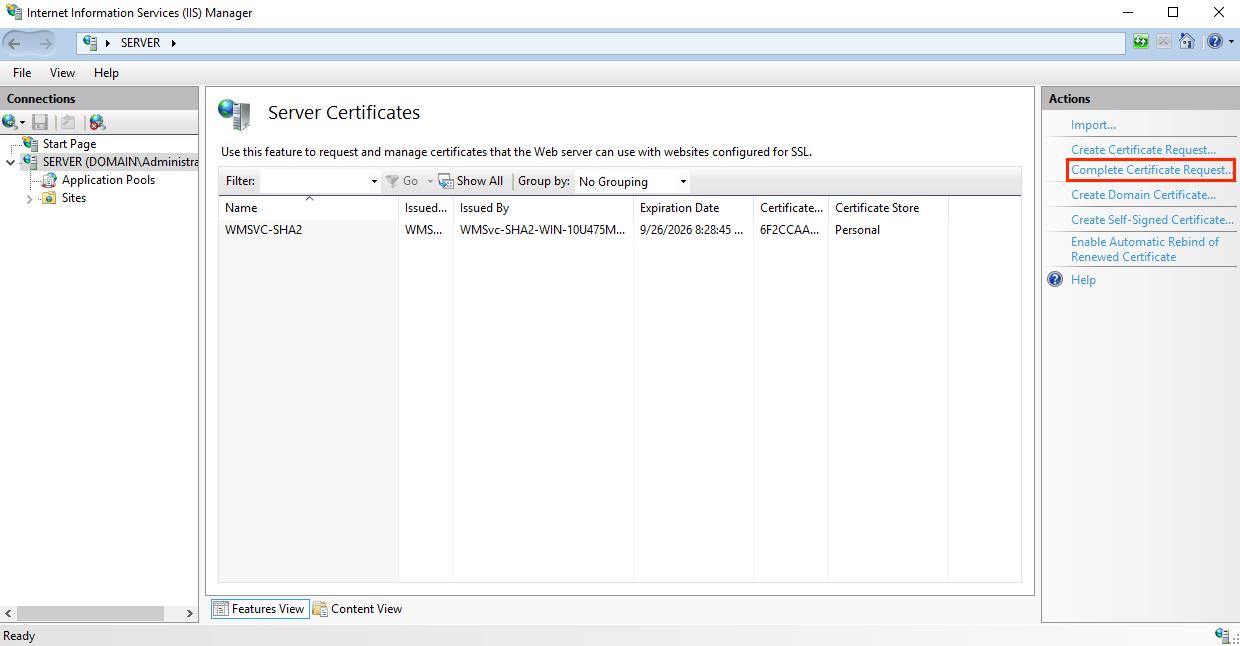
Next, within the “Server Certificates” window (again in the center pane), look to the “Actions” menu positioned on the right side. Here, you will find and need to click on the “Complete Certificate Request…” option.
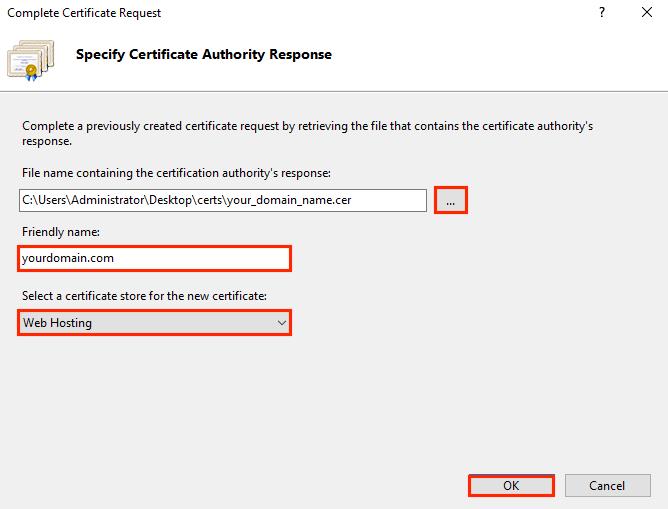
During the last stage of the SSL certificate installation, within the “Complete Certificate Request” wizard, you’ll arrive at the “Specify Certificate Authority Response” section. Here’s what to do next:
– Locating Your Certificate File: Click the “…” button to open a file browser. Navigate to and select the .cer file (for instance, your_domain_com.cer) that you’ve received from DigiCert.
– Assigning a Friendly Name: Enter a descriptive name for your certificate. This name isn’t included in the certificate itself but is used for easier identification within your system. It’s a good practice to include “DigiCert” along with the certificate’s expiration date in this name (e.g., yoursite-digicert-expiration date). This strategy helps in quickly identifying the certificate’s issuer and its validity period, especially when managing multiple certificates for the same domain.
– Choosing a Certificate Store: From the available options in the drop-down menu, choose “Web Hosting” as the location to store the newly installed certificate.
After completing these steps, proceed by clicking “OK” to finalize the certificate installation process.
Open Internet Information Services (IIS) Manager and look to the Connections menu on the left-hand side. Begin by expanding the server’s name where your SSL certificate has been set up.
Next, unfold the “Sites” section and select the particular site you intend to secure with your newly installed SSL certificate.
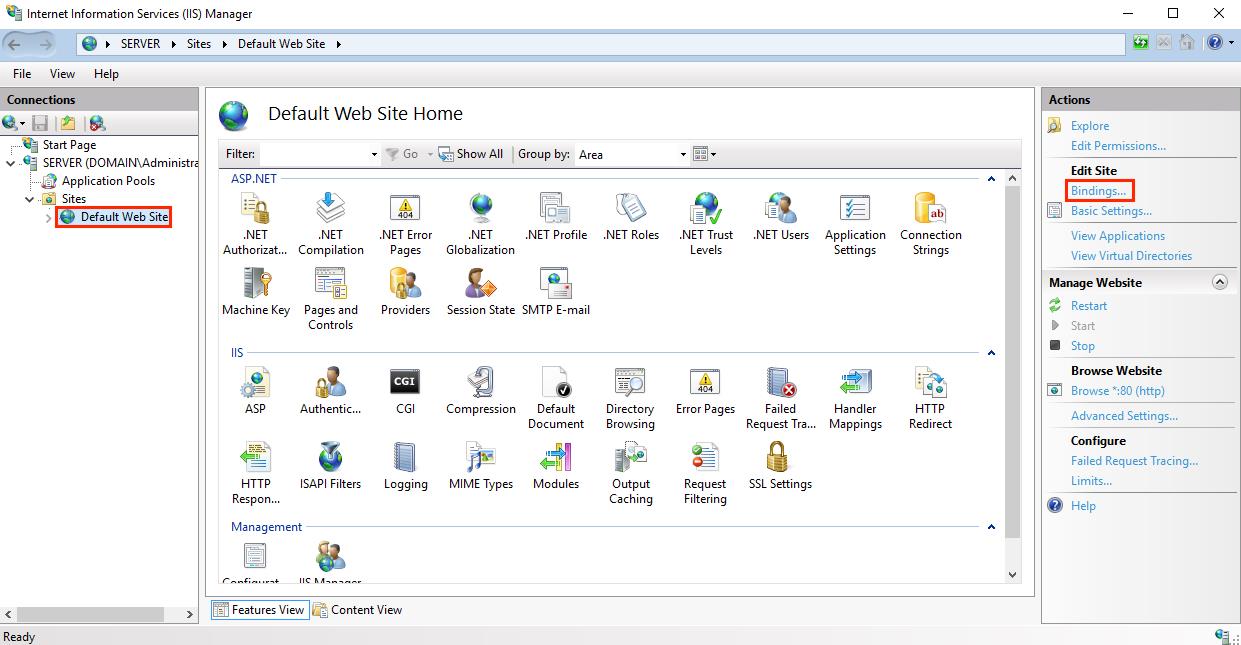
Once you’ve navigated to your selected website’s main page, direct your attention to the Actions menu found on the right side. Here, under the “Edit Site” section, you’ll want to select the “Bindings…” option.
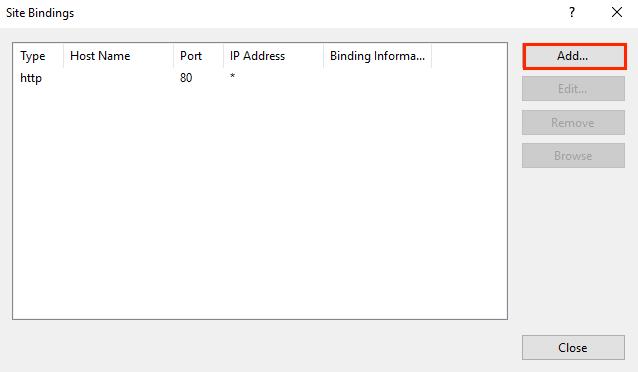
After entering the Site Bindings dialog, proceed by clicking on “Add” to initiate the process.
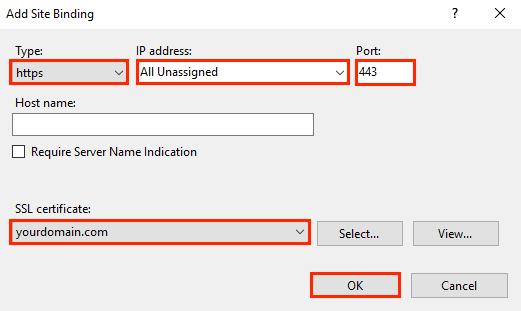
In the “Add Site Bindings” interface, you’ll need to adjust a few settings before finalizing:
Type: From the drop-down menu, choose “https” to ensure your site communicates securely.
IP Address: Select the specific IP address of your site if it has one. Alternatively, you can choose “All Unassigned” if the site doesn’t have a dedicated IP address.
Port: Enter “443” in this field. This is the standard port used for secure communications over SSL.
SSL Certificate: Look for and select the SSL certificate you’ve just installed, identified by your domain name (for example, yourdomain.com).
After setting these parameters, click “OK” to apply the changes.
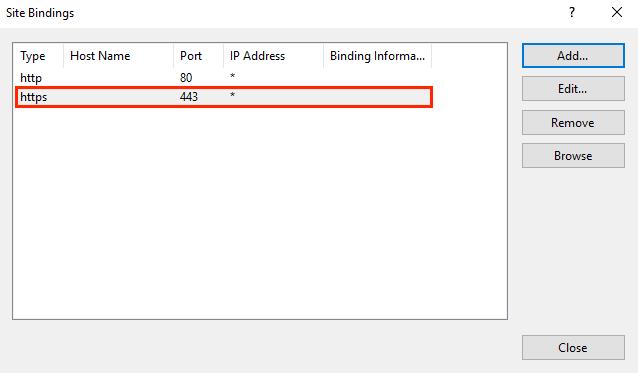
Your SSL certificate is now installed, and the website configured to accept secure connections.

Dishwasher Repair Manual
15 October 2025I liked up to you’ll obtain performed proper here. The cartoon is tasteful, your authored material stylish. however, you command get got an nervousness over that you want be delivering the following. unwell certainly come more in the past again as precisely the same nearly a lot steadily inside of case you protect this increase.
ALis
11 November 2025Your satisfaction with the content on the site is our main goal.
Interior
24 October 2025After study a few of the weblog posts in your website now, and I truly like your means of blogging. I bookmarked it to my bookmark web site listing and will probably be checking again soon. Pls check out my website as effectively and let me know what you think.
ALis
11 November 2025Your satisfaction with the content on the site is our main goal.
Short Hairstyles
25 October 2025I’ve been browsing online more than 3 hours lately, but I never discovered any attention-grabbing article like yours. It is pretty worth sufficient for me. In my view, if all webmasters and bloggers made good content as you probably did, the net will likely be a lot more helpful than ever before.
ALis
11 November 2025Your satisfaction with the content on the site is our main goal.
Short Hairstyles
27 October 2025I am not sure where you are getting your info, but good topic. I needs to spend some time learning more or understanding more. Thanks for excellent info I was looking for this information for my mission.
ALis
11 November 2025Your satisfaction with the content on the site is our main goal.
Appliance Repair Manual
3 November 2025Hi there, everything is going sound here and ofcourse every one is sharing data, that’s really good, keep up writing.
ALis
11 November 2025Your satisfaction with the content on the site is our main goal.
Appliance Repair Manual
4 November 2025This is very attention-grabbing, You are an excessively professional blogger.I’ve joined your feed and stay up for in quest of extra of your fantastic post. Also, I have shared your web site in my social networks。
ALis
11 November 2025Thank you for your goodwill.Your satisfaction with the content on the site is our main goal.
Hair Care
7 November 2025The root of your writing while sounding reasonable originally, did not really work perfectly with me after some time. Someplace within the paragraphs you managed to make me a believer unfortunately just for a short while. I nevertheless have a problem with your leaps in assumptions and you would do nicely to fill in all those breaks. In the event that you actually can accomplish that, I will undoubtedly be impressed.
ALis
11 November 2025We will do our best to improve and develop useful content.
Beauty Fashion
8 November 2025Hello to all, the contents existing at this web page are genuinely remarkable for people knowledge, well, keep up the good work fellows.
ALis
11 November 2025Your satisfaction with the content on the site is our main goal.
Appliance Repair Manual
9 November 2025This is my first time pay a visit at here and i am really pleassant to read all at single place.
ALis
11 November 2025Your satisfaction with the content on the site is our main goal.
Hairstyles
10 November 2025I’m not sure if this is a format issue or something to do with internet browser compatibility but I figured I’d post to let you know. The style and design look great though! Hope you get the issue fixed soon. Many thanks
ALis
11 November 2025Your satisfaction with the content on the site is our main goal.
Appliance Repair Manual
10 November 2025Hello everyone, it’s my first pay a visit at this website, and paragraph is in fact fruitful in support of me, keep up posting these types of articles.
ALis
11 November 2025Your satisfaction with the content on the site is our main goal.
Hairstyles
10 November 2025I’d like to thank you for the efforts you have put in writing this blog.I’m hoping to check out the same high-grade content from you later on as well. In truth, your creative writing abilities has motivated me to get my very own website now 😉
ALis
11 November 2025Thank you , Your satisfaction with the content on the site is our main goal.
Hairstyles Vip
11 November 2025Your mode of explaining everything in this piece of writing is genuinely pleasant, every one be capable of simply be aware of it, Thanks a lot.
ALis
11 November 2025Your satisfaction with the content on the site is our main goal.
Hairstyles Vip
12 November 2025We’re a group of volunteers and starting a new scheme in our community. Your website offered us with helpful information to work on. You’ve done a formidable task and our whole community will be thankful to you.
ALis
12 November 2025Really appreciate your lovely comment! We’re happy you found the post helpful. 🌿
Appliance Repair Manual
13 November 2025It’s amazing to pay a visit this site and reading the views of all friends regarding this paragraph, while I am also keen of getting know-how.
ALis
2 December 2025Really appreciate your lovely comment! We’re happy you found the post helpful. 🌿
Good Art Design
13 November 2025It’s amazing to pay a visit this site and reading the views of all friends regarding this paragraph, while I am also keen of getting know-how.
ALis
2 December 2025We truly appreciate your support and encouragement — it means a lot! 🌟
I Fashion Styles
18 November 2025Right now it sounds like WordPress is the preferred blogging platform out there right now. (from what I’ve read) Is that what you are using on your blog?
ALis
2 December 2025Yes ,We’re using WordPress with a customized theme to make the design unique. It’s user-friendly and great for most blogs.
I Fashion Styles
18 November 2025Touche. Outstanding arguments. Keep up the great work.
ALis
2 December 2025Thank you so much for your kind words! We’re really glad you enjoyed the article. 💙
Washer Repair Manual
22 November 2025What’s Going down i’m new to this, I stumbled upon this I have discovered It absolutely useful and it has aided me out loads. I am hoping to give a contribution & assist other users like its helped me. Great job.
ALis
23 November 2025Hi! Thanks a lot for your kind words.
I’m really glad to hear that you found the content useful and that it has helped you — that means a lot! I appreciate your intention to contribute and support others as well.
Thanks again for the encouragement, and I’m happy to have you here!
Appliance Repair Manual
8 December 2025Thank you for the auspicious writeup. It in fact was a amusement account it. Look advanced to far added agreeable from you! By the way, how could we communicate?
ALis
18 December 2025Thank you for your kind words. We’re glad you enjoyed the article. You can easily communicate with us through our contact page or by reaching out to our support team. We look forward to hearing from you!