
How to run Linux on Windows Server 2019 with WSL
Discover which Windows Server versions are compatible with the Windows Subsystem for Linux (WSL). According to the latest guidelines from Microsoft, You can run Linux on Windows Server 2019 with WSL. This compatibility extends to several releases of the Windows Server Semi-Annual Channel (SAC), including versions 1909, 2004, 20H1, 20H2, and the more recent Windows Server 2022.
Contents
Learn How to run Linux on Windows Server 2019 with WSL
For those interested in running Linux GUI applications through WSL, there’s a helpful guide titled “How to Install Linux GUI Apps in Windows 10 and Windows 11 with WSL” available on Petri. This resource provides a step-by-step approach to enhancing your WSL experience.
The Installation Process of WSL on Windows Server
The process of installing WSL on Windows Server offers an intriguing perspective, primarily because the procedure varies depending on the specific version of Windows Server in use. One notable distinction is the support, or lack thereof, for WSL 2 distributions on Windows Server 2019 and 2022. This stands out as a significant difference when compared to the installation on Windows 10 and 11.
However, beyond this key point, the overall experience of utilizing WSL on Windows Server parallels that on Windows 10 or 11. The process is akin to setting up Hyper-V across these platforms. Just as you would enable Hyper-V and use the Hyper-V Manager to create virtual machines on Windows 10 and 11, similarly, WSL allows for a seamless transition between using it on Windows client systems and Windows Server environments.
Getting Started with WSL on Windows
Activating WSL on Your System
To kick off the process of using Linux distributions through WSL, the first action is to activate the “Windows Subsystem for Linux” feature on your computer.
- Through PowerShell: Open PowerShell with administrator privileges and input the following command to turn on the WSL feature in Windows:
- Copy code
Enable-WindowsOptionalFeature -Online -FeatureName Microsoft-Windows-Subsystem-Linux
- Confirm and proceed with the system restart when prompted to ensure the changes are applied.

- Via Server Manager (For Server Users): If you’re working with a server, the same result can be achieved graphically. Navigate to the Server Manager, select “Add roles and features,” then go to the “Features” section to enable WSL.
These steps lay the groundwork for installing your preferred Linux distributions under the Windows Subsystem for Linux, streamlining the integration of Windows and Linux environments on your machine.
Initiating Your Preferred Linux Distribution with WSL
Once you’ve enabled the Windows Subsystem for Linux (WSL), the next step is to select and install your desired Linux distribution. This section guides you through the process using the command line, particularly focusing on acquiring a Linux distribution directly.
Downloading and Installing a Linux Distro via Command Line
- Obtain Your Linux Distribution
Begin by opening PowerShell. You can download your chosen Linux distro using the Invoke-WebRequest cmdlet or curl.exe. For example, to download Ubuntu 20.04, you would use the following command:
“`
curl.exe -L -o ubuntu-2004.appx https://aka.ms/wslubuntu2004
“`
- Prepare and Install the Distro
Once downloaded, you need to prepare the file for installation:
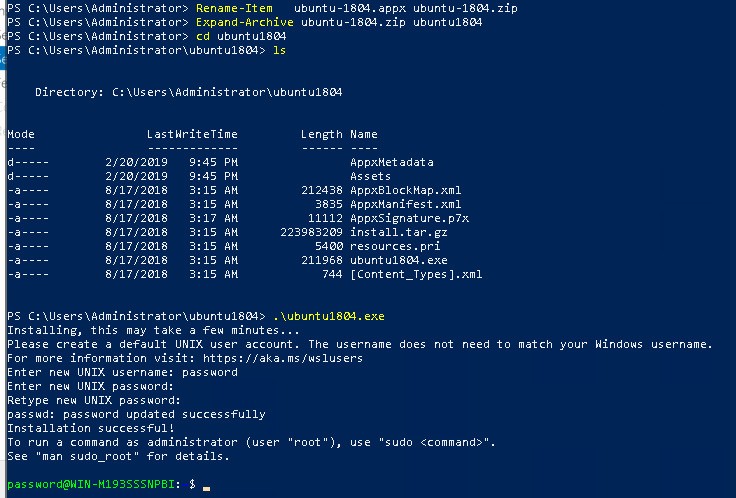
– Rename the downloaded file to a .zip format for extraction:
“`
Rename-Item ubuntu-2004.appx ubuntu-2004.zip
“`
– Extract the contents of the zip file:
“`
Expand-Archive ubuntu-2004.zip ubuntu2004
“`
– Navigate into the extracted directory and run the installation executable:
“`
cd ubuntu2004
.\ubuntu2004.exe
“`
During installation, you’ll be prompted to create a UNIX username and password. This step is essential for securing your new Linux environment.
Setting Up and Updating Your Linux Environment
After installation, it’s a good practice to update and install essential packages:
– Update your system’s package list and upgrade all your installed packages to their latest versions:
“`
sudo apt update && sudo apt upgrade
“`
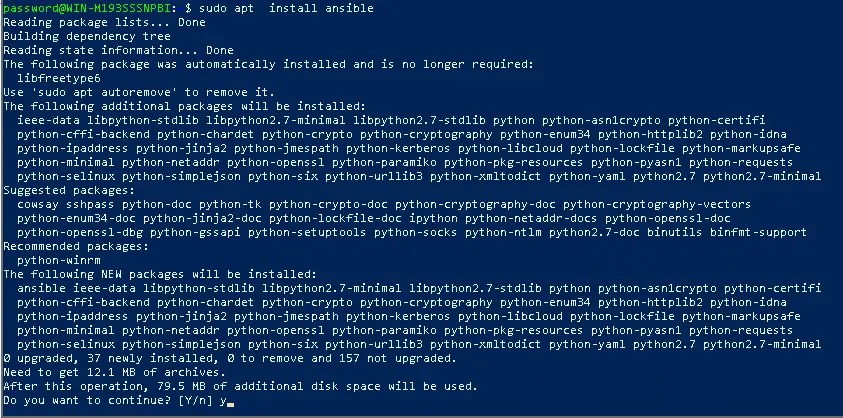
– To install additional tools or software, use the apt install command. For instance, installing Ansible:
“`
sudo apt install ansible
“`
Integrating Your Linux Distro into the Windows Environment
To seamlessly operate your Linux distro from any location within PowerShell, add the distro path to your Windows environment PATH. This can be accomplished with the following PowerShell commands:
“`
$userenv = [System.Environment]::GetEnvironmentVariable("Path", "User")
[System.Environment]::SetEnvironmentVariable("PATH", $userenv + ";C:\Users\Administrator\ubuntu2004", "User")
“`
After updating the PATH, you’ll need to restart PowerShell to apply the changes. Now, you can launch your Linux distro directly from any directory by typing its executable name, such as `ubuntu2004.exe`.
This setup provides a flexible and integrated environment for running Linux alongside your Windows Server, offering the best of both worlds for developers and system administrators.
