
How to set up DNS in Mikrotik?
Your network’s speed and dependability may be substantially enhanced by configuring DNS (Domain Name System) in Mikrotik. Human-readable domain names may be converted into IP addresses via DNS, allowing smooth device connectivity. We’ll take you through setting up DNS with Mikrotik in this article, along with advice on how to handle typical problems.
Contents
Describe DNS
A decentralized naming system called DNS converts domain names (like example.com) into IP addresses (like 192.168.1.1) for Internet addresses. It serves as the internet’s equivalent of a phone book, enabling users to access websites and other network resources by typing in simple names rather than lengthy IP addresses.
Why is DNS so crucial?
In network communication, DNS is vital. It makes data packet routing easier, boosts security, and increases network speed. You may decrease latency, lessen network congestion, and stop illegal access to your network resources by correctly configuring DNS.
Configuring DNS in Mikrotik
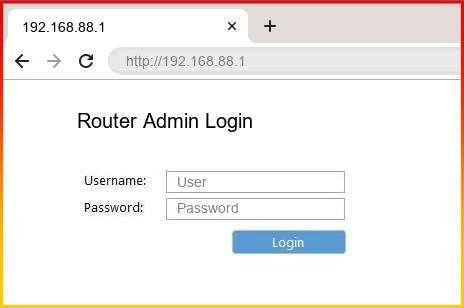
Accessing the Mikrotik router in step one
You must enter the router’s configuration interface to configure DNS in Mikrotik. Use an Ethernet cable to connect your computer to the router, or join the router’s wireless network. Open a web browser, and in the address bar type the router’s default IP address, which is often 192.168.88.1. To view the router’s settings, enter your username and password to log in.
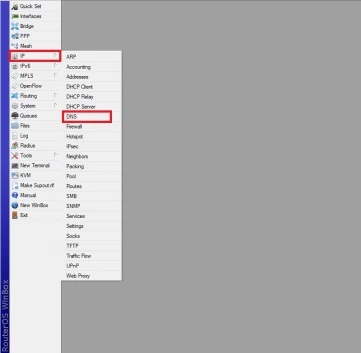
Setting up the DNS settings in step two
After entering your username and password, go to the Mikrotik router’s “IP” area and choose “DNS” from the left-hand menu. You may set up your network’s DNS settings here. You have the option of setting up your own DNS servers or using the DNS servers offered by your internet service provider (ISP).
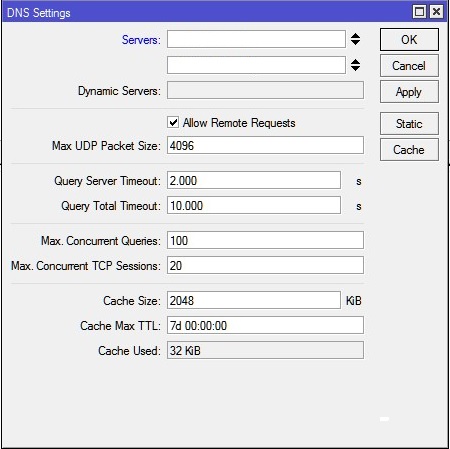
Adding DNS servers, step three
Click the “+” button under the “Servers” tab in Mikrotik to add more DNS servers. Click “Apply” to save the changes after entering the IP address of the DNS server you wish to use. For redundancy and quicker response times, you may add additional DNS servers.
Step 4: Verify the DNS settings
It’s important to verify the settings after adding the DNS servers to make sure everything is working as it should. To check DNS resolution and connection, you may use the Mikrotik router’s built-in utilities, such as the “Ping” or “Traceroute” commands. To verify that everything is functioning properly, browse websites or run DNS lookups to test the DNS setup.
resolving typical DNS problems
Even with adequate settings, DNS problems might still occur. Following are some typical issues and solutions:
Check your DNS servers’ response times and think about switching to quicker options like Google DNS or Cloudflare DNS if your DNS resolution is taking too long.
DNS cache problems Any issues with caching may be fixed by clearing the DNS cache on your Mikrotik router.
IP addresses of incorrect DNS servers: Make sure your DNS servers’ IP addresses are typed properly in the settings by checking them twice.
firewalls that prevent DNS queries Check that DNS traffic may get via your firewall’s rules.
Conclusion
Optimizing the speed and dependability of your network requires setting up DNS in Mikrotik. This guide’s instructions will help you guarantee quick DNS resolution and improve the operation of your network as a whole.
FAQs
On my Mikrotik router, how can I delete the DNS cache?
Enter "/ip dns cache flush" in the Mikrotik router's console to flush the DNS cache.
Can I use publicly accessible DNS servers like Cloudflare DNS or Google DNS?
Yes, you may use Cloudflare DNS (1.1.1.1 and 1.0.0.1) or Google DNS (8.8.8.8 and 8.8.4.4) as public DNS servers in Mikrotik.
What is a Mikrotik router's default IP address?
Typically, 192.168.88.1 is a Mikrotik router's default IP address.
How can I check my Mikrotik router's DNS resolution?
To verify DNS resolution, use the "ping" or "nslookup" commands in the router's console on a Mikrotik device.
